This article is the third and final part of Godot’s user interface system overview. If you haven’t read the previous articles, I recommend reading them: How to Build a Fine Menu and Exploring The Fundamentals Of A Menu. In this article, I want to reflect on all the decisions I made while creating a menu for a game. I will go over the graphics, audio, and the overall menu feel that I implemented in my demo.

How to Create a Captivating Menu That Leaves the Player With No Choice but to Play
The menu scene is typically the first thing the player will see when starting the game, and, as you know, the first impression is everything. So, how do you create a compelling menu that will draw the player to play your game and leave a lasting image in their mind? Well, it’s a combination of the depth of visuals, audio quality and the general feeling the player gets when he launches the game.
The Menu Hierarchy Should Be Minimal but Contain All Functionality
The menu hierarchy structure is a fine balance between providing the player with functional options and avoiding screen clutter.
On one hand, you could create an extensive menu hierarchy with many different menus and submenus, but that would result in a complex, cluttered screen.
On the other hand, a minimal menu that doesn’t offer the player any options is also not ideal. So, how do you decide what to include in the hierarchy? Here are several guidelines:
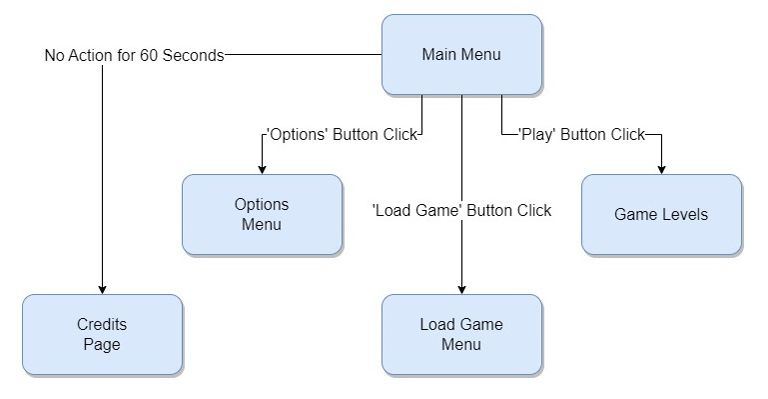
- Optional menus like a ‘Leaderboard’ page or a ‘Credits’ page do not need to have a button in the main menu. You can display them as a small button in the corner of the screen or show them after a certain time has passed with no user action. For example, show the ‘Credits’ page after 2 minutes of inactivity.
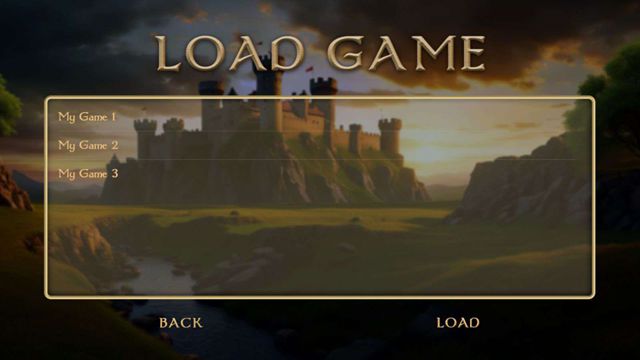
- There are mandatory menus that must appear in the hierarchy, such as the ‘Main’ menu, ‘Options’ menu, or a ‘Load Game’ menu (if your game has that functionality). Do not skip on those, as they are important to the players understanding of the functionality of the game.
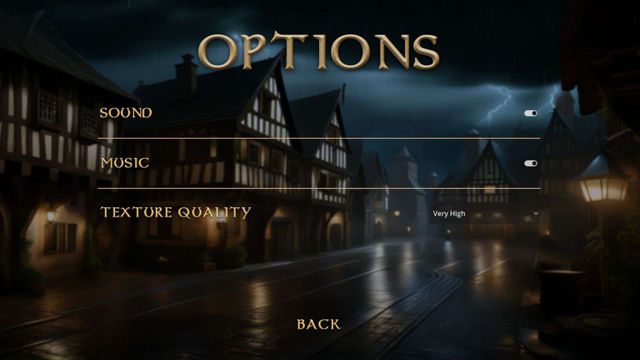
- The Options menu is a delicate subject and it’s important to carefully consider every option you include in that menu. Large games can have a substantial number of options, including graphics, audio, gameplay, or other settings. If possible, dividing the options and placing some during gameplay and the rest in the menu is a good solution. If not, categorizing the options so that players can clearly see the categories, using separators, internal buttons or tabs, is a good choice.
Menu Graphics: Creating a Good First Impression
The visual appeal of your menu is the first thing the player sees. Psychologists say that we form a first impression in a couple of seconds. The first few seconds buy you the next few minutes, and they, in turn, buy the next few hours of gameplay. So when the player looks at the menu in your game, every second counts.
- The menu background images, button shapes, and animations should convey your game’s theme and purpose. In my example, the theme is a relaxing game set in a small town during medieval times. My background image captures the feeling of the game during play, and the button shapes and mouse cursor all follow the same idea.
- Variety is also important; switching the background when moving from one menu to another is a good idea. It keeps the menu interactive, and over time, the player gets familiar with the menus and learns to associate the image with the menu type. This repetition helps solidify the images in the player’s mind.
- Watch the contrast between the background image and the buttons. It’s really annoying when the background is the same color as the button and you can’t really see the button’s shape.
If any of the elements in your menu feel unrelated to the environment, some people might get confused and won’t understand what your game is about. On the other hand, if everything is aligned, the player is reassured that your game is the one they want and need to play right now.
Menu Audio: A Gateway to the Soul
Do you know the feeling of smelling something familiar, and suddenly being flooded with memories and emotions? Well, the same thing happens with sound. Our auditory system in the brain is closely connected to the parts that govern memory and emotion. Playing music that emphasizes the theme of your game will resonate with the player and trigger emotions that will leave them no choice but to play.
In my example, I created a menu for a game set in medieval times, and the music I chose for it is a relaxing tune played on a harp. This music resonates with me because it makes me feel as if I am living in a small town in that era. It’s very inviting for people who, like me, enjoy this theme and want to play a relaxed game.
Keep in mind that you can’t please everyone; there is no game that will appeal to everyone. You have to know your audience and tailor the music and sound effects to them. Once they are hooked, they can’t resist playing the game every time they hear the music or sounds.
Here are some guidelines for the menu audio:
- The music in the menu should have a neutral tone. Neutral tone music has no specific scene affiliation; it serves as background music with a simple progression. Music from a fast action or chase scene doesn’t fall into this category, as it’s too stressful for a static menu. Additionally, music that is too sad or dramatic will create a strange sensation since there is nothing sad or dramatic about a menu.
- Environmental sound effects that complement the music are great additions. For example, rain, thunder, lightning, wind, crows, or other birds. You could also add random sound effects to emphasize the emotion you are trying to convey. A horror game might feature mildly scary music in the menu, accompanied by random metal sounds, knocks, thuds, footsteps, or any other mysterious noises.
- Include a button click sound when the player clicks a button. This emphasizes the button click and reassures the player that he actually pressed the button.
- For menu transitions or other animations, you might want to add a sound to the animation. For instance, turning a page in a book or a swipe sound if the transition effect swipes the menu to the side.
Menu Feel: It’s a Real Thing
The feel of your menu is how the menu reacts to a player’s actions. Here are some examples that will give you an idea of what I mean:
- A button click sound should be emitted when the player presses a button, not when it is released. Playing a sound upon button release creates a delay between the moment the mouse button is clicked and the sensation of the button being clicked in your menu. It’s like watching a movie where the sound comes just a split second after the image. This small nuance is so annoying that it can drive the player crazy, make them think less of your game, and potentially ruin the great first impression we are trying to create.
- The action of a button (i.e menu transition) should only happen when the button is released, as opposed to the click sound played when a button is pressed.
- Transitions between menus should be noticeable but not overly apparent. Fading in and out of menus quickly is a good idea, but executing it at a painfully slow pace can be disastrous. No transition can work for some menus, but it often adds some interactivity. In my example, I used a fade-in/fade-out effect with a swift transition between menus, just to add that extra spark.
- The mouse cursor is often an overlooked element. It is quite dissatisfying to see a menu with a lot of thought and effort put into it, and the default ugly white mouse cursor moving around. Spend a few minutes designing a few mouse pointer sprites and incorporate them into your game. This will make your game feel much more authentic.
- Consider having keyboard shortcuts for the buttons. Pressing ‘Enter’ should always execute the default command. For example, if the player is in the ‘Load Game’ menu and they have already chosen the file they want to load, pressing the ‘Enter’ key should have the same effect as pressing the ‘Load’ button. If you only have a single button in a menu, like a ‘Back’ button, pressing ‘Enter’ should perform the same action as if the player pressed that button.
- Double clicks are also expected in most cases. When the player wants to load a game, double-clicking on the file name should load the game. The same goes for any other object selection.
There are many more small changes and features you can add to your menus to spice things up, but I’ll let you figure those out on your own.
The Smell: Maybe in the Future
If it were possible to incorporate smell into games, it would make people even more addicted to gaming. As I mentioned in the last paragraph, smell is one of the strongest triggers for memory recall and emotion, and emotion is what makes the world go ’round.
Unfortunately, we don’t have that technology yet, as far as I know. Perhaps in the future, it will become possible, and when that day comes, I can guarantee the video game industry will skyrocket. But until then, visual graphics and audio will have to suffice.
Summary
I hope you enjoyed reading this series of articles as much as I enjoyed writing them. To learn Godot’s user interface system in depth, visit Godot’s official UI documentation. For more educational articles about game development and Godot tutorials, visit my blog at Night Quest Games Blog. Good luck on your journey!
If the information in this article was helpful to you, please consider supporting this blog through a donation. Your contributions are greatly appreciated and allow me to continue maintaining and developing this blog. Thank you!


