One of the ways to communicate between nodes in Godot is to use signals. Other game engines or applications that use the same technique have different names for it. You might have heard the terms Events or Messages, which refer to the same behavior.
In this article, we will define signals and discuss how you can use them in Godot 4. We will explore the basics of signal usage, including how to create and connect them in your game. We will talk about the benefits of using signals and cover some advanced signal usage. Each section will be followed by a simple example so that you have a practical understanding of the subjects.
What is a Signal in Godot?
Signals are messages sent between different nodes found in the Godot project. They are used to notify that an event has occurred, pass on information about it, and trigger a specific behavior in the receiving node. In Godot, you can define signals to notify about object collision, user input, and more.
Why Should You Use Signals In Your Games?
Signals provide a way for objects to communicate with each other without requiring direct references, and keep your code modular and organized. Signals also offer flexibility, as you can change the behavior of your game by simply connecting or disconnecting signals. Finally, you can easily connect objects with similar behavior to the same signals, allowing for code reuse.
Example: Using a Signal in Godot
You can use a signal to notify the player that their health should be reduced because they collided with an enemy. You can do this by emitting a collision signal from an enemy node and connecting a player node to listen to that signal. Once the enemy and player have collided, the signal will be emitted, and a method will be invoked to reduce the player’s health.
How are Signals Implemented in Godot?
Signals in Godot are implemented using a variation of the Observer design pattern. The Observer pattern is a design principle that allows a class to invoke a method in a different class without directly having a reference to it. This design pattern is useful for implementing a messaging system in large software projects.
In Godot, every node can emit signals and connect to signals emitted by other nodes. When a signal is emitted by a node, the signal and its attached data are captured by a centralized messaging system. The messaging system then pushes the signal, along with its data, to all the nodes connected to that specific signal. The signal triggers a method in the receiving node, which then performs some action in response.
Connecting Nodes to Signals in Godot
Each node in Godot has built-in signals that you can use and connect to other nodes. There are two ways to connect nodes to signals in Godot: through the editor and using a script.
Option 1: Connecting Signals Through the Godot Editor
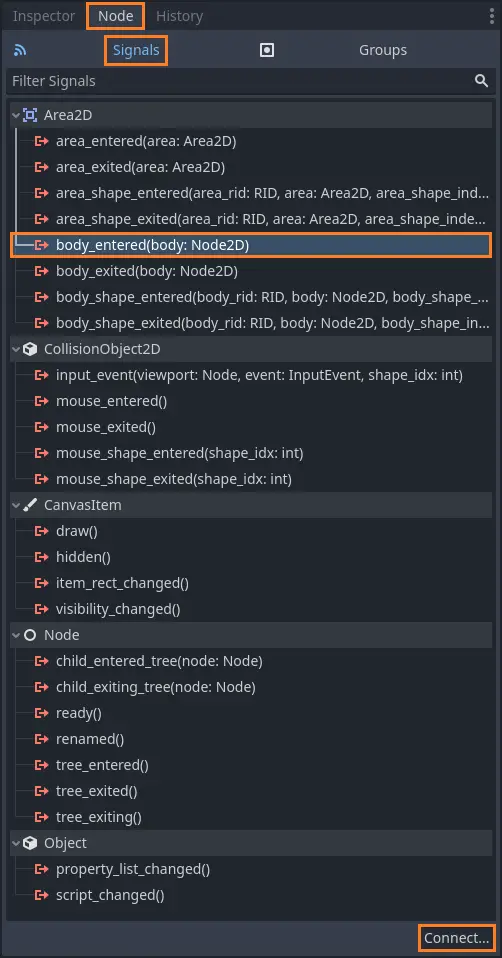
- Select the source node (node that emits the signal) and open the Node panel, found next to the Inspector on the right side of the screen.
- In the Node panel, select the ‘Signals’ tab to show all available built-in signals for the node you selected.
- Double-click the signal you want to connect (or click once on the signal and then press the ‘Connect’ button at the bottom).
- In the connection window, select the target node that will receive the signal and the method that will be called once the signal is emitted.
- In the generated function, write the required behavior of the target node when the signal is received.
Note: To disconnect a signal, go to the Node panel, click the connected signal, and then press the ‘Disconnect’ button at the bottom of the screen. Don’t forget to remove the target method from your code if you don’t need it anymore.
Example: In the attached image, you can see the connection of the Area2D body_entered signal to a method found on a different node. The target node and method selection dialog will appear once you hit the Connect button.
Option 2: Connecting to Signals Using a Script
- Create a script for the target node (the node that will receive the signal).
- In the script, create a method that includes the required behavior of the target node once the signal is received.
- Get a reference to the source node (the node that will emit the signal) by using the
get_node()method. - To connect the signal to the target method, call the
connect()method on the signal object of the source node and pass the target method’s name.
Note: To disconnect a signal through the code, call the disconnect() method on the source node and provide the signal name and target method as arguments.
Example: Connecting a Signal Using a Script
The attached code demonstrates how to connect the built-in body_entered signal of the Area2D node to a signal handler. The body_entered signal is called when another body collides with the Area2D node. In the signal handler method, the code checks if the colliding body is the player and inflicts damage to them.
# Example: Connecting a signal using a script

extends Node2D

# Get enemy and player nodes
@onready var EnemyNode : Area2D = get_node("Enemy")
@onready var PlayerNode : CharacterBody2D = get_node("Player")

# Override the node initialization method
func _ready():
	# Connect body_entered signal to the OnBodyEntered method
	EnemyNode.body_entered.connect(OnBodyEntered)

# Signal handler for the body_entered events
func OnBodyEntered(body):
	if (body is Player):
        # The player receives damage upon collision
		PlayerNode.ReceiveDamage(10)
Creating and Connecting Custom Signals in Godot
Sometimes, you might want to create your own custom signals and pass specific information alongside them. Godot allows you to generate as many signals as you want by using the signal keyword. Additionally, you can attach as many variables as you wish when the signal is emitted. There are several steps to create and connect a simple signal through the code:
How to Create and Connect a Custom Signal
- Declare the signal by using the
signalkeyword, followed by the name of the signal and an argument list, in the emitting script. - Emit the signal in the same class in which you defined it using the
emit_signal()method. The signal should be emitted based on the logic of your game. - In the receiving script, get the source node (the node that should emit the signal) by using the
get_node()method. - To connect the signal to a method, call the
connect()method on the source node and specify the name of the signal and the target method.
Important: Things to Remember About Custom Signals
- The name of the signal upon which the
connect()method is call should be exactly as the name in the definition of the signal as well as and the emitted signal name. - Try not to emit signals continuously, as it might hurt the performance of your game. For instance, avoid emitting signals every time the player presses a button. Pressing buttons is so common that the amount of emitted signals might degrade your game’s performance.
Example: Creating and Connecting a Custom Signal
In a chess game, the player moves a selection box to choose the piece he would like to control. To allow piece selection, you can create a new signal called SelectionAttempt in the player node and emit it when a user tries to select a piece on the chessboard. Alongside the signal, you would also pass the selected (x, y) location on the board.
The main board node connected to this signal receives it and checks if a piece actually exists in that location. If it does, the board could indicate that the piece was successfully selected by playing an animation. Otherwise, the main board node might do nothing and continue as if the signal was never received. You can see the code below.
Implementing the Unit Class (Unit.gd)
extends Node2D
class_name Unit

# Location of the unit on the board
var m_Location : Vector2 = Vector2.ZERO

# Changes the current location of the unit
func ChangeLocation(offset : Vector2) -> void:
	m_Location += offset

# Returns the current location of the unit
func GetLocation() -> Vector2:
	return m_Location
Implementing the Selection Box Class (SelectionBox.gd)
extends Node2D
class_name SelectionBox

# Signal notifying a selection attempts has been made
signal SelectionAttempt(location)

# Signal notifying a release attempts has been made
signal ReleaseAttempt()

# Location of the selection box on the board
var m_Location : Vector2 = Vector2.ZERO

# Currently selected unit
var m_SelectedUnit : Unit = null

# Override the physics process callback function
func _physics_process(delta) -> void:

	# Handle selection/release of units
	if (Input.is_action_just_pressed("ui_accept")):
		if (m_SelectedUnit):
			# Signal the game controller that a release attempt has been made
			ReleaseAttempt.emit()

		else:
			# Signal the game controller that a selection attempt has been made
			SelectionAttempt.emit(m_Location)

	# Handle unit or selection box movement
	var movementDirection = Vector2.ZERO
	if (Input.is_action_just_pressed("ui_up")):
		movementDirection = Vector2.UP

	elif (Input.is_action_just_pressed("ui_down")):
		movementDirection = Vector2.DOWN

	elif (Input.is_action_just_pressed("ui_left")):
		movementDirection = Vector2.LEFT

	elif (Input.is_action_just_pressed("ui_right")):
		movementDirection = Vector2.RIGHT

	if (movementDirection != Vector2.ZERO):
		if (m_SelectedUnit):
			# Move the unit according to the movoement direction
			m_SelectedUnit.ChangeLocation(movementDirection)

		else:
			# Move the selection box according to the movoement direction
			m_Location += movementDirection

# Set the currently selected unit
func SelectUnit(unit : Unit) -> void:
	m_SelectedUnit = unit

# Remove the currently selection unit
func ReleaseUnit() -> void:
	m_SelectedUnit = null
Implementing the Game Controller Class (GameController.gd)
extends TileMap
class_name GameController

# Get the selection box and unit nodes
@onready var m_SelectionBoxNode : Sprite2D = get_node("SelectionBox")
@onready var m_UnitNode : Sprite2D = get_node("Unit")

# Override the node initialization callback function
func _ready() -> void:
	# Connect the signals from the selection box to local methods
	m_SelectionBoxNode.SelectionAttempt.connect(OnSelectionAttempt)
	m_SelectionBoxNode.ReleaseAttempt.connect(OnReleaseAttempt)

# Handler for the SelectionAttempt signal
func OnSelectionAttempt(location) -> void:
	# TODO: Get the piece found in the requested location
	var selectedUnit = m_UnitNode

	if (m_UnitNode):
		# Pass the unit object to the selection box
		m_SelectionBoxNode.SelectUnit(selectedUnit)

# Handler for the ReleaseAttempt signal
func OnReleaseAttempt() -> void:
	# Tell the selectoion box to release the unit
	m_SelectionBoxNode.ReleaseUnit()
Common Questions
Can I customize signals to have any number of arguments, with different data types in Godot?
Yes, Custom signals in Godot are customizable and can have as many arguments as you require, including different data types. To define a custom signal, use the signal keyword and give it a proper name. Next to the name, write all the arguments you need to pass in parentheses.
Can I connect and disconnect signals dynamically during runtime in Godot?
Yes, signals in Godot can be dynamically connected and disconnected through the code. To connect a signal to a method, use the connect() method on the signal’s source node. To disconnect a signal, use the disconnect() method on the signal’s source node.
How do I keep track of all signals in my game?
There is no easy way to track the signals using the Godot editor. One option is to manually draw or use an external tool to map the nodes and their connections. Another way is to simply search for the signal you need using its name. The final and most complex method is to use an external software that provides dependency diagrams. In large projects, you might need to use these types of software to track all your signals.
What other forms of node communication can I use?
There are several means of communication between nodes and scenes, and signals are only one of those methods. You can use direct node reference or use global objects to store information during scene transitions. To learn more about how to communicate between nodes, read the 3 Simple Ways to Communicate Between Nodes in Godot article.
Skull and Bones
Enter the perilous world of skull and bones, where you play by your own rules to rise from a nobody to become the most fearsome pirate kingpin. skull and bones is on ubisoft connect, epic games, playstation 5, xbox series x|s, and luna.
Learning More About Godot and Game Development
If you want to know more about the Godot game engine or game development in general, there are many more articles and guides in my blog at Night Quest Games Blog. To get a feel of what Godot is and what it can do, read my Godot Game Engine: The Greatest Thing Since Sliced Bread post.
For more technical details, read the official Godot documentation at https://docs.godotengine.org/en/stable/getting_started/step_by_step/signals.html. Good luck!
If the information in this article was helpful to you, please consider supporting this blog through a donation. Your contributions are greatly appreciated and allow me to continue maintaining and developing this blog. Thank you!