The 2D camera in Godot does not follow the player character automatically; it is up to you to decide how to move the camera. There are several ways to set up the camera to follow the player:
- Attach the Camera2D node directly as the player’s child node.
- Create a Camera2D node in the scene and track the player’s location via the RemoteTransform2D node.
- Create a Camera2D node in the scene and track the player’s location using a script.
I will explain how to implement each of the approaches mentioned above and the benefits of each. You can then decide which technique is best suited for your project. Next, I will show you how to customize the camera to improve the camera movement. And finally, I will go over some common mistakes so you can quickly solve them if you stumble upon any.
Option 1: Follow the Player by Attaching a Camera2D to the Player’s Node
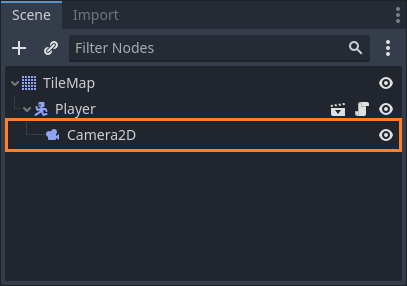
The easiest and fastest way to get your camera working is by creating a Camera2D node as a child of your player’s node. To implement this approach, follow these steps:
- Select the player character node from the scene tree.
- Click the little plus icon at the top of the Scene panel.
- In the search bar, write ‘Camera’.
- Select the ‘Camera2D’ node from the list.
- Click the ‘Create’ button to add the new node to the scene.
You will notice the Camera2D appeared under the player node. From now on, the position of the camera will be aligned with the position of the player character.
This approach works well for small games, quick prototyping, or if you don’t have programming knowledge. However, be careful; if you remove the player node during gameplay, the camera will also be deleted, leaving your game stuck in the last location of the camera.
Option 2: Follow the Player via the RemoteTransform2D Node
This technique is a bit more complicated than the previous one. The RemoteTransform2D node updates the transform of a target object. In our case, it should update the camera’s location in the scene, based on the player’s movement.
One benefit of this approach is that you can control the modified transform properties. For example, you can disable the camera rotation and scale. So if your player’s rotation or scale changes, the camera will not rotate or scale.
Another benefit is that if your player instance is destroyed, the camera will still exist since it is bound to the world scene and not the player. Here are the steps to set it up:
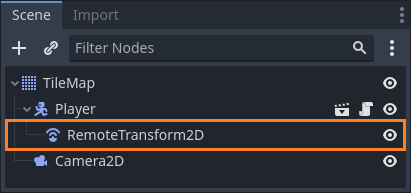
- Create a Camera2D in your main world scene.
- Attach a RemoteTransform2D node as a child node of your Player instance.
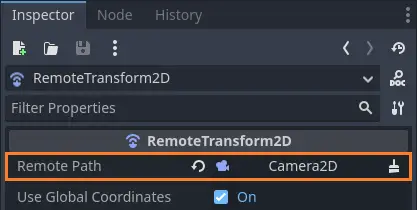
- Drag the Camera2D node to the “Remote Path” field in the RemoteTransform2D inspector panel.
Option 3: Follow the Player Using a Script
This approach is the most advanced and gives you the most control over your camera. Using a script gives you the benefit of controlling each of the camera’s properties through the code.
Using a script to move the camera is a good option for cases like single-axis tracking, custom camera movement or multiple characters sharing a camera. For instance, a shared camera can switch between characters by changing the target node that the camera is currently following.
Here are the steps to make the camera follow the player:
- Create a Camera2D in your main world scene.
- Add a new script to the Camera2D and name it ‘CustomCamera2D’.
- In the CustomCamera2D script (see code below):
- Define an exported variable with a Node2D type, which will hold the target node the camera is tracking. Let’s name it ‘TargetNode’.
- In the
_process()method, implement the logic that updates the camera’s position based on the target’s position.
- Select the Camera2D node from the scene tree.
- Drag the player node to the exported ‘TargetNode’ property in the Inspector panel.
extends Camera2D
class_name CustomCamera2D

# Target node the camera is following
@export var TargetNode : Node2D = null

func _process(_delta) -> void:
	set_position(TargetNode.get_position())		# Change this code to make custom camera movement
Customizing the 2D Camera Movement
There are several customizations you can make to improve your camera movement. Here are some examples:
How to Enable Camera Smoothing
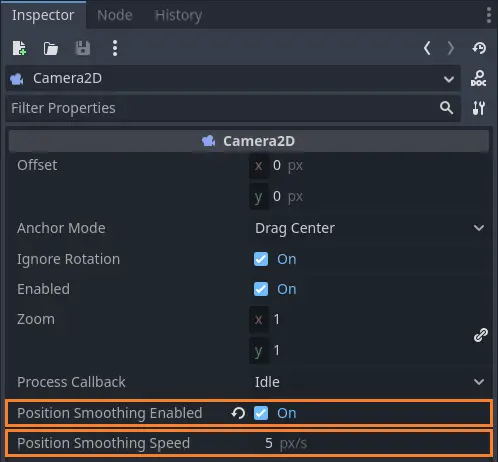
Camera smoothing refers to the responsiveness of the camera to the player’s movement. When camera smoothing is disabled, the camera moves with the player, keeping them centered at all times. With camera smoothing, you can reduce the camera’s responsiveness to make it “chase” the player. This feature creates smoother transitions as the camera follows the player or any other object in your game.
To enable camera smoothing, tick the “Position Smoothing Enabled” checkbox in the Camera2D inspector. You can also control the speed of the camera movement while it is chasing the target player or object. To do this, change the “Position Smoothing Speed” field to whatever feels natural in your game. A lower value will make the camera move slower, while a higher value will make it feel like smoothing is disabled.
How to Set the Camera Boundaries
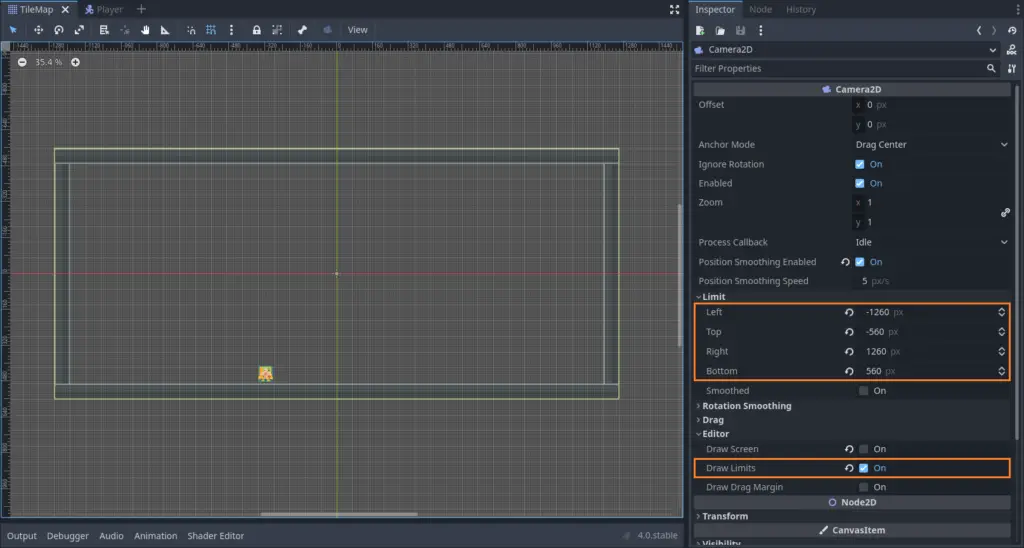
You can limit the camera to stay within a box. This feature is useful when you need to restrict the camera to the level boundaries. The bounding box is not displayed by default, but you can enable it in the editor.
To set the boundaries of the camera, open the “Limit” section in the Camera2D inspector panel. In the “Limit” section, you will see the left, top, right, and bottom fields. These values are the pixel distances from the center of the scene. If you want to see the bounding box, go to the “Editor” section in the Camera2D inspector panel and check the “Draw Limits” checkbox. This will show you a yellow box representing the limits of the camera.
How to Set the Camera Zoom
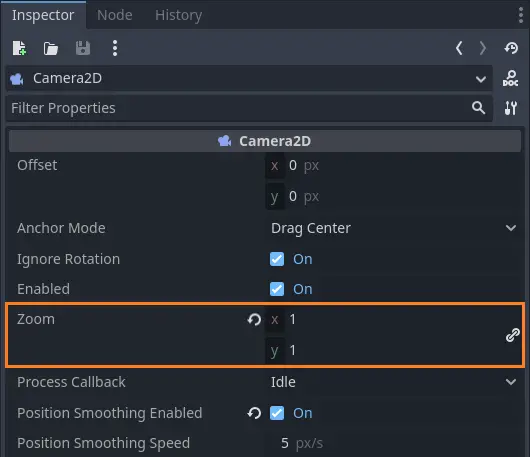
You can adjust the camera’s zoom level using the “Zoom” field in the Camera2D inspector panel. Values higher than 1 will cause the camera to zoom in, while values between 0 and 1 will zoom out.
It’s also possible to detach the link between the horizontal and vertical zoom axes. But, this option should be used with caution, as it can distort the visuals in your game.
Common Mistakes When Setting up a 2D Camera
I have listed a few common mistakes that can cause the 2D camera to malfunction. If you have any issues, I encourage you to check for the following common mistakes:
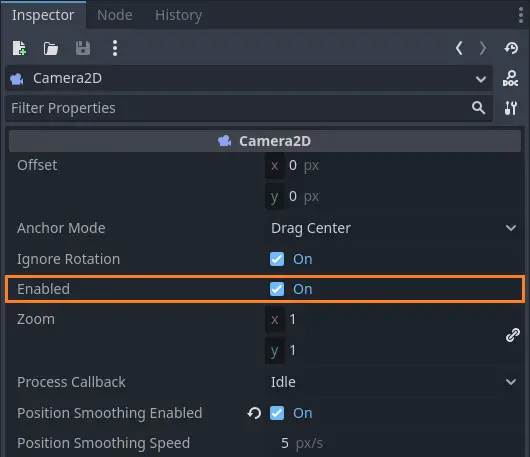
Forget to Enable the Camera
By default, a Camera2D node should be enabled in Godot 4. You may have disabled it by mistake while developing your game. Check that the “Enabled” checkbox is ticked in the Camera2D inspector panel.
If you have more than one camera enabled in your scene, the primary camera will be the one found highest in the scene tree.
Running the Wrong Scene
You might be running the wrong scene, where the camera is not present. For example, if you set the default scene to your Player and the Camera2D node is in the world scene, you won’t have a functional camera when starting the game. To fix this, go to the Project menu in the top menu bar and select Project Settings. Then go to the “Application” section and select the “Run” tab. Change the “Main Scene” to the scene with the camera.
Last Words
To learn more about the Camera2D class in Godot, you can read more in the official Godot documentation page: https://docs.godotengine.org/en/stable/classes/class_camera2d.html.
If you are still having trouble with the camera in your project, leave a comment below, and I will try to help you. Also, if you are interested in game development, check out the Night Quest Games Blog. There, you will find many articles and resources about indie game development. Good luck!
If the information in this article was helpful to you, please consider supporting this blog through a donation. Your contributions are greatly appreciated and allow me to continue maintaining and developing this blog. Thank you!