In the early days of computer graphics, rendering images was a relatively simple process compared to modern standards. Computer-generated images primarily consisted of basic geometric shapes and flat colors.
During the 1980s and 1990s, as computer graphics began to advance, external devices with rudimentary software, such as transform and lighting processors, were used for graphics rendering. Nvidia led the charge by integrating transform and lighting processors into a graphics controller, which they named the ‘Graphics Processing Unit’ (GPU). The ease of use, integration, and consumer-friendly pricing propelled the graphics industry forward.
The term ‘shader’ was coined by George Lucas and the team at Pixar in 1984. They were working on a graphics engine that would enable them to render entire films on a computer, which we now take for granted. To accomplish this, they needed to ‘shade’ (or color) the triangles/polygons that make up every shape in the scene.
Fast forward to the year 2000, and we witnessed a significant leap. Microsoft, Nvidia, and ATI introduced something called a ‘programmable shader.’ This allowed users to write their own software for how the graphics should be rendered, and the GPU would execute the code.
Today, every processor on the GPU is referred to as a shader, whether it’s a vertex, a geometry, a fragment shader, or any other type of processor. Shaders serve as the secret sauce behind the stunning 2D and 3D visuals you see in games and movies.
Introduction to Shaders and Shader Programming
In the article below, you will learn what shaders and shader programs are, how they work, and see some examples of what you can achieve when using shaders in your games.
What Are Shaders?
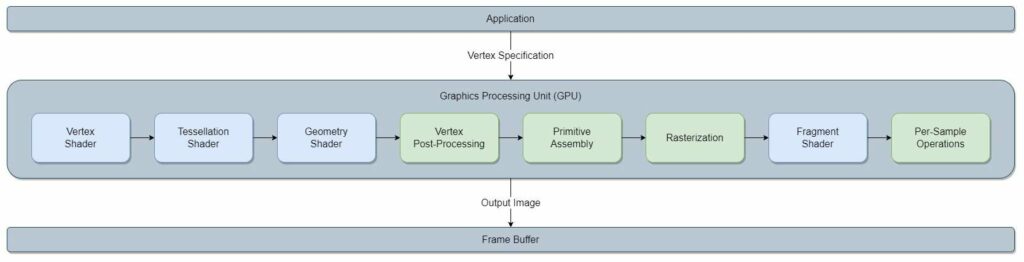
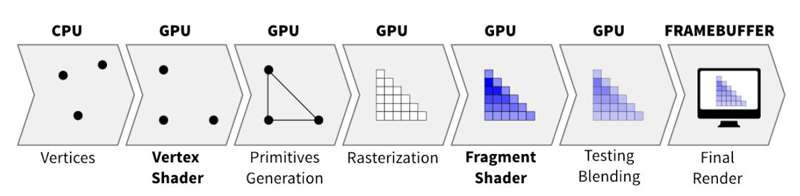
Shaders are small computer programs that allow the developer to control various aspects of the GPU’s (Graphics Processing Unit) rendering process. Several shaders run sequentially on the hardware of the GPU to create a single frame. This group of shaders, also known as the ‘Rendering Pipeline’ or ‘Graphics Pipeline’, receives scene information from the application as input, and creates a complete 2D image as output. The resulting 2D image can then be directly displayed on the connected monitor.
What Can You Achieve With Shaders?
The primary function of the graphics pipeline is to render objects based on the data sent from the application. Specific shaders can be used to modify how objects appear in space, enabling a wide range of visual effects and animations. Many aspects of an image can be modified, including vertex locations, color, lighting, shadows, textures, material properties, and many other features. Some notable examples of shaders include wind sway, flag wave, glow, tint, dissolve animation, fire, water, various image blur styles and animations, and more.
It is important to note that generating these visual effects in real-time demands a significant amount of processing power. To achieve high performance, all of these operations are done on the GPU hardware, as opposed to the CPU. The GPU hardware is specifically designed to execute many complex mathematical calculations in parallel. A standard CPU would struggle to render complex visual effects without a significant drop in FPS (frames per second).
How Does Shader Programming Work?
To render graphics on a screen, an application must access the graphics card connected to the computer and create a new shader program that will allow it to use the GPU’s rendering services. Once the program is created, the application can specify the code for each shader in the pipeline it wants to overwrite. Subsequently, the GPU compiles the code and integrates it into the current graphics pipeline used by the application.
How Does the Application Submit Data to the GPU?
Each frame, the application sends scene information to the GPU, including shapes, colors, and variables. To send the data, the application uses a specific graphics communication protocol, such as OpenGL, DirectX, Vulkan, etc. After sending all the data needed for rendering, the application must send a ‘Draw’ call to the GPU to start the rendering process.
Upon receiving the Draw command, the GPU renders a 2D image based on the predefined shader program. The resulting 2D image is stored in a designated space in the GPU’s memory, known as a ‘Frame Buffer.’ The data in the frame buffer can be further modified through post-processing or sent directly to the monitor.
Can the Application Define Multiple Shader Programs?
Yes, an application can define multiple shader programs for its graphics requirements. While creating the vertex specification for a single frame, the application may switch shader programs and submit different data for each program it uses. For example, it is a common practice to use a separate shader program for text rendering, shadow and lighting effects, or even specific materials such as water or fire. During the rendering process, the GPU will render each vertex group using the shader program assigned to it by the application.
What Language Do Shaders Use?
The shader language depends on the graphics protocol used. Most modern GPUs support several graphics protocols. For example, one of the most popular and reliable graphics protocols today is OpenGL. This graphics specification uses the ‘OpenGL Shading Language’ (also known as ‘GLSL’). It is a low-level language similar to the C programming language. Other examples include the ‘High-Level Shader Language’ (HLSL) for DirectX and ‘SPIR-V’ for the Vulkan specification.
What Types of Variables Are Used in Shader Programming?
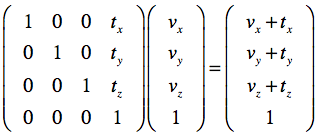
While application programming mostly uses basic variable types such as integers, booleans, and floating-point numbers, shader programming primarily uses complex mathematical structures such as vectors, 3×3, and 4×4 matrices. These vector and matrix multiplications are the fundamental mathematical operations needed for translating, scaling, and rotating vertices and shapes in both 2D and 3D space. Additionally, they are used for transforming objects between various coordinate spaces (model, world, view, clip, and device coordinate space).
Shader Types Available in Godot
Some of the shaders in the rendering pipeline can be overwritten by the user, while others are hardware based and can not be changed. Overwriting these small programs is what allows you to create diverse visual effects and animations. Godot only exposes the Vertex and Fragment shaders.
The Vertex Shader
A vertex is usually thought of as a point in space, but in reality, it’s much more than that. A vertex is a data collection related to a specific point in space. For example, I can define a vertex that includes the point’s coordinates, the color of the point, the normal direction, texture coordinates, or any other attribute required by the application.
By writing a vertex shader, you can modify these attributes, which will alter how objects are rendered when this shader program is applied. The most common use case for this shader is shape distortion. For instance, a flag wave motion can be achieved by using a simple flag texture and changing the Y-coordinate value of each vertex along the X-axis over time, using a sine function.
The Fragment / Pixel Shader
A Fragment shader, sometimes also called a Pixel shader, is a program that controls the visual aspects of each pixel. Using this shader, you can manage the output color, the alpha channel and the z-depth of every pixel in an object. For instance, if you want to create a smooth disappearing effect for an object, you can design a shader that applies a function to the alpha channel over time. Gradually reducing the alpha channel with a fixed value will give the object a linear disappearing effect.
Other Shaders on the GPU
In general, there are more shaders that you could overwrite, such as the Tessellation Shader and the Geometry Shader, but those are for advanced developers. In the context of Godot, the engine only exposes the Vertex and Fragment shaders.
Shader Programming for Beginner Developers in Godot
The Godot game engine lets you create ‘Shader’ files as materials for nodes, which modify the appearance of the node. Godot uses its own unique language for shaders, similar to GLSL. Shader materials can be applied to both 2D and 3D nodes, but for the sake of simplicity, I will focus on 2D nodes for now.
Shader Language Variable Types in Godot
For the most part, the Godot shading language uses the same types as GLSL, and adds more functionality on top. Here is a list of types you can use in the shader code:
- Basic variable types: These are the fundamental variable types you can instantiate in the GPU’s memory. Examples of these types are: int, float, bool, vec2, vec3, vec4, mat2, mat3, mat4, sampler2D, etc. As mentioned before, the GPU’s processing power comes from very efficient and parallel operations between vectors and matrices, which are represented here as ‘vec’ and ‘mat’ variables.
- Built-in attributes: Attributes that Godot exposes for the developer to use inside the shader code. Overwriting the attribute ‘COLOR’ in the fragment shader will set the color and alpha channel of a pixel. Using the ‘TIME’ attribute will give you the time since Godot was started. These are just a couple of examples of built-in attributes. All of these attributes are in capital case.
- Uniform variables: Variables that are transferred from outside the shader. For instance, if you want to control some aspect of the shader from GDScript, you may create a ‘uniform’ variable inside the shader code and access it from the Godot editor via the ‘Shader Parameters’ section or from your GDScript code using a specific API.
- Const variables: Constant shader variables that are non-modifiable during runtime.
- Varying variables: Values that can be transferred between shaders. For example, if you want to pass some value from the Vertex shader to the Fragment shader, you can do it by defining a varying variable.
Basic Shader Language Built-in Attributes in Godot
- VERTEX (vec2/vec3): Defines the output vertex coordinates in 2D or 3D space. Should be used inside the Vertex shader function.
- UV (vec2/vec3): Vertex coordinates coming from the Vertex shader as input to the Fragment shader. May be used in the Fragment shader function.
- COLOR (vec4): Defines the output color and alpha level of the fragment. Should be assigned in the Fragment shader function.
- TEXTURE (image): The texture image attached to the node. Using external textures is optional and is usually accessed from the Fragment shader function.
- TIME (float): The time since Godot started. Used for creating time-based animations. May be utilized anywhere within the shader code.
Using Mathematical Functions for Complex Calculations
Sometimes you might want to apply mathematical functions such as sin, cos, abs, etc. These functions are readily available for use within the shader code. Sin and cos functions are popular in the shader development world because they are cyclical. Therefore, if you want a repeated cyclical motion, like the flag motion I mentioned before, you should use one of these functions.
Additional useful functions you might need:
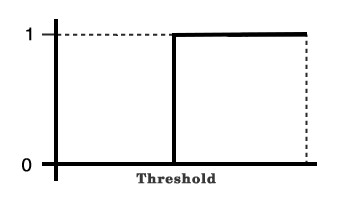
step(threshold, value): Returns 0 if the given value is below the threshold; otherwise, it returns 1. The Step function is commonly used instead of a conventional ‘if’ statement and has a positive impact on the performance of the running code. This is because GPUs are not designed for branch conditions; they excel at computations of mathematical problems.
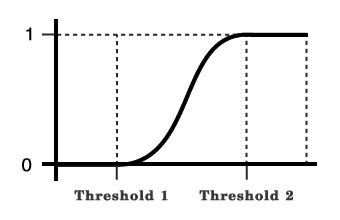
smoothstep(threshold1, threshold2, value): The ‘smoothstep’ function is similar to the ‘step’ function, but with an addition of a smooth curve between the thresholds. It returns 0 if the value is below the low threshold, 1 if the value is above the high threshold, and a value between 0 and 1, based on the smooth function.
Common Built-in Shader Functions in Godot
texture(textureObject, uvCoordinate): Samples a texture’s color and alpha level at the given coordinates. For instance, to create a ‘dissolve’ effect (see the example shaders below), you will need some form of a noise texture, which has gradual variations between black and white. The shader then needs to sample the noise texture using this built-in function and adjust the alpha levels of the original object at the same coordinate, based on a predefined function.mix(color1, color2, ratio): Blends the two given colors with a certain ratio.

World of Tanks
World of Tanks is a team-based massively multiplayer online action game dedicated to armored warfare in the middle of the 20th century. Throw yourself into epic tank battles with other tankers all over the world. Your arsenal includes more than 400 armored vehicles from America, the United Kingdom, Germany, France, the Soviet Union, China and Japan.
Implementing a 2D Shader in Godot
Adding a 2D Shader Material to a Node in Godot
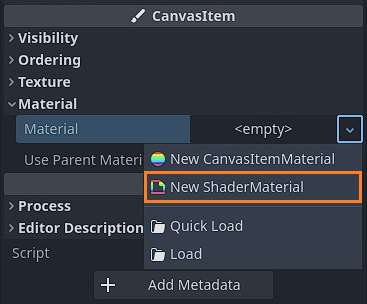
You can add a new shader material to a node in a couple of simple steps:
- Create a new ShaderMaterial object under the ‘Material’ section in the Inspector panel of the node.
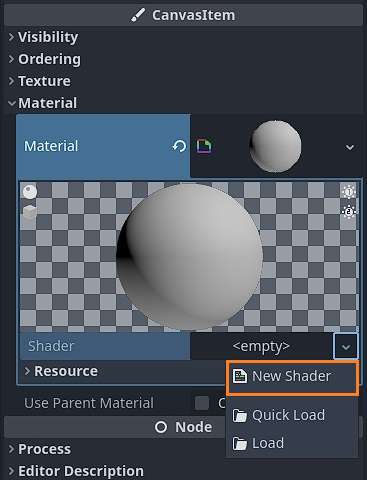
- Open the new ShaderMaterial and create a new Shader instance.
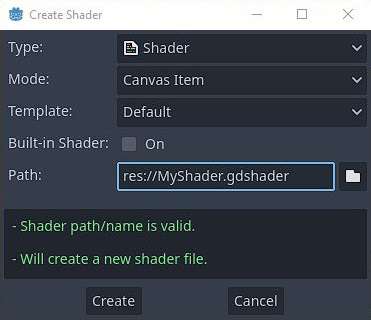
- In the ‘Create Shader’ panel, make sure the ‘Type’ field is set to ‘Shader’ and the ‘Mode’ field is set to ‘Canvas Item’ (for 2D shaders). In the ‘Path’ field, you can specify the shader file name and path.
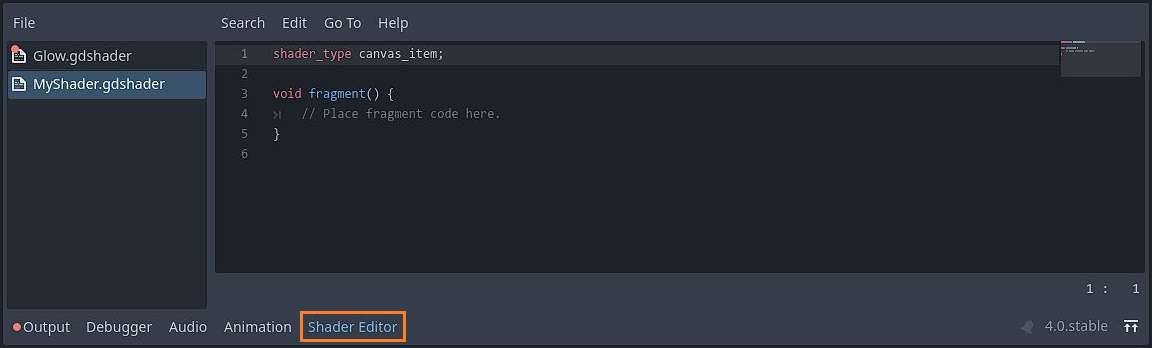
- To open the code editor, click on the new shader object and then click the ‘Shader Editor’ tab at the bottom of the screen.
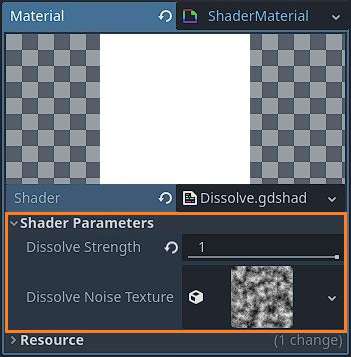
Shader Parameters in the Material Section
The Shader Parameters section contains all uniform variables defined in the shader code. Once a uniform variable is defined in the shader code, a new field will appear in this section.
Note: You can also specify the type of field you want. For example, if you have a range-based value, you can define the variable by using the hint_range(min, max) keyword and specifying the minimum and maximum values for this field.
uniform float DissolveStrength : hint_range(0.0, 1.0) = 0.5;
uniform sampler2D DissolveNoiseTexture;
Accessing the Shader Parameters From Gdscript
Reading and writing the shader parameters from GDScript is fairly easy and straightforward. To read a shader parameter from GDScript, you should use the get_shader_parameter(parameter_name) function of the ShaderMaterial object.
extends Node2D

@onready var m_ShaderSpriteDissolve : Sprite2D = get_node("Dissolve")

func _ready():
	var dissolveStrength : float = m_ShaderSpriteDissolve.get_material().get_shader_parameter("DissolveStrength")
	print("The Dissolve Strength is %d" % dissolveStrength)
Writing a value to the shader parameter requires you to use the set_shader_parameter(parameter_name, value).
extends Node2D

@onready var m_ShaderSpriteDissolve : Sprite2D = get_node("Dissolve")

func _ready():
	m_ShaderSpriteDissolve.get_material().set_shader_parameter("DissolveStrength", 0.5)
You can also create animations through GDScript using a Tween. A tween is a value modification function that occurs over time. You can use a tween to modify the material’s shader parameter by defining the final value and the duration.
extends Node2D

@onready var m_ShaderSpriteDissolve : Sprite2D = get_node("Dissolve")

func _ready():
	var dissolveTween : Tween = m_ShaderSpriteDissolve.create_tween()
	var finalValue : float = 0
	var duration : float = 4.0
	dissolveTween.tween_property(m_ShaderSpriteDissolve.get_material(), "shader_parameter/DissolveStrength", finalValue, duration)
Shader Implementation Examples in Godot
Shader Example 1: Dissolve / Burn
The scroll image used in this shader was taken from: https://www.freepik.com/free-vector/old-scroll-papyrus-parchment-paper-map-background_43314155.htm.
To create this shader, I used a noise texture for the dissolve randomness. To create a new noise texture, you must define a uniform sampler2D object in the shader code, and then instantiate a new noise texture from the ‘Shader Parameters’ section in the Inspector panel.
The DissolveStrength makes the progression of the effect. This parameter is controlled from GDScript and is modified by using a tween with a specific duration. I explain the meaning of each line of code in the comments below.
shader_type canvas_item;

// Strength of the dissolve effect.
// A value of 1 means object is intact.
// A value of 0 means the object is completely dissolved
uniform float DissolveStrength : hint_range(0.0, 1.0) = 0.5;

// The noise texture used for the dissolve pixel randomness
uniform sampler2D DissolveNoiseTexture;

void fragment() {

	// Sample the noise texture
	vec4 noiseColor = texture(DissolveNoiseTexture, UV);

	// Caluclate the brightness of the pixel in the noise texture
	float noiseBrightness = (noiseColor.r + noiseColor.g + noiseColor.b) / 3.0;

	// The alpha channel value in the target object is defined by the noise brightness
	// A Dissolve Strength below the noise brightness means the pixel is invisible
	// A Dissolve Strength above the noise brightness means the pixel is visible
	COLOR.a *= step(noiseBrightness, DissolveStrength);

	// Calculate the difference between the noise brightness and the dissolve strength
	// This value defines the thickness of the 'burning' of the object
	float brightnessDifference = abs(noiseBrightness - DissolveStrength);

	// Modify the color of the edges of the 'burning' pixels
	COLOR.rgb -= vec3(0.0, 0.4, 0.4) * step(brightnessDifference, 0.025);
}

Shader Example 2: Appear / Disappear
The ocean image in this shader example was created using the Fish Pack assets.
The DisappearHeight is the point where the image starts to disappear. The DissapearWidth is the width of the alpha transition. The calculation includes a value offset so that the optimal height range is between -0.5 and +0.5. The DisappearHeight parameter is controlled from GDScript using a tween.
shader_type canvas_item;

// The height where the image starts to disappear
uniform float DisappearHeight : hint_range(-1.0, 1.0) = 1.0;

// The width of the disappearing horizon
uniform float DisappearWidth : hint_range(0.0, 0.5) = 0.1;

void fragment() {
	// Adjust the alpha channel value so the object disappears above the disappearance height
	COLOR.a = smoothstep(	1.0 - DisappearHeight - (0.5 * DisappearWidth),
							1.0 - DisappearHeight + (0.5 * DisappearWidth), UV.y + 0.5);
}

Shader Example 3: Character Hit
The character in this shader was created using the Monster Builder Pack assets.
This shader tints the character with the specified color and fades away over time. The alpha channel is not changed, but the RGB channels are mixed with the selected color. The mix ratio depends on the current hit stage. The HitStage parameter is controlled from GDScript using a tween.
shader_type canvas_item;

// Stage of the hit effect
// A value of 0 means the character is not hit
// A value of 1 means the character if fully tinted
uniform float HitStage : hint_range(0.0, 1.0) = 0.0;

// Color of the hit effect
uniform vec4 HitColor : source_color;

void fragment() {
	// Mix the pixel color with the hit color, with a ratio based on the hit stage
	COLOR.rgb = COLOR.rgb * (1.0 - HitStage) + HitColor.rgb * HitStage;
}

Shader Conclusions
Shaders are an incredible tool for creating visually appealing effects and animations. If this is the first time you are learning about them, it’s worth gaining some experience.
Where Can I Find More Shader Examples?
There is an awesome website called Godot Shaders that has thousands of free shader examples. Some of them may not work out-of-the-box in Godot 4 since they were written for Godot 3, so you might need to make some adjustments. Nonetheless, it remains a great source of shader examples and information.
You can absolutely take several shaders and reverse-engineer them to understand how they were built. While some shaders are easy to understand, others are based on very complex mathematical and geometrical knowledge. I suggest starting with the easier ones.
Learning Game Development and the Godot Game Engine
Learning game development by yourself is not easy. I have written many articles about how to make games in the Godot game engine, along with other related articles. Visit the Night Quest Games Blog to learn more.
Where Did I Get All of the Information for This Article?
All of the information presented in this article is based on my own personal knowledge as a software and game developer, various YouTube videos, the official Godot documentation pages and my own experimentation with shaders in Godot:
- https://docs.godotengine.org/en/stable/tutorials/shaders/shader_reference/spatial_shader.html
- https://docs.godotengine.org/en/stable/tutorials/shaders/your_first_shader/your_first_2d_shader.html
- https://docs.godotengine.org/en/stable/tutorials/shaders/shader_reference/shading_language.html
- https://www.youtube.com/watch?v=KVTa2xkly1g&t=3s&ab_channel=PlayWithFurcifer
- https://www.youtube.com/watch?v=1pJyYtBAHks&t=68s&ab_channel=PlayWithFurcifer
- https://www.youtube.com/watch?v=6wxuVe8Y9CM&t=783s&ab_channel=ieeeComputerSociety
If the information in this article was helpful to you, please consider supporting this blog through a donation. Your contributions are greatly appreciated and allow me to continue maintaining and developing this blog. Thank you!


