The parallax effect is a widely used technique to create beautiful 2D games, so much so that Godot developers implemented a specific set of tools to help you add these effects to your own game. In this article, I will explain what the parallax effect is, how to apply it to your Godot project, and give an example of a 2D scene I created using the tools Godot offers.
What is a Parallax Background?
A parallax background is a layered background movement technique that creates an illusion of depth in a 2D scene. The parallax background can be made from one or more layers of images. The depth illusion is created by moving each layer at a different speed.
The guiding principle of parallax backgrounds is that objects closer to the camera move faster than those farther from the camera. As you add more layers to the parallax background, the 2D scene will have more depth and will appear more realistic to the viewer.
Creating a Parallax Background in a Godot Project
Here are five simple steps to create a background with a parallax effect in your Godot project.
1. Adding the background images to the project
The first step is to add all the necessary assets to the Godot project. So, drag all the background images into your project. Don’t forget that each image should be somewhat transparent to allow the player to see the layers behind. To preserve the transparency you will have to import images with a format that has transparency information (like ‘png’).

2. Setting Up The Parallax Background Node
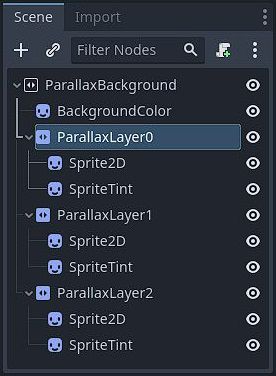
Next, you need to create a ParallaxBackground node in your 2D scene. The ParallaxBackground will be the parent node of all the parallax layers you want to add in your game. This node has several scrolling properties that you don’t need to change for basic parallax movement. The ParallaxBackground node follows a Camera2D node, so when the camera moves, the ParallaxBackground node will update all its layers according to the camera’s movement.
Note: Adding a Constant Image or Color in the ParallaxBackground Node
2D games will usually have a constant image or color in the far background, which does not move or repeat when the camera position changes. To achieve this, you can add a Sprite2D node as the first child of the ParallaxBackground node. This will ensure two things:
- The static and dynamic background layers of your game will be defined by the ParallaxBackground node.
- The static part of the background will not be affected by the movement of the other layers.
3. Setting Up The Parallax Layer Nodes
The next step is to add ParallaxLayer nodes under the ParallaxBackground. Each ParallaxLayer node represents an image (or a group of images or other nodes) that will move at a certain speed, based on the movement scale setting you choose. Here are the steps to add all layers:
- Add as many ParallaxLayer nodes as you need under the ParallaxBackground node.
- For each ParallaxLayer node you added, attach a Sprite2D node as its child.
- For each Sprite2D node, drag the appropriate background image from the FileSystem panel to the sprite’s ‘Texture’ field in the Inspector Panel.
- Go to the ‘Offset’ section in each Sprite2D node’s Inspector and disable the ‘Centered’ property. This will ensure the Sprite2D texture is drawn from the top-left corner and will ensure that all images in the parallax effect are aligned.
- Optional: Attach additional Sprite2D nodes to your parallax layers as needed and apply steps 3-4 again.
Note: Creating a Parallax Foreground Effect
In addition to the background, you could also add a foreground parallax effect. The foreground layers are all the layers found between the player and the camera, as opposed to background layers, which are found behind the player away from the camera.
To add foreground parallax layers, you simply add another ParallaxBackground node and repeat steps 1-5. The only difference here is that the movement speed of the foreground layers must be faster than the camera speed.
4. Adding Camera or Player Movement to the Scene
The depth perception of the scene can only be sensed if the camera is moving. For this example, I will add a simple camera controller that will allow me to move left and right in the scene. Although I only implement the movement in the horizontal axis in this example, you can apply the parallax effect to any direction you want.
The camera controller consists of a simple Camera2D object and a script attached to it.
extends Camera2D

# Camera movement speed (pixels)
const CAMERA_MOVEMENT_SPEED : int = 5

# Camera screen limits from left boundary (pixels)
const CAMERA_LEFT_LIMIT : int = -1400
const CAMERA_RIGHT_LIMIT : int = 1920

func _process(delta):
	if (Input.is_action_pressed("ui_left") and position.x > CAMERA_LEFT_LIMIT):
		position.x -= CAMERA_MOVEMENT_SPEED
	if (Input.is_action_pressed("ui_right") and position.x < CAMERA_RIGHT_LIMIT):
		position.x += CAMERA_MOVEMENT_SPEED
5. Adjusting the Parallax Layers Properties
Now that everything is ready, it’s time to run the game, see what it looks like, and adjust each layer’s properties according to your project’s requirements. If you haven’t changed any layer properties up to this point, you will find that all layers move together, with no parallax effect at all. To allow for depth perception, you need to adjust some of the layers’ properties.
Updating the Parallax Layer’s Movement Speed
As I mentioned before, each parallax layer should move at a different speed; the layer closest to the camera should move the fastest, while the layer farthest from the camera should move the slowest.
To adjust the movement speed, go to the ‘Motion’ section in the Inspector panel and change the ‘Scale’ property. A scale value of 1 means that the layer will move at the same speed as the camera. A lower value than 1 means the layer will move at slower speeds. For example, setting a background layer movement scale value to 0.5 will cause the layer to move at half the speed of the camera, whatever that speed is set to.
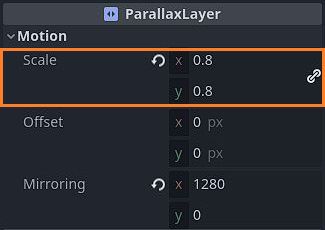
For foreground layers, the movement scale should be greater than 1, meaning they will move faster than the camera movement speed.
Mirroring the Parallax Layer’s Images
If your background image is smaller than the level itself, you will probably need to enable motion mirroring. The ‘Mirroring’ property under the ‘Motion’ section mirrors the image of the layer in a certain direction.
In the x and y fields, you need to specify the number of pixels you want to mirror, which is usually the size of your image. The mirroring property ensures that whenever the camera moves outside the boundaries of the background image, it will repeat itself.
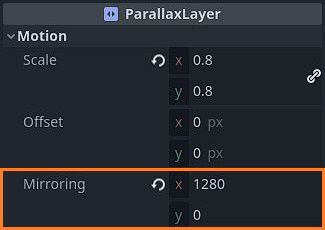
Keep in mind that for the mirroring to look seamless, the image has to be seamless; otherwise, the player will notice the point where the old image ends and the new image begins.
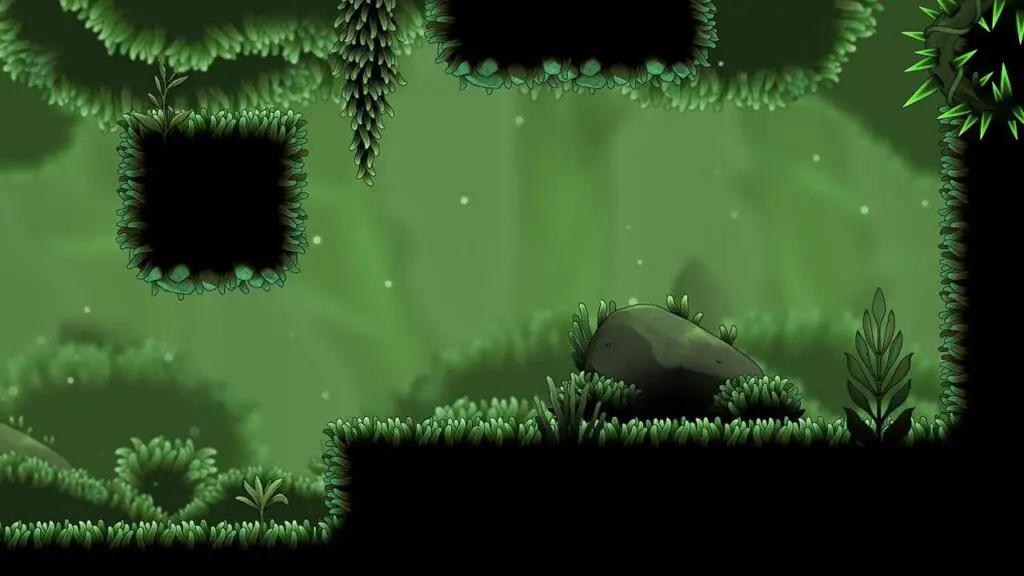
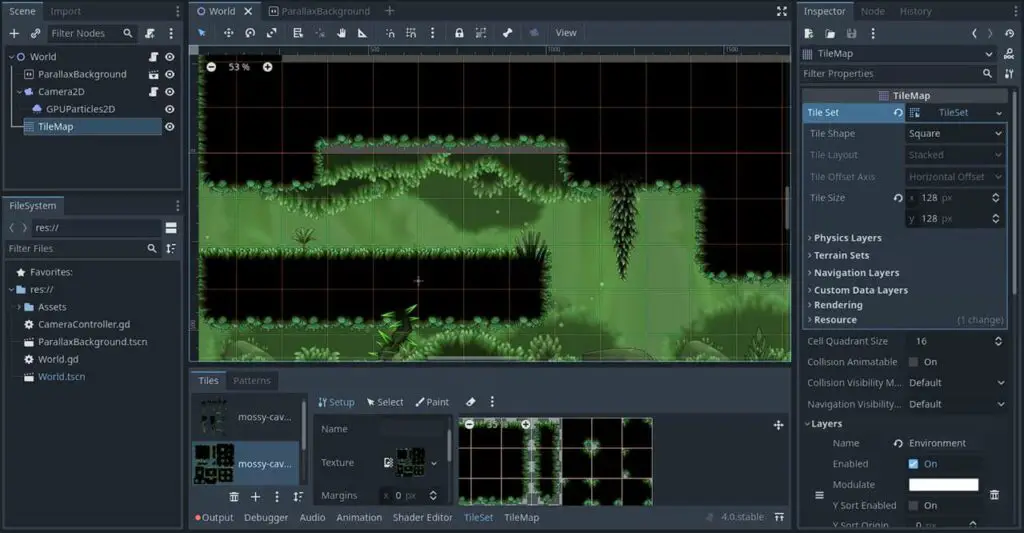
Example of a Parallax Background in Godot 4
In this example, I created a scene with four layers: three background layers with a parallax effect and one tilemap layer, which serves as the actual game level. To create all of these layers, I used the incredible Mossy Cavern asset pack.

How I Created the Background Layers?
Since the background layers are constant images and don’t have any interaction with a potential player or other characters, I created them in Photoshop as three separate images. The benefit of creating them in an art tool is that they are usually very robust in terms of duplicating and manipulating objects (scaling, rotation, warping, etc.), as opposed to Godot’s tilemap node, where you have to adhere to a standard grid and create ‘Alternative Tiles’ for tile variations.
How I Created the Tilemap Level Layer?
The layer closest to the camera (the actual level) must be created inside Godot using the Tilemap node. In this case, the grid layout is helpful in separating the tile sprites and painting them on the map easily.
Note: Resizing the Images to Match the Camera Size
The images and tileset used for this example are very high-quality files (4096×4096), which means each tile or sprite is at least 512×512 pixels. This size will not work with a standard camera, which is usually 1920×1080. So to create the background images and the tilemap, I resized all assets to be 25% of their original size using Photoshop.
You could also adjust the camera itself to zoom out to see the tiles from far away, but this creates several major problems, such as having to import huge background images and other assets into the Godot project and adjusting all other objects in the project to the same order of magnitude. Resizing the assets was a safer bet.
Conclusion
Godot makes it super easy to add background depth to a 2D game using the parallax nodes. If you need more functionality, you might find what you are looking for in the official Godot documentation at https://docs.godotengine.org/en/stable/classes/class_parallaxbackground.html and https://docs.godotengine.org/en/stable/classes/class_parallaxlayer.html.
I am a software engineer, game developer, and the owner of the Night Quest Games website. I write blog articles to help people with their game development journey, as well as document my own. If you want to learn how to apply real software development principles and architecture to games, I invite you to read my Night Quest Games Blog. You won’t be sorry.
If the information in this article was helpful to you, please consider supporting this blog through a donation. Your contributions are greatly appreciated and allow me to continue maintaining and developing this blog. Thank you!


