A Timer node in Godot is a time measurement tool that counts down from a specified value to zero. Once the timer reaches zero, it emits a signal that can be used by other nodes to perform an action.
Timers have a variety of use cases, such as enforcing animation/state length, simulating time (as in simulation games), managing time-based internal game logic, and occasionally measuring internal actions for debugging and performance analysis.
By reading this article, you will learn about Timer nodes, their purpose, and see a small example showing how a Timer node can be used to create a functional Digital Clock. Enjoy!

Common Uses of Timers in Games
Animation/State Length Enforcement: Some animations or object states lack a clear trigger to stop and transition to the next animation or state. In such cases, a time-based animation or state becomes necessary. The animation/state starts alongside the timer. When the timer expires, the animation/state ends and transitions to the next one.
Time Simulation: Simulation games use timers to define each passing time unit within the game. For instance, in a city-builder game like the classic SimCity, at normal game speed, the game could progress to the next calendar month every 5 seconds. Here, a cyclical timer is set to expire every 5 seconds. Upon each timeout signal, the game’s internal logic updates as if a month has passed in the game.
Time-Based Internal Game Logic: Most games feature internal logic that operates based on time. For example, puzzle or racing games usually have countdown clocks to apply pressure on players to finish the game. Adventure games might simulate a day-night cycle dependent on an internal clock. Even in FPS games, enemies might have behaviors that rely on time.
Performance Measurements: Performance is crucial in large-scale games. To make sure games run smoothly on various platforms and hardware sets, they undergo performance testing, particularly in critical areas where complex code is executed. One of the simplest methods for measurement involves inserting timers within the code to measure specific code segments suspected of high workload that could potentially slow down the game, and enforce their execution time. While this method doesn’t replace external tools that offer high-accuracy performance and latency measurement, it does provide a good indication of critical code areas that need to be addressed.
What Signals Do Timer Nodes Have In Godot?
Timers in Godot have only one signal, which is the ‘timeout’ signal indicating that the predefined time has passed and the timer has reached zero. Once the signal is emitted, all connected callbacks will be invoked. If you’re not yet familiar with the concept of ‘Signals’ in Godot, read the How to Use Signals for Node Communication article for a better understanding.
Setting up a Simple Timer Node From the Godot Editor
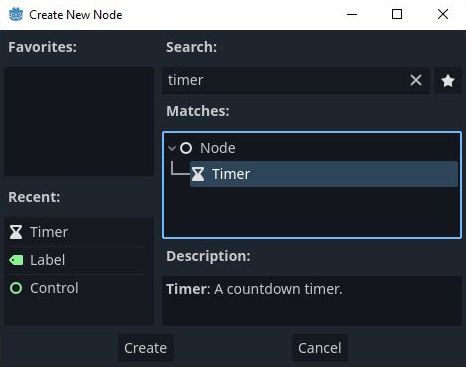
To create a new timer node in the Godot Editor, follow these steps:
- Click the ‘Add Child Node’ button in the Scene panel.
- Search for ‘Timer’ and select the Timer node.
- In the Inspector panel of the new Timer node, adjust the ‘Wait Time’ property to your desired duration.
Once you have a timer node, you’re free to change its name and access all its internal properties through GDScript. Typically, you’d start and stop the timer from the code.
Creating a New One-Shot Timer Object From GDScript Code
It’s possible to instantiate a local Timer object without having to create a node for it. Since timers are a global feature directly connected to the engine, they can’t be instantiated as a ‘new’ object (like Resources can). Therefore, you must use SceneTree.create_timer() to generate a new timer from the code. The SceneTree class is a global object accessible from any part of the code.
You don’t need to worry about freeing this object once it finishes its job. Memory cleanup will be automatically handled by the engine when the timer expires.
Exploring the Main Timer Node Properties
Here’s a quick summary of the main properties of a Timer node:
wait_time: The wait time is the initial time from which the Timer begins counting down. When the timer reaches zero, it means that the set time has passed. This property is adjustable from the Inspector panel and from the code.one_shot: When enabled, the timer automatically stops and becomes inactive upon reaching zero. If disabled, the timer resets to thewait_timevalue and starts the countdown again. This property can be modified from the Inspector panel and from the code.autostart: Automatically starts the timer when the Timer node is added to the scene tree. This property can be adjusted from the Inspector panel and from the code.time_left: Indicates the time remaining on the timer until it reaches zero. Access to this property is limited to the script only.
Timer Controls You Can Access From GDScript
The Timer node can be controlled from the script code using the following methods:
start(time_sec): Initiates the timer countdown from thewait_timevalue down to zero. Iftime_secis provided, thewait_timeandtime_leftproperties are updated accordingly.stop(): Instantly stops the timer countdown.is_stopped(): Returns true if the timer is currently stopped; otherwise, it returns false. A timer that has reached zero is considered stopped and will return true in this case.
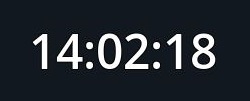
Example of Using a Timer to Make a Digital Clock
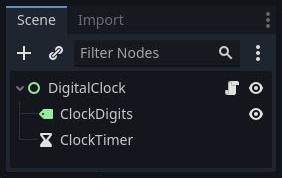
To demonstrate how timers function in Godot, I’ve created a small project featuring a digital clock. The clock is implemented by a single ‘Control’ scene with the following children:
- ClockDigits: a Label representing the clock’s digits.
- ClockTimer: a Timer node sending a signal every second.
The scene initializes the clock’s time to the current system time and starts the clock timer. Upon receiving the ‘timeout’ signal from the timer, the scene script calculates the new time, formats it as a string, and updates the label. You can replicate the project by following the steps below.
1. Creating the DigitalClock Scene and All Child Nodes
Begin by creating a new scene with a ‘Control’ type and adding Label and Timer nodes. You can see the scene tree in the attached image.
For additional information regarding the Control node and user interface in general, visit User Interface in Godot (Part 1): How to Build a Fine Menu.
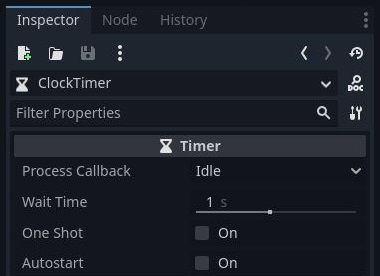
2. Configuring the Clock Timer Node
Navigate to the Inspector panel of the Timer node and adjust the ‘Wait Time’ property to 1 second. Ensure that the ‘One Shot’ and ‘Autostart’ properties are disabled (as they are not needed for this example).
3. Writing the Script to Handle Clock Initialization and Update
Create a new script and attach it to the DigitalClock scene. Below is a script I’ve written to initialize and update the clock. Copy the code provided below and experiment with it to understand how it works. Once you’ve understood the logic, feel free to improve it and develop your own approach.
extends Control
class_name DigitalClock

const SECONDS_PER_DAY : int = 86400
const SECONDS_PER_MINUTE : int = 60
const SECONDS_PER_HOUR : int = 3600

@onready var m_NodeClockTimer : Timer = get_node("ClockTimer")
@onready var m_NodeClockDigits : Label = get_node("ClockDigits")
@onready var m_InitialTime : Dictionary = Time.get_time_dict_from_system()

var m_CurrentTimeSeconds : int = 0

# Initialize the clock and the timer
func _ready() -> void:
	m_CurrentTimeSeconds = m_InitialTime.hour * SECONDS_PER_HOUR + m_InitialTime.minute * SECONDS_PER_MINUTE + m_InitialTime.second

	# Connect the timer signal to a local callback method
	m_NodeClockTimer.timeout.connect(_OnTimerExpired)

	# Update the clock digits for the first time
	UpdateClockDigits(m_CurrentTimeSeconds)

	# Start the clock timer
	m_NodeClockTimer.start()

# Update the digits of the clock
func UpdateClockDigits(seconds : int) -> void:
	m_NodeClockDigits.set_text("%02d:%02d:%02d" % [ _GetHours(seconds), _GetMinutes(seconds), _GetSeconds(seconds) ])

# Get the hours from the total number of seconds
func _GetHours(seconds : int) -> int:
	return seconds / SECONDS_PER_HOUR

# Get the minutes from the total number of seconds
func _GetMinutes(seconds : int) -> int:
	return (seconds % SECONDS_PER_HOUR) / SECONDS_PER_MINUTE

# Get the leftover seconds from the total number of seconds
func _GetSeconds(seconds : int) -> int:
	return (seconds % SECONDS_PER_MINUTE)

# Callback method for the timer 'timeout' signal
func _OnTimerExpired() -> void:
	m_CurrentTimeSeconds = (m_CurrentTimeSeconds + 1) % SECONDS_PER_DAY
	UpdateClockDigits(m_CurrentTimeSeconds)
My Take on Timer Nodes in Godot
Timers are crucial in almost every type of game imaginable. I used a timer node to create the clock in my puzzle game ‘ChemLab‘. In the game, a Timer node is set to expire every 1 second, similar to the example in this article. Upon each timer expiration, I update the visible clock on the screen and adjust the internal clock, counting down from a maximum time assigned to each level.
Developing games isn’t easy, but fortunately, you have my blog to guide and assist you as you progress. I’ve invested many hours and a lot of effort in writing these articles and implementing example projects like you saw in this article. Feel free to continue reading at Night Quest Games Blog.
If the information in this article was helpful to you, please consider supporting this blog through a donation. Your contributions are greatly appreciated and allow me to continue maintaining and developing this blog. Thank you!


