In my search for a way to implement a leaderboard for one of my games, I discovered that Godot doesn’t have a built-in user-friendly node for a data table. This was very frustrating to me because all other solutions I read for a basic table are quite complex and ugly. To solve this, I decided to create a table scene myself.
In this article, I will go over an example table I made in Godot. After many scene and node configurations, and theme customizations, I finally landed on a reasonable architecture for a data table that allows for not only data flexibility and code reuse but also theme customization of each individual row as well. It won’t be the greatest table you’ve ever seen, but it’s a good start.
General Node Structure of the Data Table
The table consists of three separate scenes:
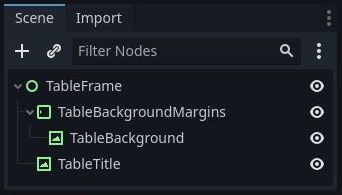
- TableFrame: It includes the frame, background, and title images of the table. These images are created externally (I used Photoshop) and imported into Godot.
- TableRow: This scene represents a single row of the table containing the data columns. It includes several Label nodes and, optionally, vertical separators to distinguish each column.
- Table: This is the table object, which includes a TableFrame instance, a title label, a header row, and multiple TableRow nodes.
Step 1: Creating the TableFrame Scene
The TableFrame scene is a Control node that includes the frame, background, and title bar of the table. All images were created in Photoshop, and the arrangement was done in Godot. If you’re not familiar with user interface concepts in Godot, feel free to check out the User Interface in Godot article.
- The first step you need to take is to create two separate images: one for the frame and background, and one for the title box. I didn’t combine them into a single image because it offers more flexibility in arranging and resizing the table to adapt it to various screen resolutions and aspect ratios.
- Next, import the images into Godot and create a new scene (mine is called ‘TableFrame’).
- Add TextureRect nodes and attach the imported images. You can utilize MarginContainer nodes to arrange the images in a way that positions the title on top of the frame, similar to what you see in the image above.
Step 2: Creating the TableRow Scene
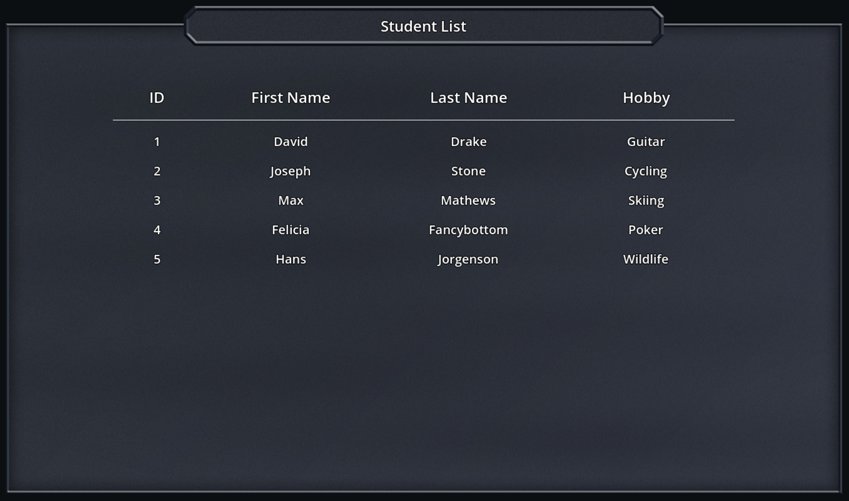
Now it’s time to create a single data row. This scene is specific to your needs. For this example, I chose to have four columns representing a student list: ID, first name, last name, and hobby.
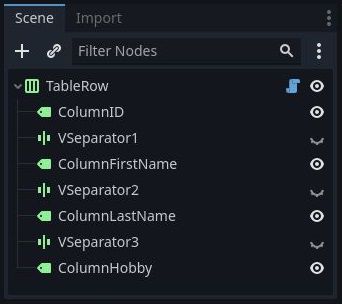
- Create a new HBoxContainer scene (in my case, called ‘TableRow’) and add several Label nodes to it. An HBoxContainer is a container that arranges its children horizontally in a row.
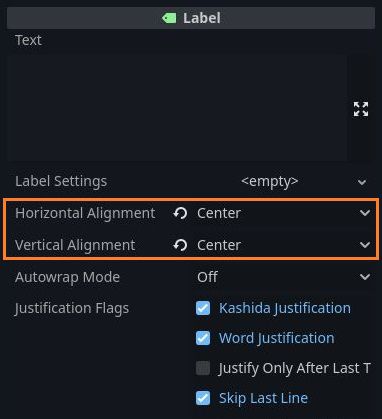
- For each label, set the horizontal and vertical layout to fill the entire area and center the text.
- Add a script to the root node. The script exports all row fields so you can set the values from the Godot editor. It also implements a method that updates the text of each label based on the given data.
Note: The TableRow script is defined as @tool to allow the exported values to be updated in the Godot editor in real time.
@tool

extends HBoxContainer
class_name TableRow

@export var ID : String = ""
@export var FirstName : String = ""
@export var LastName : String = ""
@export var Hobby : String = ""

@onready var m_NodeColumnID : Label = get_node("ColumnID")
@onready var m_NodeColumnFirstName : Label = get_node("ColumnFirstName")
@onready var m_NodeColumnLastName : Label = get_node("ColumnLastName")
@onready var m_NodeColumnHobby : Label = get_node("ColumnHobby")

# Initialize all table row field values
func _ready():
	Set(ID, FirstName, LastName, Hobby)

# Set the table row fields with the given data
func Set(id : String, firstName : String, lastName: String, hobby : String) -> void:
	m_NodeColumnID.set_text(id)
	m_NodeColumnFirstName.set_text(firstName)
	m_NodeColumnLastName.set_text(lastName)
	m_NodeColumnHobby.set_text(hobby)
A few customizations you can make for each row:
- Add a VSeparator node between each Label node to create a border between the columns.
- Create a new Theme in the root node and modify the ‘Label’ component (colors, border, fonts, etc.). This way, all label children under the root node will have the chosen settings without your needing to modify each label separately.
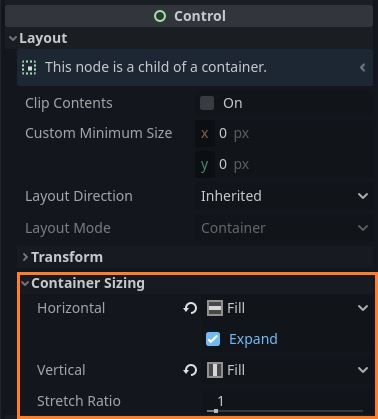
- Customize the width of each column by adjusting the ratio between them. In the Inspector panel of each label, navigate to Control -> Layout -> Container Sizing, change the horizontal and vertical properties to ‘Fill’ and check the ‘Expand’ checkbox. The ‘Stretch Ratio’ bar determines the ratio between this node and all others in the same container. For instance, if you want the ID column to be smaller than the rest, set its stretch ratio to 1, while setting the stretch ratio of all other labels to something higher, like 2.
Step 3: Creating the Table Scene
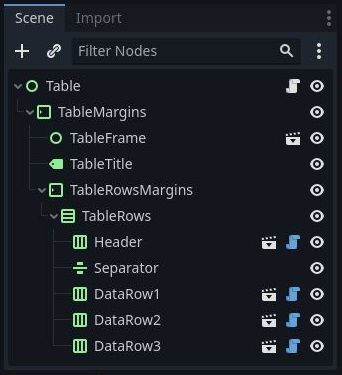
The Table scene is a Control node that includes an instance of the TableFrame scene, a table title Label node, the table Header row, and all data rows.
- Begin by adding all nodes to the scene. Incorporate MarginContainer nodes to manage the position of the table components.
- Then, include a VBoxContainer node that will contain the Header row and all data rows below it. Note: you can enhance the table’s appearance by adding a separator line beneath the Header.
- The final element for this scene is the script that manages the table. This script enables access to and modification of the table data. In my example, I only implemented a
CreateNewDataRow(data)method to add rows to the table. However, you can include an entire set of functions for table operations, such as:GetDataRow(index),DeleteDataRow(index),FindDataRow(criteria), and many more.
To differentiate the header text style from the data rows’ style, modify the theme of the ‘Header’ node instance within this scene (instead of directly accessing the TableRow scene for changes). Ensure to make the Theme unique if you saved the resource.
extends Control
class_name Table

# Table data rows container
@onready var m_NodeTableRows : VBoxContainer = get_node("TableMargins/TableRowsMargins/TableRows")

# Add example rows, in addition to the predefined ones
func _ready():
	# Example rows added from the code
	CreateNewDataRow("4", "Felicia", "Fancybottom", "Poker")
	CreateNewDataRow("5", "Hans", "Jorgenson", "Wildlife")

# Create a new TableRow object, fill in data and add to the table
func CreateNewDataRow(id : String, firstName : String, lastName: String, hobby : String) -> void:
	var newTableRow : TableRow = preload("res://TableRow.tscn").instantiate() as TableRow
	m_NodeTableRows.add_child(newTableRow)
	newTableRow.Set(id, firstName, lastName, hobby)
My Take on Tables in Godot
Tables are a forgotten form of data representation in Godot. Many games utilize tables to display various data types, such as in-game data or scoreboards/leaderboards. In my puzzle game ‘ChemLab‘, I implemented a table similar to the one presented in this article, to be used as a leaderboard panel that tracks the highest scores in the game.
I hope the information in this article was useful to you. If you’re eager to learn more about creating fantastic games, continue reading at the Night Quest Games Blog. See you there!
If the information in this article was helpful to you, please consider supporting this blog through a donation. Your contributions are greatly appreciated and allow me to continue maintaining and developing this blog. Thank you!


