This article contains my personal background and is written from the heart. I hope you appreciate my honesty and learn a thing or two from my game development journey so far.
My Personal Story
Around 1993, my parents bought me my first computer. It was a crappy Intel 486, which at the time was a solid PC. It had a processor with a frequency of 100MHz and a whopping 8 MB of RAM. The hard disk was also pretty large, with 850MB of storage. The computer had Windows 3.11 installed, but the default operating system was something called ‘Norton Commander.’ It was a simple blue screen with two columns containing all the files in a specific folder.
One day, my mom bought me a CD (yes, this was the era of compact disks) that had about 300 demo games for kids. I was probably around 7 years old at the time, so I played those games as much as I could. I invited friends over so we could play together in “multiplayer” games (one person using the arrow keys, while the other person is using the WASD keys). But one of those games on that CD really caught my attention. This was a puzzle game called ‘Atomix.’
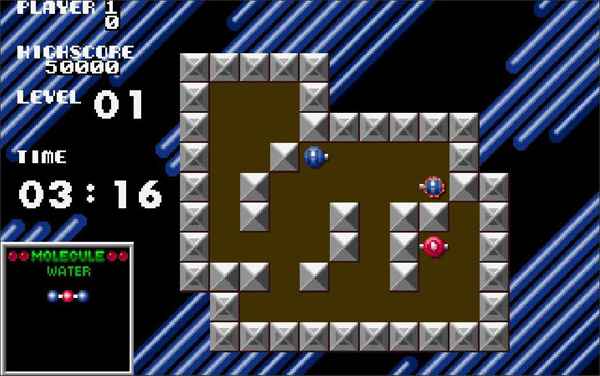
Atomix was a simple game; you had a collection of atoms, and the goal was to build a molecule from them. But this game had a catch: every time you tried to move an atom, it moved until it bumped into something, either a wall or another atom. This limitation made it very challenging to solve the puzzle, especially on large molecules. Each level had a clock, and when the clock ran out, you lost the game and had to start over.
I spent so many hours figuring out how to solve these puzzles. And when I finished the game, I restarted it and played again, trying to go through all the levels quicker. This game was one of the classics I remembered the most, so I decided to recreate it.
Introducing My First Game: ChemLab
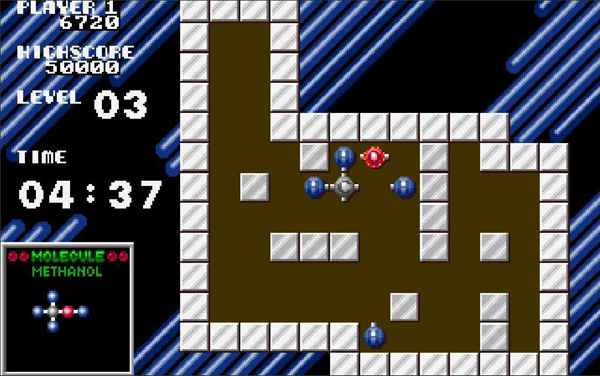
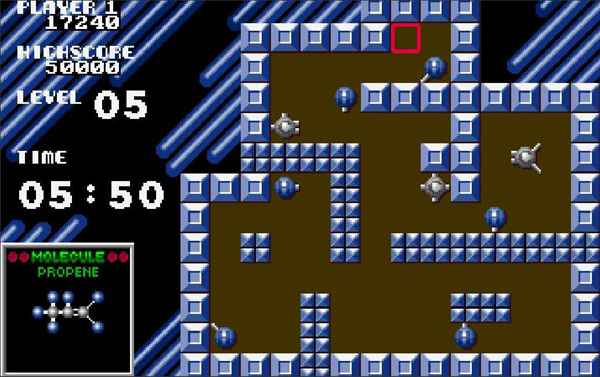
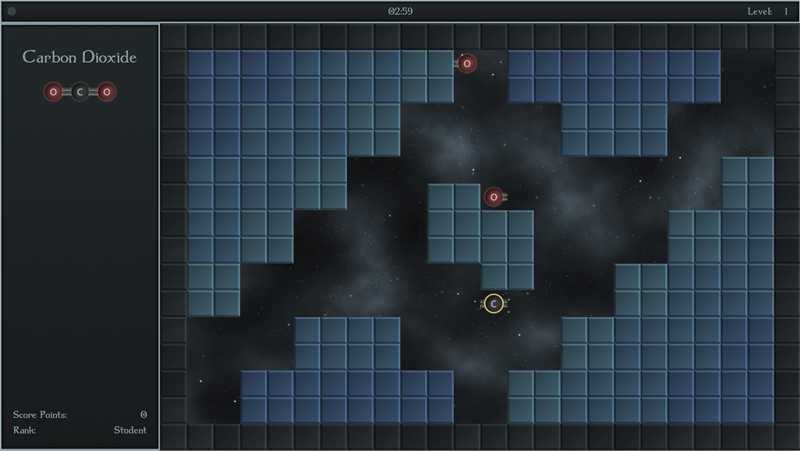
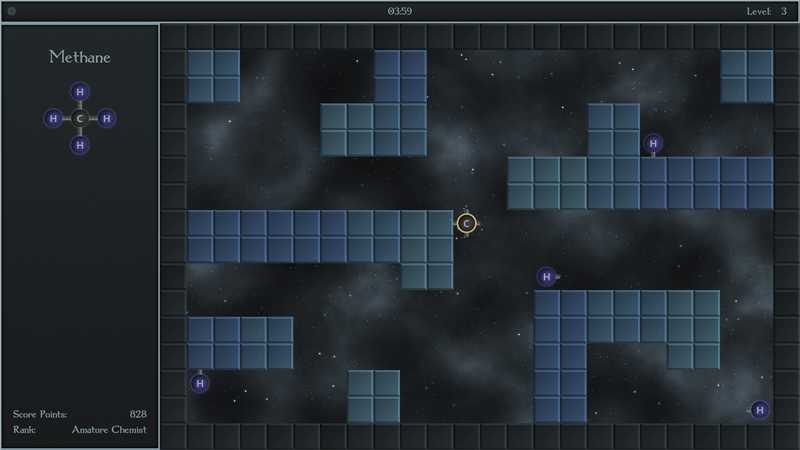
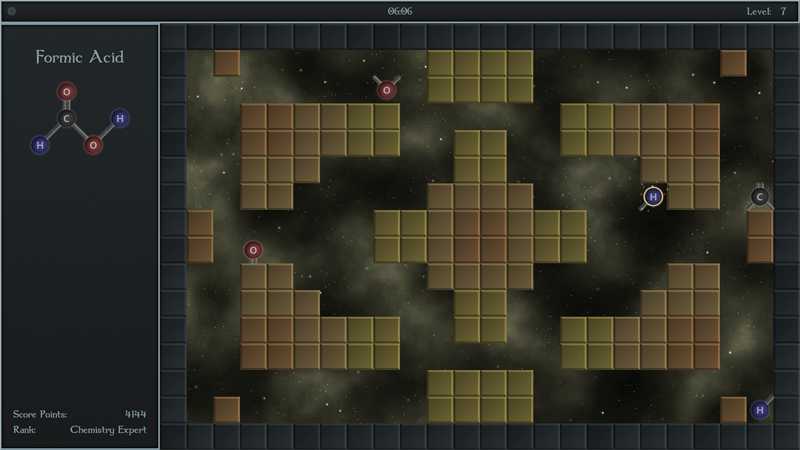
ChemLab is very similar to the classic Atomix game, with minor changes and additions. It is an educational grid-based puzzle game involving constructing simple molecules from their atoms. Similar to the classic Atomix game, atoms don’t move a single square each time; they slide until they either hit a wall or another atom. Solving these puzzles requires you to visualize and plan how you can utilize all atoms at your disposal to put every atom in its correct place.
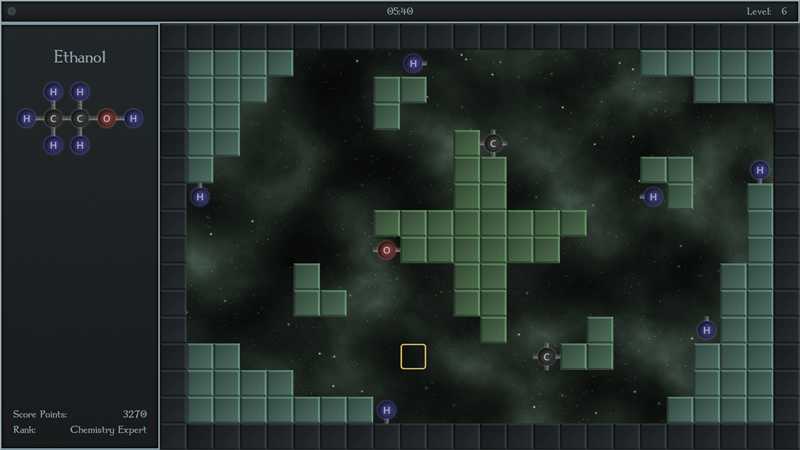
Currently, the game has 5 stages, with each stage represented by a different color. Each stage consists of 3 levels, so the game has a total of 15 levels. The first few levels might seem easy, and that’s because they are! However, the second half of the game is quite challenging and will really engage your brain.
The game features a fully functional save and load game system. You can save and load games at any point during gameplay. By the way, if your are interested in building a solid save / load system in your game, this article may help you get started: Godot 4 Save and Load Games: How to Build a Robust System. Additionally, I’ve created a Leader Board with a unique ranking system to track your progress. Furthermore, each level has an introduction screen with a short description of the molecule, solely for educational purposes.
You can see the game page and download it here: https://vitaly-frog.itch.io/chemlab. The game is completely free to download and play. You can read a review of the game on the popular freeappsforme website.
Why Did I Choose to Make This Game?
When I started my game dev journey, I heard a lot of folks who had been doing this for years say, “The big issue with most game developers is that they never complete a game.” And I thought to myself, “If releasing the first game is such a hard task, why not make a super simple game and release it quickly?” It makes sense, right? Wrong!
I thought this game would be simple enough that I could release it in a matter of weeks, get some feedback, and continue to the next one. After all, this game has no complex art, simple gameplay logic, and similar, consistent levels. Unfortunately, reality did not agree with me.
Prototypes Are Easy, Production Is Hard
I actually created the prototype of the game in a couple of days! However, this was far from being a game someone could play. Yes, the user input and game mechanics were working, but I only had a couple of different levels, ugly graphics, no audio, no menu, no save/load game functionality, and the code was a mess, probably riddled with bugs. This was my first prototype.
After taking a hard look at my creation and deciding to continue with it, I knew it needed dramatic improvement. Considering the fact that I was working a full-time job as a software engineer, taking care of a toddler and my pregnant wife, I had little to no time to invest in this project. So I did what any logical person would do – I sacrificed my sleep to continue development.
I woke up at 5 am almost every day to start working on this game and on my Night Quest Games Blog, and I kept developing after everyone went to sleep. Fortunately, I am a morning person and I love waking up early to start my day, so waking up at 5 am was natural to me. This routine went on for about 6 months. However, at some point, the very long work hours and lack of sleep began to take a toll on me, and I started to break.
I had three choices: either stop this game development endeavor, reduce my work hours at my job, or leave it completely. Reducing my work hours at my workplace was not an option, and I wasn’t ready to give up on game development. So, with the blessing of my wife, I took the big leap.
I Left My High-Paying Full-Time Job to Pursue Game Development
This was a hard decision to make, and its implications could affect my entire family. I am lucky to have an incredible wife who supports my decision to quit my job and pursue something I enjoy in life.
We have enough money in savings to get by and maintain a good quality of life. I am not too worried about our financial situation, but I hope that in the future, my projects will generate some income so I can safely continue developing games without having to return to a full-time job.
Once I left my job, I had a lot of free time on my hands, so I started planning all the tasks I needed to complete to release my first game. It seemed easy at first; after all, it’s just a matter of outlining the steps to achieve a goal, right? Wrong again!
You Don’t Know What You Don’t Know
Knowing and planning what you are going to do is an integral part of every project. So, if you outline all the tasks you need to achieve a goal, what’s the problem? Well, game development requires so many skills that you will get bombarded with issues along the way. This means your game will be delayed if you don’t give yourself a sufficient time buffer to learn and implement. If the knowledge gap is too wide, you might give up entirely, as it’s not worth the trouble of learning and remaking the game.
I Had to Recreate All of My Sprite Sheets
I’ll give you a simple example. I learned the hard way to save all of my original and modified asset files (e.g., Photoshop files, Audacity files, etc.). At some point during my testing, I noticed bleeding of a sprite into another sprite within the same sprite sheet. Since I hadn’t saved any Photoshop files, I was forced to recreate all of my sprites. Editing the sprite sheet image would have resulted in ugly and stretched graphics, so I didn’t go that route.
Sometimes You Just Have to Count Pixels
Here’s another unexpected issue. As I was approaching the completion of my game, I noticed that the width and height of each cell on the grid were not equal, but they should have been! At first, I thought I was imagining it since it was a slight distortion, but upon closer look, I noticed that the height was slightly longer than the width.
The graphics distortion occurred because I had 16 vertical 64-pixel squares, totaling 1024 pixels. This was problematic because most modern screens are 1920×1080. So, where did the extra 56 pixels go? The game engine stretched the image to fit the height of the screen while keeping the width constant, causing the grid to stretch vertically.
Initially, I considered redesigning the squares to make them larger, but I already had the 24×16 grid locked in my game logic and didn’t want to change everything just to accommodate those lost pixels. So, I decided to take a different approach, which turned out to be a great benefit – I added the top menu panel.
Adding the top menu panel was unexpected and took me several days to draw, implement, and integrate into the game. And although it caused a setback in my schedule, I was really happy with the result since it improved the look of my game and resolved the vertical stretch problem.
In any case, these were harsh lessons I had to learn while trying to progress with the game. My takeaway is to plan for the unknown and unexpected things right from the start.
What I Have Learned From Creating My First Game
I have learned so much during these last few months that I couldn’t describe it all in a single post. Even though it’s hard to pinpoint everything I’ve learned, I will try to summarize one important lesson that applies to each aspect of game development.
1. Plan Everything From Day One
Assuming you already have a basic idea of the storyline for your game and a rough idea of how you want it to look, it’s crucial to start planning every aspect of your project right from the beginning.
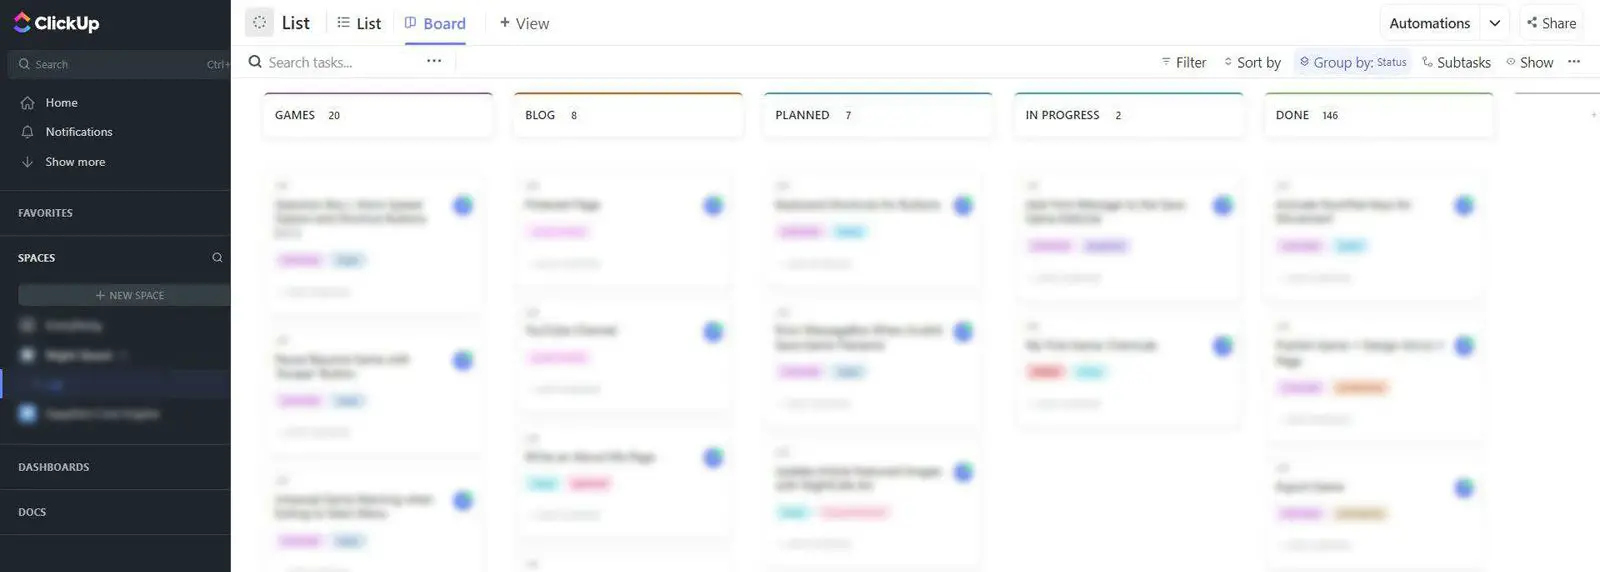
I personally use the free version of ClickUp to keep track of my tasks, but you can use any project management software that you feel comfortable with. Game developers who don’t use some form of project management software are setting themselves up for failure. There’s just so much to do, and you must keep track of it all. Without this software, you risk getting lost, forgetting features, overlooking bugs, and turning your project into a chaotic mess.
Once you have the software customized to your needs, it’s time to input everything you know into it. Every little task and reminder should be recorded, even if you think you might not do it. Just put it there, in case you change your mind. This process will take some time.
With all your tasks in front of you, you can now begin scheduling them on your calendar. I personally use Google Calendar, but you can choose any application that suits you. Begin by allocating blocks of time for your tasks. Even if you’re unsure about your schedule several weeks or months in advance, provide an estimate of how long you think each task will take and schedule them accordingly.
The purpose of this exercise isn’t to drive you crazy, although it may feel that way initially. The goal is to understand the scope of the project, considering your skill set. If you populate your calendar, and your jaw drops because it’ll take three times longer than you initially thought, well, now you know!
One more important point to mention is to give yourself an extra 50% time buffer to complete the project. I’m not kidding; a 50% buffer is a reasonable margin to work with. This means that if you anticipate your project will take 2 months, it will probably take around 3 months. As I mentioned before, you never know what you don’t know yet.
2. Save All Asset Files, Code and Data
I had the pleasure of recreating all of my game assets at the end of my project because I didn’t save any. Examples include code files, art files (Photoshop/Illustrator), animation files (DragonBones/OpenToonz), audio projects (FL Studio/Audacity), and so on. This is really important because you’ll likely have to modify your assets several times during the project, and without the source files, you can’t do that.
Another crucial point I want to mention is to try not to perform irreversible actions within your software. If you use Photoshop or any other art software for that matter, do your best not to rasterize layers, as it erases all logical information about your shapes and colors, converting everything into a solid image. For audio, save the project files, the original audio clips and create duplicates if you’re uncertain about some changes you’ve made. In short, save every step of the creation process.
When your asset source files are well-organized, you’re free to make changes and experiment with them as your heart desires. If not, well, good luck recreating complex graphics, audio, or animations during the busiest time in your project.
3. System-Driven Design Is Key for Code Flexibility
Games are not simple projects that you can create in a day (although there are people who do it for game jams). There’s no ChatGPT you can summon and say, “Make me a good game.” Otherwise, everyone would be doing it, and itch.io would be filled with weird AI games. The truth is, games are complex, large-scale software projects. While art, animation, and audio are undoubtedly important, at the core of this magnificent undertaking lies the software that governs everything.
In contrast to software applications, games are highly distributed and hierarchical software. What I mean by that is, while software applications can be large with many classes and objects, there aren’t as many connections and interactions between them. Games, on the other hand, have complex data structures, numerous different objects nested within each other that need to interact with other objects located in entirely different parts of your code. This means that some pieces of code might need to interact with other pieces of code at the other end of your game’s codebase.
Now, what happens when you decide to change the behavior? You must update all object connections and relationships. Scaling this up to a large game, it can become an absolute nightmare! That’s why I strongly recommend generalizing the code as much as possible and creating generic systems and libraries within your code.
When your code is generic enough, it is usually not affected by external changes. These systems will not only benefit you in your current project but can also be transferred to your next one.
As a software engineer, my experience in the industry has taught me that every good application, including games, will have systems and libraries that are independent of the game itself. That’s why I wrote an article on this topic, which you’re welcome to read: System-driven Design.
4. Prepare a Publishing and Marketing Plan
I didn’t have a marketing or publishing plan; I just uploaded my game to itch.io and hoped for the best. Unfortunately, hope is not a good strategy, and for the first couple of days, no one downloaded my game (except me and some friends). Every time I checked the Dashboard on the website, I heard crickets. This was somewhat disappointing but not entirely unexpected.

The website kept nagging me about writing a devlog post to increase the visibility of my game page, so I did. I wrote a short summary of my game and how I developed it. We will see how it goes in the next couple of weeks. If you want to read it, you can find it here: https://vitaly-frog.itch.io/chemlab/devlog/584951/launching-my-first-game-chemlab.
My point is, publishing a game on a single website in the hope that people will magically discover it is a lost cause. What did you expect? It’s stored somewhere in a dark corner of the interwebs. Unless you put in some manual work, no one will ever see it, and it will be buried under thousands of other games that people publish every day.
There are many ways to increase the exposure of your game, such as linking it to your website, writing posts about it on your website, creating devlogs, sharing it with your friends, sending it to influencers who can showcase your project, uploading it to other platforms, and posting links on forums like Reddit, among other strategies.
5. Don’t Forget to Take Breaks
After I left my full-time job, I had so much motivation that I literally worked from early morning until night. This continued for several weeks, but then, toward the end of the project, my motivation decreased, and burnout began to set in.
I understand the desire to create the best games as quickly and efficiently as possible, but the reality is, you are human and have only so much time and energy each day. If you don’t have a family, and you can work for 19 hours a day without burning out, go for it. But for the rest of us mortals, we need some rest and time to spend with our families, kids, and friends. Don’t forget to give your body and brain the rest they need; it will benefit you in the long run.
Looking Forward
I will update the game and address some of the issues people have pointed out to me. However, aside from that, I am not going to invest any more time into this project. The goal of this project was to learn the entire process of creating a complete game. Now that I have the basic knowledge of the entire process, I can start fresh with my second game and develop it much better and more efficiently.
If you are interested in game development, I create my games using the Godot 4 game engine. I have many tutorials and guides on various topics on my Night Quest Games Blog. See you there!
If the information in this article was helpful to you, please consider supporting this blog through a donation. Your contributions are greatly appreciated and allow me to continue maintaining and developing this blog. Thank you!

Some good insights here and a nice read. I like your writing style! 🙂
You could add the important point of thinking about target systems (Windows, Mac, Linux, Web) from the beginning and how to test them,
as this has a major impact on your target audience size. 😉
Hey Daniel,
You are right about the target platform, it is important to think about it from the beginning.
I think I will dedicate an article for this topic.
Thank you for the response!