State machines are a vital part of the internal logic of objects and characters in a game. They are one of the fundamental topics of knowledge any game developer should have in their arsenal. Join me on a journey to discover what state machines are and how you can implement them in Godot to enhance your game development process.
Introduction to Finite State Machines in Video Games
If you’re unfamiliar with state machines, this section is for you! I’ll explain in simple terms what state machines are, how they’re used in video games, and provide examples of their usage in characters and objects.
What is a Finite State Machine?
A finite state machine is a collection of potential states of an object and the connections between them. It has a finite number of states, unlike an infinite state machine, where the number of states is undefined. The connections between states set the conditions that allow transitions from one state to another. In the context of video games, state machines are usually used to describe the different behaviors of a character or an object in the game.
Example: Defining the States of a Player Character
A player character in a game can have various states, such as Idle, Walking, Running, Crawling, Jumping, Sliding, Attacking, Defending, Shooting, Hurt, Dead, and many more.
Each of these states has its own logic, and transitioning to any of them usually involves playing an appropriate animation and sound.
How State Machines are Used in Game Characters and Objects
The state machine of a single character or object defines the possible states this entity can be in. Apart from all the state definitions, the state machine module also tracks the current state of the entity and applies changes to that entity – either during state transitions or while in a particular state. The state machine can be implemented within the entity’s class/node or as a separate system that is later attached to the entity.
The Naive Solution to Character States in Godot
In the context of Godot, the naive approach to implementing a state machine involves using a ‘match’ statement in GDScript (or a ‘switch’ statement in C#). Each value represents a state index that executes the corresponding code of that state. Typically, the ‘match’ statement is placed in the _process() or _physics_process() methods. While this implementation is easy and straightforward, unfortunately, it comes with several downsides.
const FRICTION : float = 24.0		# Friction force applied on player
const GRAVITY : float = 980.0		# Gravity force applied on player

const JUMP_VELOCITY : float = -460.0				# Initial character velocity upon jump
const MOVEMENT_SPEED_GROUND : float = 200.0			# Ground movement speed multiplier
const MOVEMENT_SPEED_AIR : float = 180.0			# Air movement speed multiplier
const INITIAL_STATE : StateMachine.StateType = StateMachine.StateType.Idle
var m_CurrentState : StateMachine.StateType = INITIAL_STATE

@onready var m_NodeAnimation : AnimatedSprite2D = get_node("Animation")
@onready var m_NodeAudio : Node = get_node("Audio")
@onready var m_NodeAudioRun : AudioCollection = m_NodeAudio.get_node("AudioRun")
@onready var m_NodeAudioJump : AudioStreamPlayer = m_NodeAudio.get_node("AudioJump")

func _physics_process(delta):
	var movementHorizontal : float = Input.get_axis("PlayerMoveLeft", "PlayerMoveRight")
	var characterJumped = Input.is_action_just_pressed("PlayerJump")

	# Check transition to 'Idle' state
	if ((m_CurrentState != StateMachine.StateType.Idle) and (movementHorizontal == 0) and is_on_floor()):
		m_NodeAnimation.play("Idle")
		m_NodeAudioRun.Stop()
		m_CurrentState = StateMachine.StateType.Idle

	# Check transition to 'Run' state
	elif ((m_CurrentState != StateMachine.StateType.Run) and (movementHorizontal != 0) and is_on_floor()):
		m_NodeAnimation.play("Run")
		m_NodeAudioRun.Play()
		m_CurrentState = StateMachine.StateType.Run

	# Check transition to 'Jump' state
	elif ((m_CurrentState != StateMachine.StateType.Jump) and characterJumped and is_on_floor()):
		m_NodeAnimation.play("Jump")
		m_NodeAudioRun.Stop()
		m_NodeAudioJump.play()

		# Update character vertical movement velocity
		velocity.y = JUMP_VELOCITY

		m_CurrentState = StateMachine.StateType.Jump

	match (m_CurrentState):
		StateMachine.StateType.Idle:
			# Nothing to do while in idle state
			pass

		StateMachine.StateType.Run:
			# Update character texture direction
			if (movementHorizontal != 0):
				m_NodeAnimation.set_flip_h(movementHorizontal < 0)

			# Update character movement velocity
			velocity.x = movementHorizontal * MOVEMENT_SPEED_GROUND

		StateMachine.StateType.Jump:
			# Update character texture direction while jumping
			if (movementHorizontal != 0):
				m_NodeAnimation.set_flip_h(movementHorizontal < 0)

			# Update character movement velocity
			velocity.x = movementHorizontal * MOVEMENT_SPEED_AIR

	# Apply gravity force and update character movement velocity
	velocity.x = move_toward(velocity.x, 0, FRICTION)
	velocity.y += GRAVITY * delta

	move_and_slide()
The Problems with the Naive State Machine Solution
A large state machine results in cluttered code. In large state machines, the ‘match’ statement block of code can become a real mess, spanning hundreds of lines. Finding a bug or changing a specific behavior within this code can be very difficult. You might have a better chance of winning the lottery.
Lack of control over state entry or exit. The ‘match’ statement only defines the behavior of the character or object within a state. However, sometimes there is a need for code that executes only once during a state transition. For instance, when a character transitions to a ‘Jump’ state, their velocity should be set to a specific number to initiate an upward force. Subsequently, gravity alters that velocity until the character lands and moves to a different state.
This issue requires you to dedicate another block of if/else statements which handle enter and exit actions, cluttering the code even further.
Difficulty in copying the state machine to other entities. As the state machine code is embedded within the entity’s code, separating and transferring it to another character or object becomes challenging. Copying code snippets from one script to another can be an incredibly frustrating and time-consuming task, especially when dealing with many objects that require a state machine.
Fortunately, there is a better solution to this problem, one that involves the Godot editor.
A Finite State Machine Tailored for Godot
Now that you understand the basics of state machines, it’s time to move on to the big boys league and implement a robust system that allows easy control of states for characters and objects in your game.
The Proposed Structure of a State Machine in Godot
The following rules serve as the fundamental guiding principles for implementing the state machine. They provide an insight into what I aim to build and how I integrate it into the Godot editor to create a developer-friendly environment.
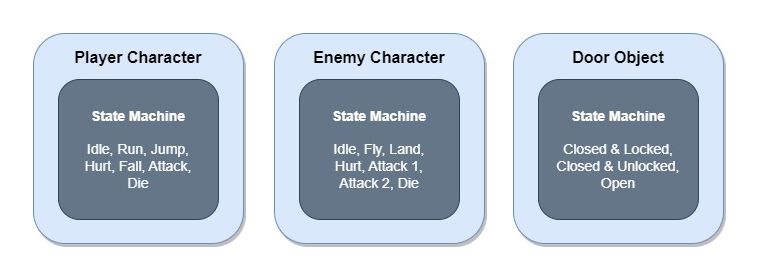
1. Each character or object with multiple potential states gets its own custom state machine. As the logic required for each character or object differs, each should have its own implementation of a state machine with its unique internal logic.
For instance, the states of a player character are different from those of a door (closed, open, locked, unlocked, etc.).
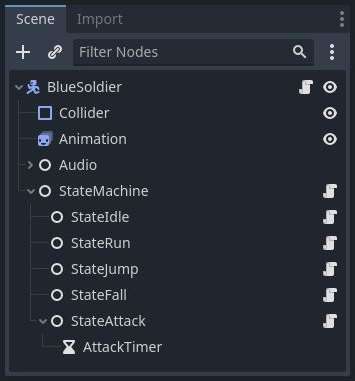
2. The state machine and each state are represented by nodes in the scene tree. The state machine node and script are located under the target entity, responsible for processing and updating the object while in a specific state. Moreover, it initializes the states and manages the transitions between them.
All individual state nodes are placed under the state machine node, responsible for implementing the actual code executed upon entering and exiting a state, as well as the code that runs while the object is in that state.
The scene tree image illustrates the “Blue Soldier” scene with its state machine. Each state is a simple ‘Node’ type, which has a script that implements the specific behavior of that state.
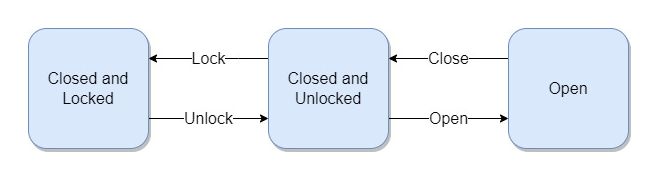
3. The state machine of each character or object tracks the current state of that entity. Consider a door, which can be in three potential states: closed and locked, closed and unlocked, and open. At any given moment, the door can only be in one of these states.
When the player encounters a closed and locked door and unlocks it with a key, the door transitions from a “Closed and Locked” state to a “Closed and Unlocked” state. Once the player opens that door, the door’s state changes to the “Open” state.
4. The state machine owns the target entity and manages the necessary adjustments during state processing and transitions. While the entity is in a particular state, the state machine is responsible for updating the entity’s properties, as required (checking user input, updating physics, sprites, transform, etc.).
When the conditions for transitioning to a new state are met, the state machine should implement all necessary changes to the target character or object when exiting the old state and entering the new one. For instance, each state transition usually involves playing an animation or a sound.
Moreover, other changes can be implemented, such as adjusting the entity’s transform (location, rotation, or scale) or modifying physics properties (velocity, momentum, etc.).
The Benefits of Creating a State Machine Specifically Tailored for the Godot Editor
Building a state machine by using the Godot editor features will make game development much easier for you. The node structure I described allows you to do several things:
- Easily export variables from each of the states to control internal parameters through the Godot editor.
- Encapsulate all needed functionality within each state node, including the state’s behavior and enter/exit state behaviors.
- Copy the nodes and scripts to other objects, without having to separate the state machine code from the actual entity’s code.
- Keep the implementation of each state small, without cluttering the main script of the character or object.
Implementing a Character with a State Machine in a Godot Project
1. Preparing The World and Character Scenes
Before I show you the state machine code, setting the stage is important. We need a stable environment to test the state machine’s functionality once it’s developed.
In this instance, I’ve developed a simple 2D platformer project with a a magical forest theme, featuring a character I’ve named “The Blue Soldier.” The platforms were created using a Tilemap node. The character has five states: idle, run, jump, fall, and attack. Each state corresponds to a specific animation and sound.
By the way, the tileset used in this project is a modified version of the Oak Woods Evironment Asset Pack made by brullov. Credit where credit is due. The background is an AI generated image.

In addition to the states we are about to implement, the character script must also update the physics of the character, specifically its horizontal and vertical velocity. The physics update is placed within the character script since it’s independent of the state the character is currently in. You can see the code in the following snippet.
extends CharacterBody2D
class_name BlueSoldier

const FRICTION : float = 24.0		# Friction force applied on player
const GRAVITY : float = 980.0		# Gravity force applied on player

func _physics_process(delta):

	# Apply gravity force and update character movement velocity
	velocity.x = move_toward(velocity.x, 0, FRICTION)
	velocity.y += GRAVITY * delta

	move_and_slide()
2. Implementing the ‘State’ Script
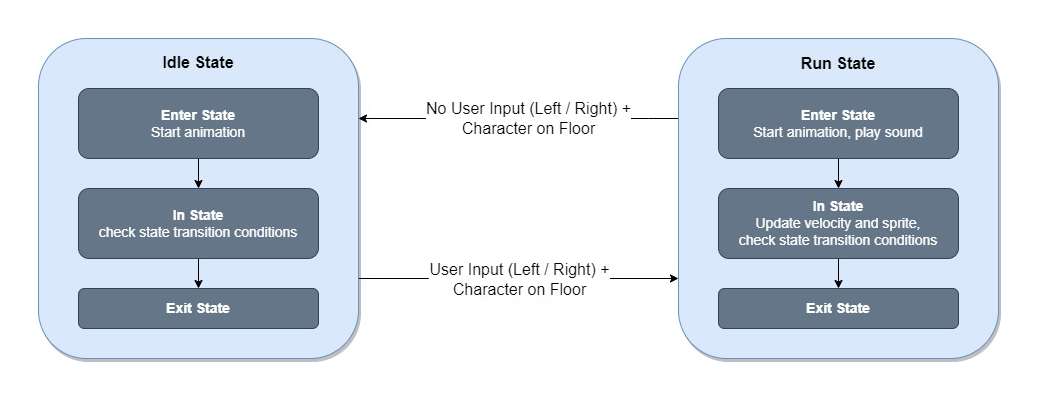
The ‘State’ script serves as the base class for all other state scripts (all other states will extend the ‘State’ class). This class defines the framework for an actual state class and contains the following methods:
Initialize(characterBody: CharacterBody2D): Initializes the state node with the target character.Enter(): Called when the character enters the state.Exit(): Called when the character exits the state.StateInput(event: InputEvent): Called by the state machine to handle user input events.StateMainProcess(delta: float): Called by the state machine to handle the main process of the state.StatePhysicsProcess(delta: float): Called by the state machine to handle the physics process of the state.
Each of these methods can have a basic implementation in the ‘State’ class and can be overridden in its child classes.
extends Node
class_name State

const NODE_NAME_ANIMATION : String = "Animation"	# Character's animation node name
const NODE_NAME_AUDIO : String = "Audio"			# Character's audio node name

@export var StateName : String = ""					# Name of the state
@export var AnimationName : String = ""				# Name of the animation sequence in the character's animation node

var m_CharacterBody : CharacterBody2D = null		# A direct reference to the character node
var m_NodeAnimation : AnimatedSprite2D = null		# A direct reference to the character's animation node
var m_NodeAudio : Node = null						# A direct reference to the character's audio node

# Initialize the state
func Initialize(characterBody : CharacterBody2D) -> void:
	m_CharacterBody = characterBody
	m_NodeAnimation = m_CharacterBody.get_node(NODE_NAME_ANIMATION)
	m_NodeAudio = m_CharacterBody.get_node(NODE_NAME_AUDIO)

# Method invoked upon entering the state
func Enter() -> void:
	m_NodeAnimation.play(AnimationName)

# Method invoked upon exiting the state
func Exit() -> void:
	pass

# Input method of the state machine
func StateInput(_event : InputEvent) -> StateMachine.StateType:
	return StateMachine.StateType.Invalid

# Main process method of the state machine
func StateMainProcess(_delta : float) -> StateMachine.StateType:
	return StateMachine.StateType.Invalid

# Physics process method of the state machine
func StatePhysicsProcess(_delta : float) -> StateMachine.StateType:
	return StateMachine.StateType.Invalid
3. Implementing the ‘State Machine’ Script
The code in the ‘State Machine’ script is responsible for several tasks: initializing the state machine, initializing each of the defined state nodes, calling the input, process, and physics functions of the state nodes, and managing state change transitions. It also includes an enum for all possible states, the initial state, and the current state of the state machine. This script contains the following methods:
_ready(): Initializes the state machine and all child state nodes._input(event: InputEvent): Invokes the input handler of the current state._process(delta: float): Invokes the main process handler of the current state._physics_process(delta: float): Invokes the physics process handler of the current state.ChangeState(nextState: State): Alters the current state and calls the Enter() and Exit() methods of the relevant states.
extends Node
class_name StateMachine

# Character-specific states
enum StateType { Idle, Run, Jump, Fall, Attack, Invalid }

@export var Character : CharacterBody2D = null		# A direct reference to the character node
@export var InitialState : State = null				# The initial state of the character

var m_CurrentState : State = null					# The current state of the character

# Initialize the state machine
func _ready() -> void:
	for child in get_children():
		var stateNode : State = child as State		# Get a reference to the child node and cast it to a State type
		stateNode.Initialize(Character)				# Initialize the state node and pass the target character node

	m_CurrentState = InitialState
	ChangeState(InitialState)						# Change the current state to the initial state

# Input method of the state machine
func _input(event : InputEvent) -> void:
	var nextState : StateType = m_CurrentState.StateInput(event)
	if (nextState != StateType.Invalid):
		ChangeState(get_child(nextState))

# Main process method of the state machine
func _process(delta : float) -> void:
	var nextState : StateType = m_CurrentState.StateMainProcess(delta)
	if (nextState != StateType.Invalid):
		ChangeState(get_child(nextState))

# Physics process method of the state machine
func _physics_process(delta : float) -> void:
	var nextState : StateType = m_CurrentState.StatePhysicsProcess(delta)
	if (nextState != StateType.Invalid):
		ChangeState(get_child(nextState))

# Change the current state to the given state
func ChangeState(nextState : State) -> void:
	m_CurrentState.Exit()
	m_CurrentState = nextState
	m_CurrentState.Enter()

	# Update debug layer
	DebugLayer.SetDebugText(m_CurrentState.StateName)
4. Implementing Each of the Character States: Idle, Run, Jump, Fall, and Attack
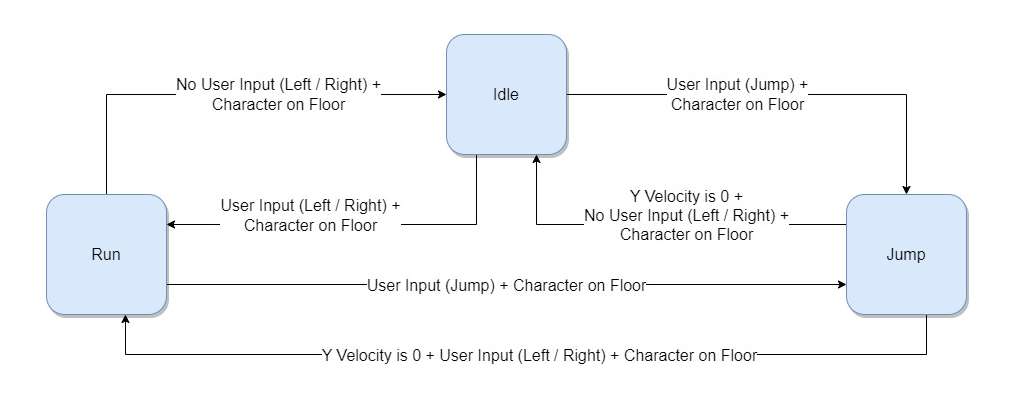
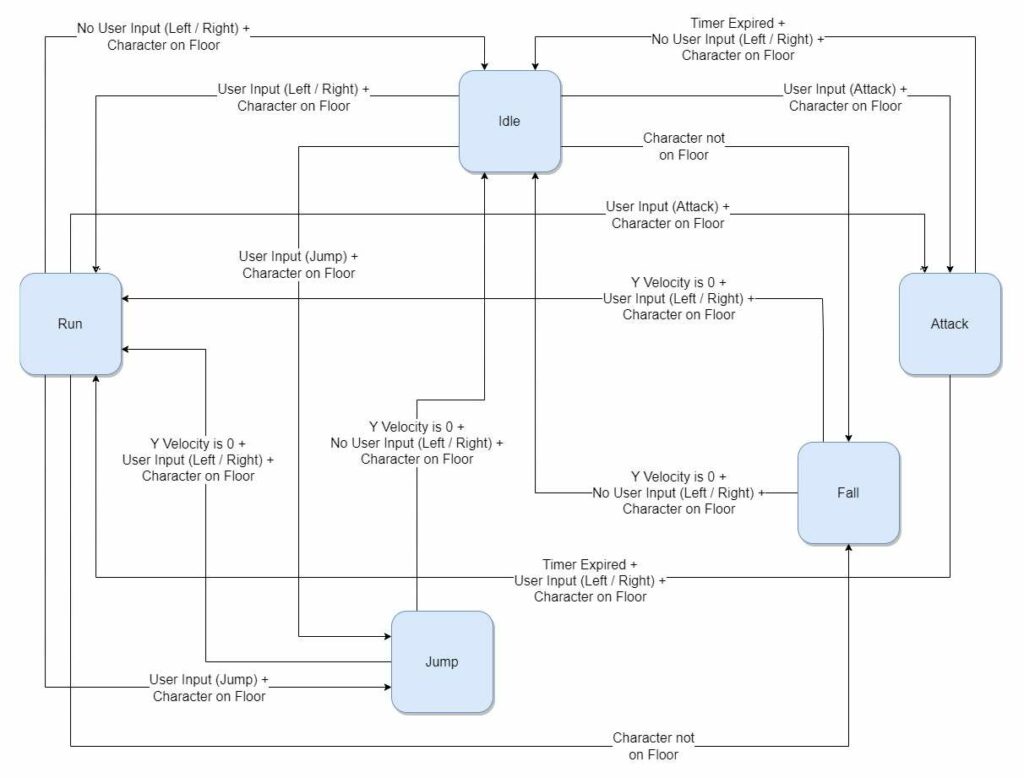
Each state script extends the base ‘State’ script and might override some or all of its methods. In the following code, I have implemented all methods, even those that don’t perform any actions, to ensure uniformity across all state scripts. The following diagram illustrates the state machine I implemented in the code below.
Code Snippet for the Character’s Idle State
While the character is in the ‘Idle’ state, the state script initiates the animation and checks for transitions to other states. It doesn’t involve any changes to the character’s properties.
extends State

# Initialize the state
func Initialize(characterBody : CharacterBody2D) -> void:
	super(characterBody)

# Method invoked upon entering the state
func Enter() -> void:
	super()

# Method invoked upon exiting the state
func Exit() -> void:
	super()

# Input method of the state machine
func StateInput(_event : InputEvent) -> StateMachine.StateType:
	return StateMachine.StateType.Invalid

# Main process method of the state machine
func StateMainProcess(_delta : float) -> StateMachine.StateType:
	return StateMachine.StateType.Invalid

# Physics process method of the state machine
func StatePhysicsProcess(_delta : float) -> StateMachine.StateType:
	var movementHorizontal = Input.get_axis("PlayerMoveLeft", "PlayerMoveRight")
	var characterJumped = Input.is_action_just_pressed("PlayerJump")
	var playerAttacked : bool = Input.is_action_just_pressed("PlayerAttack")

	# Check transition to 'Run' state
	if ((movementHorizontal != 0) and (m_CharacterBody.is_on_floor())):
		return StateMachine.StateType.Run

	# Check transition to 'Jump' state
	elif (characterJumped and (m_CharacterBody.is_on_floor())):
		return StateMachine.StateType.Jump

	# Check transition to 'Fall' state
	elif (not m_CharacterBody.is_on_floor()):
		return StateMachine.StateType.Fall

	# Check transition to 'Attack' state
	elif (playerAttacked and (m_CharacterBody.is_on_floor())):
		return StateMachine.StateType.Attack

	return StateMachine.StateType.Invalid
Code Snippet for the Character’s Run State
In the ‘Run’ state, the script plays footsteps sounds, updates the character’s horizontal velocity, flips its sprite direction if necessary, and checks for transitions to other states. Credits to InspectorJ for providing the footsteps sounds.
extends State

const NODE_NAME_AUDIO_RUN : String = "AudioRun"	# Name of the 'Run' audio node
const MOVEMENT_SPEED : float = 200.0			# Ground movement speed multiplier

var m_NodeAudioRun : AudioCollection = null		# A direct reference to the 'Run' AudioCollection node

# Initialize the state
func Initialize(characterBody : CharacterBody2D) -> void:
	super(characterBody)

	# Get state-specific audio nodes
	m_NodeAudioRun = m_NodeAudio.get_node(NODE_NAME_AUDIO_RUN)

# Method invoked upon entering the state
func Enter() -> void:
	super()

	# Play state-specific audio
	m_NodeAudioRun.Play()

# Method invoked upon exiting the state
func Exit() -> void:
	# Stop state-specific audio
	m_NodeAudioRun.Stop()

	super()

# Input method of the state machine
func StateInput(_event : InputEvent) -> StateMachine.StateType:
	return StateMachine.StateType.Invalid

# Main process method of the state machine
func StateMainProcess(_delta : float) -> StateMachine.StateType:
	return StateMachine.StateType.Invalid

# Physics process method of the state machine
func StatePhysicsProcess(_delta : float) -> StateMachine.StateType:
	var movementHorizontal : float = Input.get_axis("PlayerMoveLeft", "PlayerMoveRight")
	var characterJumped = Input.is_action_just_pressed("PlayerJump")
	var playerAttacked : bool = Input.is_action_just_pressed("PlayerAttack")

	# Check transition to 'Idle' state
	if ((movementHorizontal == 0) and (m_CharacterBody.is_on_floor())):
		return StateMachine.StateType.Idle

	# Check transition to 'Jump' state
	elif (characterJumped and (m_CharacterBody.is_on_floor())):
		return StateMachine.StateType.Jump

	# Check transition to 'Fall' state
	elif (not m_CharacterBody.is_on_floor()):
		return StateMachine.StateType.Fall

	# Check transition to 'Attack' state
	elif (playerAttacked and (m_CharacterBody.is_on_floor())):
		return StateMachine.StateType.Attack

	# Update character texture direction
	if (movementHorizontal != 0):
		m_NodeAnimation.set_flip_h(movementHorizontal < 0)

	# Update character movement velocity
	m_CharacterBody.velocity.x = movementHorizontal * MOVEMENT_SPEED

	return StateMachine.StateType.Invalid
Code Snippet for the Character’s Jump State
Upon entering the state, the ‘Jump’ script updates the character’s velocity in the y-axis with a constant value and plays the appropriate sound. In my example, I’ve allowed the character to move horizontally while in the air, so the main physics method continues receiving user input, updating the character’s velocity in the x-axis and flips the sprite as necessary. Lastly, it checks for transitions to other states. The jump sound was provided by felixyadomi.
extends State

const NODE_NAME_AUDIO_JUMP : String = "AudioJump"	# Name of the 'Jump' audio node
const MOVEMENT_SPEED : float = 180.0				# Air movement speed multiplier
const JUMP_VELOCITY : float = -460.0				# Initial character velocity upon jump

var m_NodeAudioJump : AudioStreamPlayer = null		# A direct reference to the 'Jump' AudioCollection node

# Initialize the state
func Initialize(characterBody : CharacterBody2D) -> void:
	super(characterBody)

	# Get state-specific audio nodes
	m_NodeAudioJump = m_NodeAudio.get_node(NODE_NAME_AUDIO_JUMP)

# Method invoked upon entering the state
func Enter() -> void:
	super()

	# Play state-specific audio
	m_NodeAudioJump.play()

	# Update character vertical movement velocity
	m_CharacterBody.velocity.y = JUMP_VELOCITY

# Method invoked upon exiting the state
func Exit() -> void:
	super()

# Input method of the state machine
func StateInput(_event : InputEvent) -> StateMachine.StateType:
	return StateMachine.StateType.Invalid

# Main process method of the state machine
func StateMainProcess(_delta : float) -> StateMachine.StateType:
	return StateMachine.StateType.Invalid

# Physics process method of the state machine
func StatePhysicsProcess(_delta : float) -> StateMachine.StateType:
	var movementHorizontal : float = Input.get_axis("PlayerMoveLeft", "PlayerMoveRight")

	# Check transition to 'Idle' state
	if ((m_CharacterBody.velocity.y == 0) and (movementHorizontal == 0) and (m_CharacterBody.is_on_floor())):
		return StateMachine.StateType.Idle

	# Check transition to 'Run' state
	elif ((m_CharacterBody.velocity.y == 0) and (movementHorizontal != 0) and (m_CharacterBody.is_on_floor())):
		return StateMachine.StateType.Run

	# Update character texture direction while jumping
	if (movementHorizontal != 0):
		m_NodeAnimation.set_flip_h(movementHorizontal < 0)

	# Update character movement velocity
	m_CharacterBody.velocity.x = movementHorizontal * MOVEMENT_SPEED

	return StateMachine.StateType.Invalid
Code Snippet for the Character’s Fall State
The ‘Fall’ state is entered when the character falls off a platform edge without jumping. A sound of the character hitting the ground plays when the state exits – signifying when the character hits the ground and shifts to the ‘Run’ or ‘Idle’ state.
Similar to the ‘Jump’ state, during the fall, it handles horizontal user input, updates the x-axis velocity, flips the sprite if needed, and lastly, checks for transitions to other states. The Fall state sound is an edited version of the land sound made by pekena_larva.
extends State

const NODE_NAME_AUDIO_FALL : String = "AudioFall"	# Name of the 'Fall' audio node
const MOVEMENT_SPEED : float = 180.0				# Air movement speed multiplier

var m_NodeAudioFall : AudioStreamPlayer = null		# A direct reference to the 'Fall' AudioStreamPlayer node

# Initialize the state
func Initialize(characterBody : CharacterBody2D) -> void:
	super(characterBody)

	# Get state-specific audio nodes
	m_NodeAudioFall = m_NodeAudio.get_node(NODE_NAME_AUDIO_FALL)

# Method invoked upon entering the state
func Enter() -> void:
	super()

# Method invoked upon exiting the state
func Exit() -> void:
	super()

	# Play state-specific audio
	m_NodeAudioFall.play()

# Input method of the state machine
func StateInput(_event : InputEvent) -> StateMachine.StateType:
	return StateMachine.StateType.Invalid

# Main process method of the state machine
func StateMainProcess(_delta : float) -> StateMachine.StateType:
	return StateMachine.StateType.Invalid

# Physics process method of the state machine
func StatePhysicsProcess(_delta : float) -> StateMachine.StateType:
	var movementHorizontal : float = Input.get_axis("PlayerMoveLeft", "PlayerMoveRight")

	# Check transition to 'Idle' state
	if ((m_CharacterBody.velocity.y == 0) and (movementHorizontal == 0) and (m_CharacterBody.is_on_floor())):
		return StateMachine.StateType.Idle

	# Check transition to 'Run' state
	elif ((m_CharacterBody.velocity.y == 0) and (movementHorizontal != 0) and (m_CharacterBody.is_on_floor())):
		return StateMachine.StateType.Run

	# Update character texture direction while falling
	if (movementHorizontal != 0):
		m_NodeAnimation.set_flip_h(movementHorizontal < 0)

	# Update character movement velocity
	m_CharacterBody.velocity.x = movementHorizontal * MOVEMENT_SPEED

	return StateMachine.StateType.Invalid
Code Snippet for the Character’s Attack State
The ‘Attack’ state differs from the other states because it doesn’t have a trigger to transition to another state. So, the only condition to move to a different state is time. That’s why I used a Timer node, which is a child of the attack state node. The timer in this example is set to 0.2 seconds with the ‘One Shot’ option enabled.
When entering the state, the script initiates the animation and plays the appropriate sound. All conditions for transitioning to other states involve checking whether the timer has expired. If the timer has run out, the state allows for transitioning to a different state. The attack sound is an edited version of the Sword Swing sound provided by julianmateo_. Thanks!
extends State

const NODE_NAME_AUDIO_ATTACK : String = "AudioAttack"				# Name of the 'Attack' audio node

@onready var m_NodeAttackTimer : Timer = get_node("AttackTimer")	# A direct referenec to the attack state timer

var m_NodeAudioAttack : AudioStreamPlayer = null					# A direct reference to the 'Attack' AudioStreamPlayer node

# Initialize the state
func Initialize(characterBody : CharacterBody2D) -> void:
	super(characterBody)

	# Get state-specific audio nodes
	m_NodeAudioAttack = m_NodeAudio.get_node(NODE_NAME_AUDIO_ATTACK)

# Method invoked upon entering the state
func Enter() -> void:
	super()

	# Play state-specific audio
	m_NodeAudioAttack.play()

	# Start the attack timer
	m_NodeAttackTimer.start()

# Method invoked upon exiting the state
func Exit() -> void:
	super()

# Input method of the state machine
func StateInput(_event : InputEvent) -> StateMachine.StateType:
	return StateMachine.StateType.Invalid

# Main process method of the state machine
func StateMainProcess(_delta : float) -> StateMachine.StateType:
	return StateMachine.StateType.Invalid

# Physics process method of the state machine
func StatePhysicsProcess(_delta : float) -> StateMachine.StateType:
	var movementHorizontal : float = Input.get_axis("PlayerMoveLeft", "PlayerMoveRight")

	# Check transition to 'Idle' state
	if (m_NodeAttackTimer.is_stopped() and (movementHorizontal == 0) and (m_CharacterBody.is_on_floor())):
		return StateMachine.StateType.Idle

	# Check transition to 'Run' state
	elif (m_NodeAttackTimer.is_stopped() and (movementHorizontal != 0) and (m_CharacterBody.is_on_floor())):
		return StateMachine.StateType.Run

	return StateMachine.StateType.Invalid
Running the 2D Platformer Example Project
In the video, you can see the current FPS and character state in the top left corner of the screen.
Conclusion
Congratulations on making it this far in the article. I hope it has helped you learn how to build a basic state machine in Godot. Once you’ve set up a state machine, you can expand its capabilities and add the additional features your game needs.
Sources of Information for this Article
- Starter state machines in Godot 4 by The Shaggy Dev: https://youtu.be/oqFbZoA2lnU?si=TsEqKkFaxSFqYS49
- Finite State Machines in Godot 4 in Under 10 Minutes by Bitlytic: https://youtu.be/ow_Lum-Agbs?si=w4ZZ1vwGX-zUnTUs
- Godot ‘State’ design pattern: https://docs.godotengine.org/en/3.2/tutorials/misc/state_design_pattern.html
Learning More About Godot and Game Development
Getting into game development means diving into computer science, math, art, and much more. My forte is in computer science and code architecture, which helps me develop system-driven games.
For more on the tech side of game making, go to my Night Quest Games Blog. You’ll find loads of articles on software and game development, data structures, game systems, and cool Godot engine guides. See you there!
If the information in this article was helpful to you, please consider supporting this blog through a donation. Your contributions are greatly appreciated and allow me to continue maintaining and developing this blog. Thank you!


