The Godot 4 engine can handle all kinds of input types, including input from a keyboard, mouse, and a variety of joysticks and gamepads. In this article, I will show you how to hook up input devices to your project in Godot. I will use the term “Input Controller” to describe the code necessary for detecting and reacting to user input events.
Setting Up an Input Controller in Godot
Setting up the input is fairly easy in Godot. The process consists of two simple steps, which I describe in detail below.
Step 1: Defining an Input Map
The input map functions as a translation mechanism from physical input (keyboard/mouse/joypad) to logical actions (walk/jump/shoot). For each logical action, you can have one or more inputs connected to it. The game logic will only refer to the defined action and not the connected inputs.
To change the input map, click on ‘Project’ in the top menu bar, then select ‘Project Settings’. In the project settings window, go to the ‘Input Map’ tab to see the input mapping.
To add an action, write the action name in the ‘Add New Action’ field and click the ‘Add’ button next to it. You should see your new action appear in the list.
You can now connect an input to this action by clicking on the plus icon on the right side of your new action. Then, click the physical button or key you want to connect, and press ‘OK’. You can add as many inputs as you like to the same action.
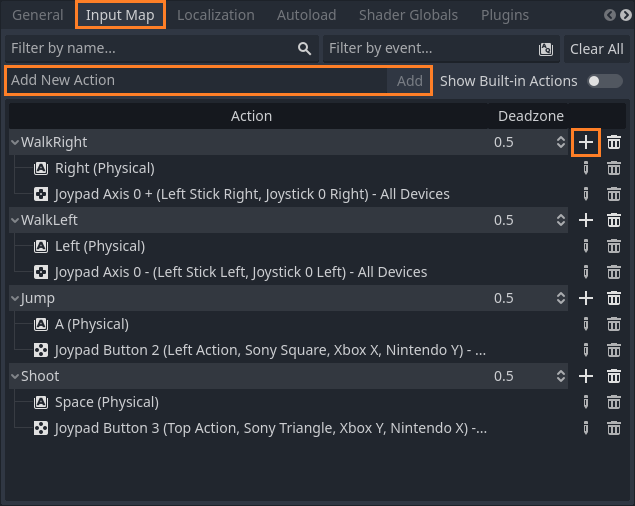
Example: Connecting Actions for 2 Platforms
In the above image, you can see that I connected each action to two inputs: one for a desktop (keyboard) and another for a console (joypad). Godot will automatically detect which platform the game is running on and use the appropriate input mappings from the Input Map.
Step 2: Connecting the Input Map to the Code
Now that you have mapped the inputs to concrete actions in your game, it is time to pull these actions and apply logic based on their states. You can check if user input is received by pulling the actions from the code. Here are several basic methods that will get you started:
Input.is_action_pressed(action)orInput.is_action_released(action)– Returns true if any of the inputs for a given action are currently pressed / released (even if the button or key is held for a long time).Input.is_action_just_pressed(action)orInput.is_action_just_released(action)– Returns true if any of the inputs for a given action were just pressed / released (returns true for the first input, and false if the button or key is held).Input.get_axis(negative_action, positive_action)– Returns the difference between 2 actions (returns a positive value if the positive_action was performed or a negative value if the negative_action was performed).
For a more in-depth explanation about input events and the input map, I encourage you to read the official Godot documentation at https://docs.godotengine.org/en/stable/tutorials/inputs/inputevent.html.
Example: Checking User Input From the Code
The code below checks for user input and changes the player’s state machine based on the performed action. For example, if the user performed the ‘Jump’ action (defined as the ‘A’ key in the input map) and is still on the floor, the playerJumped variable will be set to true and the player’s state will be changed to EPlayerState.Jump.
# Pull user inputs
var movementHorizontal = Input.get_axis("WalkLeft", "WalkRight")
var movementVertical = Input.is_action_just_pressed("Jump")

# Translate user input to player state
var playerRan = is_on_floor() and movementHorizontal
var playerIdle  = is_on_floor() and not movementHorizontal
var playerJumped = is_on_floor() and movementVertical

# Update player movement direction
PlayerMovementDirection.x = movementHorizontal if (movementHorizontal != 0) else PlayerMovementDirection.x

# Update player state machine
if (playerJumped and PlayerState != EPlayerState.Jump):
	PlayerState = EPlayerState.Jump

elif (playerRan and PlayerState != EPlayerState.Run):
	PlayerState = EPlayerState.Run

elif (playerIdle and PlayerState != EPlayerState.Idle):
	PlayerState = EPlayerState.Idle
Note: Keyboard keys and mouse buttons are binary operations, meaning a button or key can only be either pressed or released. On the other hand, joypads and joysticks can have action ‘strength’, which represents how far the user pulled on the controller’s axis.
You can check the strength of an action by using the Input.get_action_strength(action) method. This method returns a value between 0 and 1, representing the intensity of the given action.
Adding the Input Controller to the Godot Project
So far we have discussed how to implement the logic to pull input from the user. Now I want to show you where you can insert this code in your project. There are two things to consider: which node should be responsible for the input? and where in the node’s code should you put the input controller code.
Which Node Should Be Checking for Input?
The node that checks for user input is usually the one that has the most work to do with the information. It will almost always be the main character node who decides what to do with the user input information.
Sometimes you might want to do several things on different nodes, following a user input event. To do this, you have two main options:
- Implementing the same input code in all nodes that require this information and react differently for each one.
- Implementing the input code once in your main node and distributing the information to all other nodes that require it. The distribution can be either by emitting signals, or by directly calling methods from other nodes.
Example: Inflicting Damage to All Enemies Using Signals
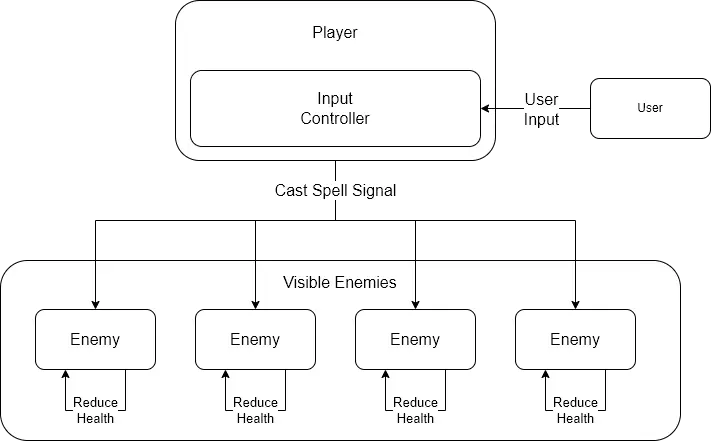
Imagine you have a player character with the ability to cast a spell that hurts all enemies seen on the screen. In this scenario, the player node is the main input controller.
When the user presses the key that triggers the spell, the player node receives this input, plays the player spell animation, and sends a group signal to all enemies visible on the screen. Upon receiving the signal, each enemy will reduce its health by some amount and play an animation to indicate that the enemy was hurt.
You can see an illustration of the architecture in the attached image.
To learn more about how signals work in Godot, read my article How to Use Signals for Node Communication (With Examples). In this article, I explain the basic concept of signals and how to use them to your advantage.
Where Shoud the Input Controller Code Be Placed?
The second thing you need to consider is where to put the logic that detects and handles user inputs in your code. There are several methods you can override to apply your input logic, each one has a different meaning and implications:
_process(delta)is called from the ‘idle’ process, which can run at any frame rate a machine can handle. An input controller may be implemented in this method only if it does not involve physics. For example, game logic, character state updates, UI updates, and animation changes can be included in this method._physics_process(delta)is called from the physics engine and runs at a fixed frame rate (60 fps by default). Input handling may be implemented in this method for almost every case, including non-physics related actions._input(event)is called only when an input is detected. You can query the event parameter to understand which input event occurred. This is the recommended method for input detection and handling._unhandled_input(event)is called for input events which are not marked as “handled” in any other previous method. To mark an input event as “handled”, invoke theget_viewport().set_input_as_handled()method.
Important: It is generally not recommended to check for input events in the _process(delta) or _physics_process(delta) methods. Since these methods are called many times each second, the unnecessary input checks might hurt your game’s performance. Using _input(event) or _unhandled_input(event) is much better for performance because these functions are only called when an actual input is detected.
Note: In addition to the four methods I mentioned above, Godot offers more methods for detecting input in specific cases. For example, you have the _unhandled_key_input(event) method, which is called for unhandled key events (ignores mouse and joypad movement). Another example is the _gui_input(event) method available in the ‘Control’ nodes. It is called only for user interface events such as button press events.
Implementing the “Single Input Controller” Example
The code below is a basic implementation of the “Single Input Controller” example I described in the previous section. For more input handling examples, go to https://docs.godotengine.org/en/stable/tutorials/inputs/input_examples.html.
Implementation of the Enemy Class (Enemy.gd)
extends CharacterBody2D
class_name Enemy

var m_Health : int

# Initialize the enemy node
func _ready() -> void:
	m_Health = 100

# Change the enemy health points by a given offset
func ChangeHealth(offset) -> void:
	m_Health += offset

	if (m_Health <= 0):
		_HandleEnemyDeath()

# Get the current health of the enemy
func GetHealth() -> int:
	return m_Health

# Handler for enemy death
func _HandleEnemyDeath():
	print("%s has died" % name)
Implementation of the Player Class (Player.gd)
extends CharacterBody2D
class_name Player

# Signal indicating the player has cast a spell
signal SignalCastSpell()

# Handle the user input
func _input(event) -> void:
	if (Input.is_action_just_pressed("CastSpell")):
		SignalCastSpell.emit()
		get_viewport().set_input_as_handled()
Implementation of the World Class (World.gd)
extends Node2D
class_name World

# Initial number of enemies in the world
@export var InitialAmount : int = 0

# Current number of enemies in the world
@onready var m_NumberOfEnemies = InitialAmount

# Get the player node
@onready var m_PlayerNode : CharacterBody2D = get_node("Player")

# Initialize the world node
func _ready() -> void:
	# Generate enemies in the world
	for enemyIndex in m_NumberOfEnemies:
		var enemy = Enemy.new()
		enemy.name = "Enemy" + str(enemyIndex)
		add_child(enemy)

		print("%s was created" % enemy.name)

	# Connect the world to the player's signals
	m_PlayerNode.SignalCastSpell.connect(_OnPlayerCastSpell)

# Callback method for the 'SignalCastSpell' signal
func _OnPlayerCastSpell() -> void:
	print("Player cast a spell")
	for enemyIndex in m_NumberOfEnemies:
		var enemy = get_node("Enemy" + str(enemyIndex))
		enemy.ChangeHealth(-10)
		print("%s got hit by the spell. Current health is %d" % [enemy.name, enemy.GetHealth()])
Common Questions About Input Detection in Godot
What is the Difference Between _input(event) and _unhandled_input(event) methods?
The _input(event) method is called for each detected input, including mouse movement, mouse buttons, keyboard, joystick, and joypad events. On the other hand, the _unhandled_input(event) method is called only for input events that were not marked as “handled” in any preceding method.
How Do I Set the Detected Input Event as “Handled”?
You can mark an input event as “handled” by calling get_viewport().set_input_as_handled() method in your node’s script. Input events marked as “Handled” will not trigger the _unhandled_input(event) method call.
How Do I Get the Delta Time inside the _input(event) method?
To get the delta time in any method in your node’s script, simply call one of the following methods:
get_process_delta_time()– returns the delta time of the main processget_physics_process_delta_time()– returns the delta time of the physics process
Where is the Best Place to Check for Input Events?
The recommended method to check for input events is the _input(event) method. This method will be called only when a user input is detected. In contrast, the _process(delta) or _physics_process(delta) methods are called every frame. Checking for input in those functions will result in a lot of redundant input checks and might hurt your game’s performance.
Can I Map Several Input Devices for Different Platforms in the Same Project?
Yes, for every project, Godot provides you with an Input Map. Using this map, you can connect as many inputs as you like to an action in your game. To connect several platforms, add the controls of all platforms you would like your game to support for each action.
Can I Dynamically Add or Remove Input Actions in Code at Runtime?
Yes. GDScript allow you to add or remove inputs at game runtime. You can change the input map by using the InputMap.action_add_event(action, event) or InputMap.action_erase_event(action, event) methods.
# Add a new action and input event to the input map
var actionName = "Crawl"
var inputEvent = InputEventKey.new()
inputEvent.set_physical_keycode(KEY_S)    # Set the 'S' key as the input of the event

# Add a new action to the input map
InputMap.add_action(actionName)

# Add an input event to the new action
InputMap.action_add_event(actionName, inputEvent)
# Remove an input event and an action from the input map
var actionName = "Crawl"
var inputEvent = InputEventKey.new()
inputEvent.set_physical_keycode(KEY_S)    # Set the 'S' key as the input of the event

# Remove an input event from the action
InputMap.action_erase_event(actionName, inputEvent)

# Remove the action from the input map
InputMap.erase_action(actionName)
Summary
Input handling is a large subject which I can’t cover in a single article, but hopefully, this article gave you the basis for understanding how input works in Godot. If you are having a tough time and need help, write to me in the comments below, and I will try to help.
To learn more about game development and Godot, I welcome you to read interesting articles and guides on my Night Quest Games Blog. I wish you the best in your game dev journey!
If the information in this article was helpful to you, please consider supporting this blog through a donation. Your contributions are greatly appreciated and allow me to continue maintaining and developing this blog. Thank you!


