For games that use a camera that can zoom in and out, making a smooth camera zoom could really improve the user experience, you know, adding a bit of that wow effect. Plus, you will see how I implement dynamic zoom limits and package all the code into one function.
In this article, you are going to learn how to implement smooth Camera2D zoom controlled with the mouse wheel and define zoom limits. If you are more of a visual learner, I created the video version of this article on YouTube. And if not, read on.
Setting Up the Project’s Input Map
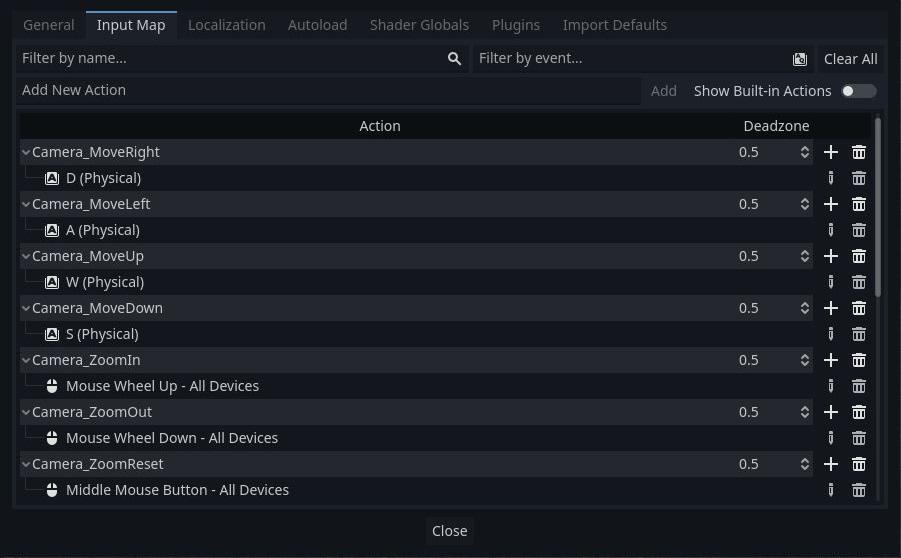
First, we need to define all actions and their inputs in the project’s input map. Go to the ‘Project’ menu, found in the top menu bar, and select ‘Project Settings’. In the new window, go to the ‘Input Map’ tab, and add all the actions your game requires.
Godot’s input system is easy to understand. The project’s input map defines specific keys and buttons for each action, and actions are subsequently connected to the logic in the code.
In my case, I want to add camera movement: right, left, up, and down, which will be controlled by the WASD keys. I also want camera zoom-in and zoom-out actions, which will be controlled by the mouse wheel.
Finally, I need a zoom-reset action so that I can return to the default zoom setting easily. This will be done with the mouse middle button.
Basic Camera2D Movement in Godot
Now that the input map is completed, we can reference the actions and attach logic for each one in the camera script.
Select the Camera2D node from the scene tree and add a script to it. We’ll start by implementing the camera movement in the _process(delta) method. This will ensure the user input is checked every frame and not wait for input events from the system.
For each action, I am checking to see whether the key was pressed. If the key was pressed, I move the camera to the corresponding direction.
const CAMERA_MOVEMENT_SPEED : float = 10

func _process(_delta) -> void:
	if (Input.is_action_pressed("Camera_MoveRight")):
		move_local_x(CAMERA_MOVEMENT_SPEED)

	elif (Input.is_action_pressed("Camera_MoveLeft")):
		move_local_x(-CAMERA_MOVEMENT_SPEED)

	if (Input.is_action_pressed("Camera_MoveUp")):
		move_local_y(-CAMERA_MOVEMENT_SPEED)

	elif (Input.is_action_pressed("Camera_MoveDown")):
		move_local_y(CAMERA_MOVEMENT_SPEED)
Note: If you put the code in the _input(event) method, it will work too, but then you will get a small time delay whenever you press and hold a key (repeat key). This happens because the _input(event) method is called only when there is an input event emitted by the viewport. For smooth movement, we need to check the state of the keys every frame. That’s why I put all the code in the _process(delta) method.
Simple Camera2D Zoom with the Mouse Wheel
Define two new constants: the camera zoom speed (CAMERA_ZOOM_SPEED) and the camera zoom default value (CAMERA_ZOOM_DEFAULT). The camera zoom speed is the speed at which the camera zooms in and out, and the zoom default value will be used to reset the zoom. Both of these constants must be a Vector2 type because the camera can zoom in each axis separately.
To check if the mouse wheel was scrolled up or down, we use the is_action_just_pressed() method. If the mouse wheel was scrolled, we multiply the current zoom value by the camera zoom speed factor. If you are still having trouble with Godot’s input action interface, you can always consult the official docs at: https://docs.godotengine.org/en/stable/classes/class_input.html
To implement the zoom reset logic, we check whether the middle mouse button is pressed. If it is, we set the camera zoom value to the default vector.
const CAMERA_MOVEMENT_SPEED : float = 10
const CAMERA_ZOOM_SPEED : Vector2 = Vector2(0.6, 0.6)
const CAMERA_ZOOM_DEFAULT : Vector2 = Vector2(1.0, 1.0)

func _process(_delta) -> void:
	if (Input.is_action_pressed("Camera_MoveRight")):
		move_local_x(CAMERA_MOVEMENT_SPEED)

	elif (Input.is_action_pressed("Camera_MoveLeft")):
		move_local_x(-CAMERA_MOVEMENT_SPEED)

	if (Input.is_action_pressed("Camera_MoveUp")):
		move_local_y(-CAMERA_MOVEMENT_SPEED)

	elif (Input.is_action_pressed("Camera_MoveDown")):
		move_local_y(CAMERA_MOVEMENT_SPEED)

	if (Input.is_action_just_pressed("Camera_ZoomIn")):
		set_zoom(get_zoom() * (CAMERA_ZOOM_DEFAULT + CAMERA_ZOOM_SPEED))

	elif (Input.is_action_just_pressed("Camera_ZoomOut")):
		set_zoom(get_zoom() / (CAMERA_ZOOM_DEFAULT + CAMERA_ZOOM_SPEED))

	elif (Input.is_action_just_pressed("Camera_ZoomReset")):
		set_zoom(CAMERA_ZOOM_DEFAULT)
Note: If you add the CAMERA_ZOOM_SPEED to the current zoom value, it will zoom-in and zoom-out, but then you will get non-linear texture scaling. The non-linearity will cause the zoom to slow down as you get closer and speed up when the camera gets far from the scene, which is why I multiplied the current zoom by a scale factor.
Defining Camera2D Zoom Limits
Let’s set a minimum and a maximum value for our camera zoom. The minimum and maximum values will ensure the user doesn’t get too close or goes too far from the scene.
Define two constants that represent the minimum and maximum values for the camera zoom. In the ‘Camera_ZoomIn’ action, check if the camera is below the maximum zoom value we defined. And in the ‘Camera_ZoomOut’ action, check if the camera is still above the minimum zoom value we defined.
const CAMERA_MOVEMENT_SPEED : float = 10
const CAMERA_ZOOM_SPEED : Vector2 = Vector2(0.6, 0.6)
const CAMERA_ZOOM_DEFAULT : Vector2 = Vector2(1.0, 1.0)
const CAMERA_ZOOM_MIN : Vector2 = Vector2(0.6, 0.6)
const CAMERA_ZOOM_MAX : Vector2 = Vector2(2.0, 2.0)

func _process(_delta) -> void:
	if (Input.is_action_pressed("Camera_MoveRight")):
		move_local_x(CAMERA_MOVEMENT_SPEED)

	elif (Input.is_action_pressed("Camera_MoveLeft")):
		move_local_x(-CAMERA_MOVEMENT_SPEED)

	if (Input.is_action_pressed("Camera_MoveUp")):
		move_local_y(-CAMERA_MOVEMENT_SPEED)

	elif (Input.is_action_pressed("Camera_MoveDown")):
		move_local_y(CAMERA_MOVEMENT_SPEED)

	if (Input.is_action_just_pressed("Camera_ZoomIn")):
		if (get_zoom() < CAMERA_ZOOM_MAX):
			set_zoom(get_zoom() * (CAMERA_ZOOM_DEFAULT + CAMERA_ZOOM_SPEED))

	elif (Input.is_action_just_pressed("Camera_ZoomOut")):
		if (get_zoom() > CAMERA_ZOOM_MIN):
			set_zoom(get_zoom() / (CAMERA_ZOOM_DEFAULT + CAMERA_ZOOM_SPEED))

	elif (Input.is_action_just_pressed("Camera_ZoomReset")):
		set_zoom(CAMERA_ZOOM_DEFAULT)
Adding Tweens for Smooth Camera2D Zoom
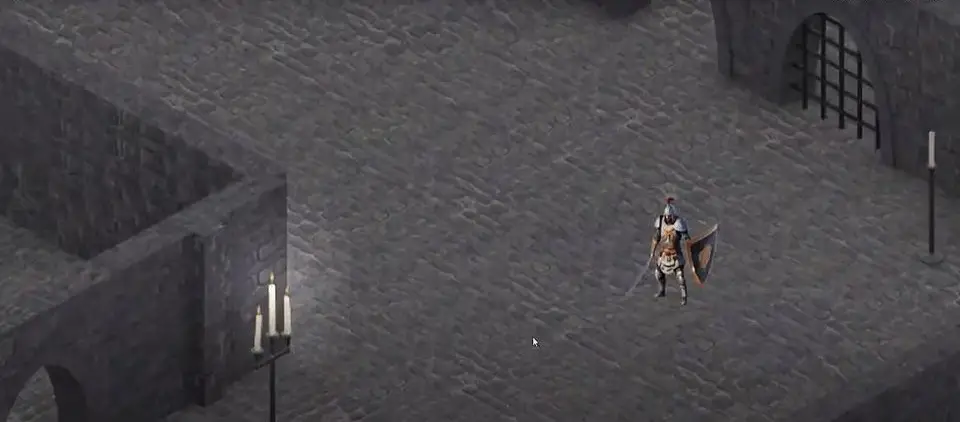
Now we are going to make cool zoom-in and zoom-out effects with the camera. The goal is to make smooth zooming with a custom transition function. We can achieve this effect using the famous Tweens provided by Godot.
First, we need a tween to make the smooth zoom and custom transitions. Then, we create a new tween object and call the tween_property method with a custom transition.
Finally, we add a couple of checks to determine whether the tween can be started. If the tween is not valid, or it hasn’t started yet, we can start it. This is done to prevent the tween from being restarted continuously while the user scrolls the mouse wheel.
Note: to achieve the camera zoom out, you need to divide the current zoom value by the same factor as the zoom in effect.
const CAMERA_MOVEMENT_SPEED : float = 10
const CAMERA_ZOOM_SPEED : Vector2 = Vector2(0.6, 0.6)
const CAMERA_ZOOM_DEFAULT : Vector2 = Vector2(1.0, 1.0)
const CAMERA_ZOOM_MIN : Vector2 = Vector2(0.6, 0.6)
const CAMERA_ZOOM_MAX : Vector2 = Vector2(2.0, 2.0)
const CAMERA_TWEEN_DURATION : float = 0.5

var m_CameraTween : Tween = null

func _process(_delta) -> void:
	if (Input.is_action_pressed("Camera_MoveRight")):
		move_local_x(CAMERA_MOVEMENT_SPEED)

	elif (Input.is_action_pressed("Camera_MoveLeft")):
		move_local_x(-CAMERA_MOVEMENT_SPEED)

	if (Input.is_action_pressed("Camera_MoveUp")):
		move_local_y(-CAMERA_MOVEMENT_SPEED)

	elif (Input.is_action_pressed("Camera_MoveDown")):
		move_local_y(CAMERA_MOVEMENT_SPEED)

	if (Input.is_action_just_pressed("Camera_ZoomIn")):
		if (get_zoom() < CAMERA_ZOOM_MAX):
			if (m_CameraTween == null or not m_CameraTween.is_running()):
				m_CameraTween = create_tween()
				m_CameraTween.tween_property(self, "zoom", get_zoom() * (CAMERA_ZOOM_DEFAULT + CAMERA_ZOOM_SPEED),
												CAMERA_TWEEN_DURATION).set_trans(Tween.TRANS_CUBIC)

	elif (Input.is_action_just_pressed("Camera_ZoomOut")):
		if (get_zoom() > CAMERA_ZOOM_MIN):
			if (m_CameraTween == null or not m_CameraTween.is_running()):
				m_CameraTween = create_tween()
				m_CameraTween.tween_property(self, "zoom", get_zoom() / (CAMERA_ZOOM_DEFAULT + CAMERA_ZOOM_SPEED),
												CAMERA_TWEEN_DURATION).set_trans(Tween.TRANS_CUBIC)

	elif (Input.is_action_just_pressed("Camera_ZoomReset")):
		set_zoom(CAMERA_ZOOM_DEFAULT)
You can see in the code that I used the TRANS_CUBIC transition to make a cool zoom transition, but you can choose any transition that will fit your game.
My Take on Camera2D Zoom in Godot
Godot provides a nice interface to control the zoom of the camera. The manipulation of the camera’s location and zoom, as mentioned in this article, is achieved with simple logic that you can implement and modify to suit your needs. The only thing a bit more advanced here is the usage of tweens.
I hope this article was helpful to you. If you want to dramatically improve your game development skills, visit the Night Quest Games Blog. You will find many resources and guides there that will help you on your journey to greatness! Best of luck.
