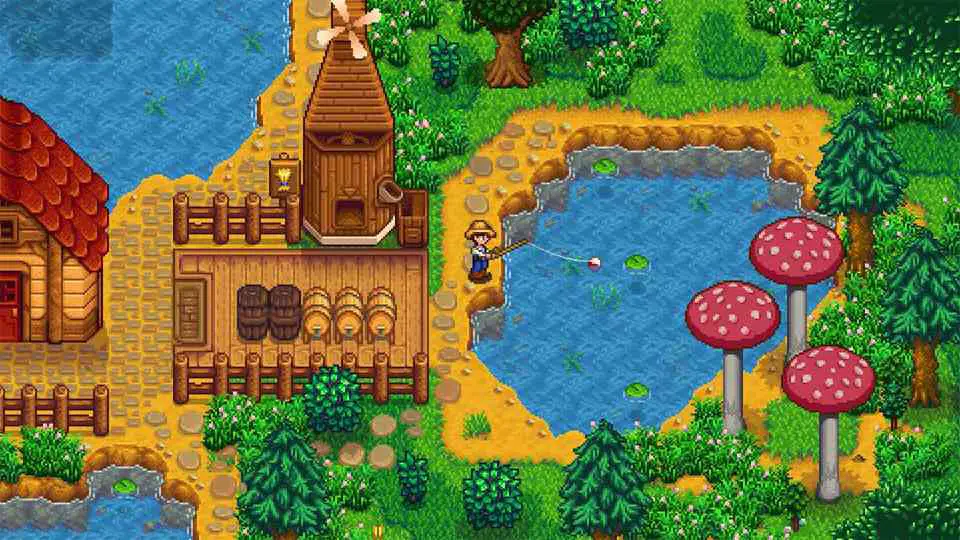
In the famous indie game Stardew Valley, the map consists of several terrain types, such as grass, sand, and water. Although it may seem easy to create all map tiles, it’s actually quite complex. Each tile can consist of multiple terrains, and each terrain type can appear in a different section of the tile.
This means that creating a complex map would require accurate fitting of each tile to its surrounding tiles, based on the neighboring terrain types and their angle. Matching each tile to its neighbors can be a tedious endeavor and take a lot of development time. This is where Godot’s tilemap terrains feature comes in.
Tilemap terrains allow you to create complex tile structures without mapping each tile individually. In this case, you can define the patterns of drawing terrains by matching each tile’s corners and sides to the tiles around it.
In this article, I will show you step by step how to create tilemap terrains, match tile corners and sides, and create maps amazingly quickly. Additionally, I will give some examples of how to access the tilemap terrains from GDScript code and modify them. Let’s get into it.
Defining Terrain Sets and Terrains for a Tilemap in Godot 4
Here is a step-by-step guide you can follow to define terrain sets and terrains for your tilemap in Godot 4.
Step 1: Creating a New Terrain Set and Terrain
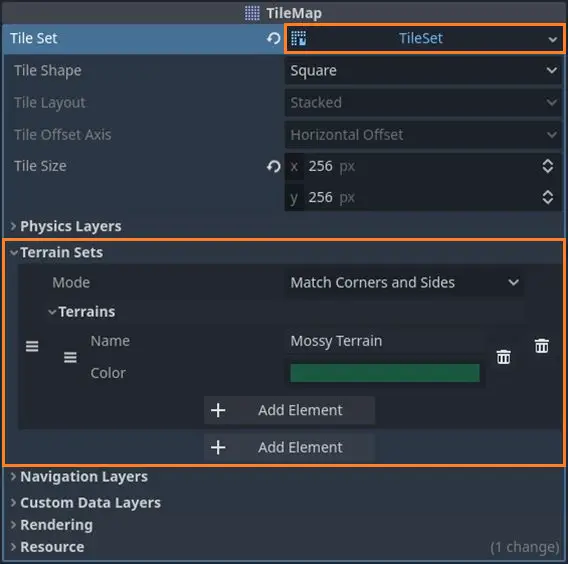
Since tiles are matched according to their terrain type, as well as other parameters, they are defined in groups called Terrain Sets. Each Terrain Set can contain multiple terrains, which are matched during the drawing process. To create a new terrain set and add your terrains, follow these steps:
- Select your tilemap node from the scene tree and open the TileSet object found in the ‘Inspector’ panel.
- Open the ‘Terrain Sets’ section and click on the ‘Add Element’ button. This will create a new terrain set.
- Click the ‘Add Element’ button just below the ‘Terrains’ section to add a new terrain.
- Give the new terrain a name and a color to represent it. The color does not affect the tiles themselves.
- Keep adding as many terrains as you need for your game.
Step 2: Selecting the Most Suitable Mode for Your Terrain Set
The matching mode defines which neighbors are matched to a center tile. Here are the available options:
- Match Corners and Sides: requires both corners and sides to match with neighboring terrains.
- Match Corners: requires corners to match with neighboring terrains.
- Match Sides: requires sides to match with neighboring terrains.
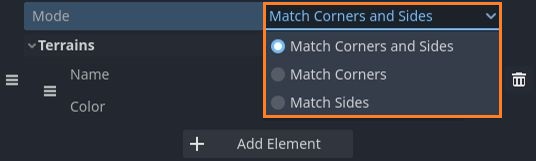
Your choice would depend on the type of game and terrain you want to create. To build a map in a top-down / platformer game, you would usually use the ‘Match Corners and Sides’ option. On the other hand, simple roads, pipes or other objects that follow a path would use the ‘Match Sides’ or ‘Match Corners’ modes.
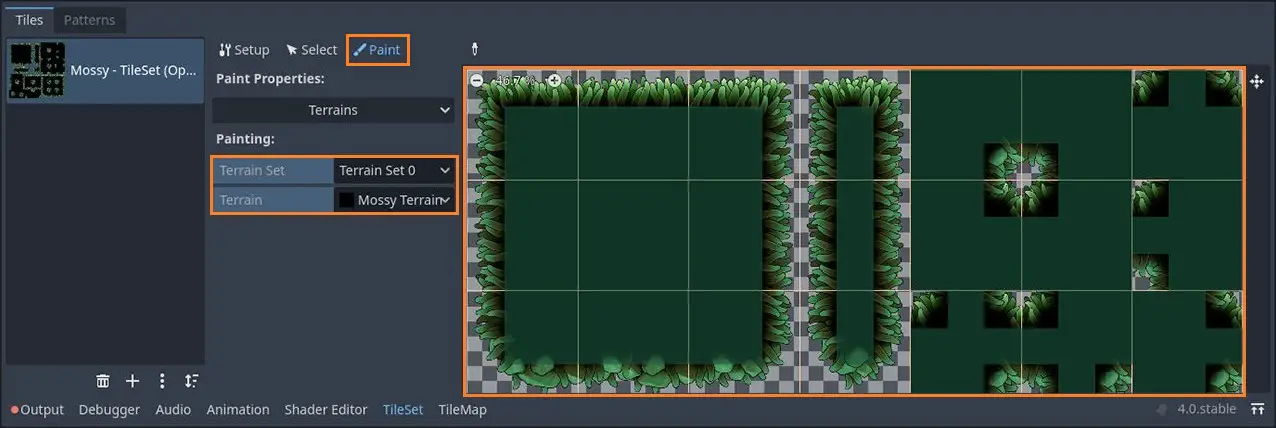
Step 3: Defining the Peering Bits for Each Tile
The next step is to define how Godot matches the tiles together. Every time you paint the terrain in your scene, Godot will take into consideration the terrain types and peering bits you are going to define in this step. Here is what you need to do:
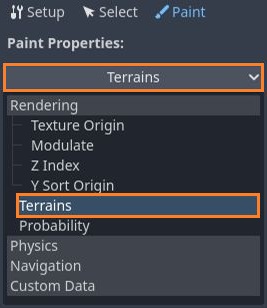
- Select your tilemap node from the scene tree and go to the ‘TileSet’ tab at the bottom of the screen.
- In the tile set properties tab, select the ‘Paint’ tab at the top of the window (the little brush icon).
- In the ‘Paint Properties’ field, open the drop-down box and choose the ‘Terrains’ property. There you will see all the terrain sets you defined in the Inspector.
- Select your terrain set and the specific terrain you want to configure. Once selected, you will see some markings on the tile set images.
- Click one time on each tile to activate the selected terrain for that tile.
- For each active tile, draw the peering bits specific to that tile.
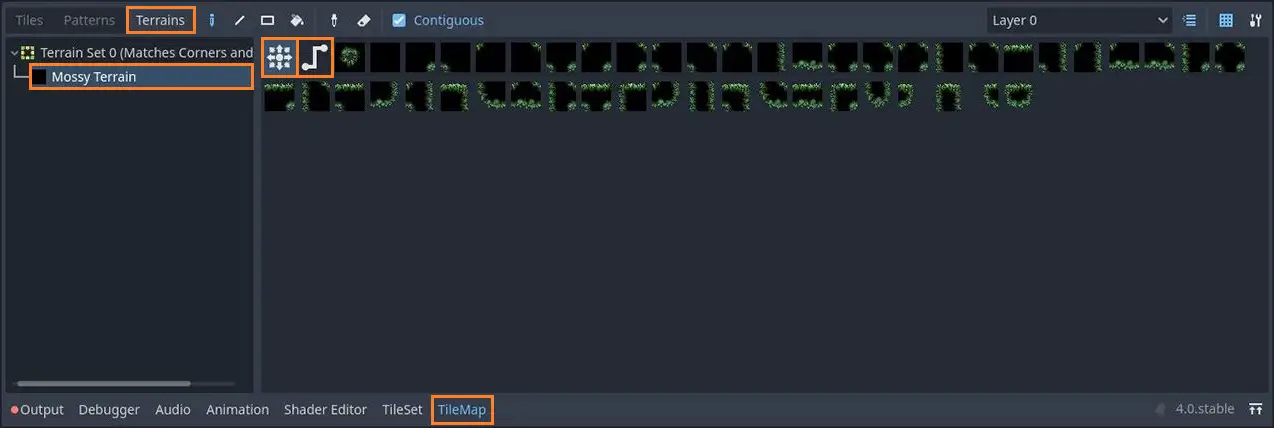
But wait, how do I choose the peering bits so that my terrain is drawn correctly? It may seem complicated at first, but actually, it’s quite easy. The peering bits dictate the following: A tile will appear only if all of its marked peering bits should be drawn on the map. Let’s take the ‘Match Corners and Sides’ (3×3) mode as an example. In this case, the top-left corner of a platform will require 3 other tiles: the right, bottom, and bottom-right tiles to appear as well.
There is a very simple visual way of marking these bits. Mark the bits on top of the inner space of your terrain. You can see a clear example of this method in the image above.
Note: In order to draw the entire map correctly, you will need a full tile set. For example, a ‘Match Corners and Sides’ mode (3×3) will require 49 different tiles to create all types of corners and angles of a 2D platformer game level. Each mode will have its own number of required tiles to create a proper tile map. A partial tile set will cause some unexpected placement of tiles.
Step 4: Choosing the Right Paint Mode for Your Scene
The paint mode is the approach the Godot editor takes when trying to paint a terrain. There are two options in Godot 4:
- Connect Mode: paints a terrain, then connects it with the surrounding tiles with the same terrain.
- Path Mode: paints a terrain, then connects it to the previous tile painted within the same stroke.
The first paint mode is good for painting maps where you have one or more different terrains, while the second mode is suitable for painting things like roads, pipes, or anything that follows a path. You can choose the paint mode by following these steps:
- While the tilemap node is selected, go to the ‘TileMap’ tab at the bottom window.
- Click on the ‘Terrains’ tab at the top of the window.
- Select the terrain set and terrain you want to paint from the list.
- In the main area of the window, you will see two symbols representing the two paint modes I described. Select one of them to activate it.
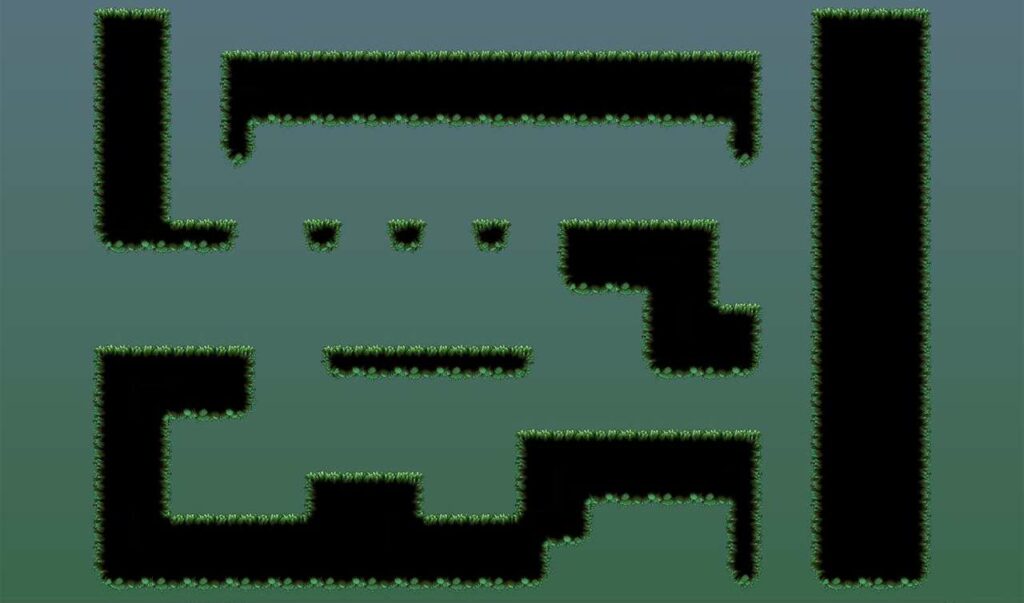
Step 5: Painting the Scene Using the Selected Terrain
Once you have done all the previous steps, you are ready to start creating your tilemap. Start drawing your terrain in the main scene window. When you are done painting one terrain type, you can switch to the next terrain and start painting that one too. Keep iterating over the terrain painting process until your map is complete.
Note: In some games, you might need more terrain sets to differentiate between levels, worlds, places, etc. To do that, you can simply go back to the tilemap Inspector panel and add more TerrainSet objects to the list. Define new terrains and start creating whole new levels and worlds. This will give your game some diversification and keep the player hooked.
Accessing the Terrain Set and Terrains From GDScript
Accessing terrain sets and terrains from GDScript code is possible and can be quite useful in some cases. In this section, I want to talk about why one would need to access the terrain data from GDScript code, how to do it, and finally give an example of creating and modifying a terrain set from the code.
Why Would I Want to Access the Terrains From GDScript?
In some cases, you would want to access the terrain sets and terrains from GDScript code at runtime. Examples of these cases would be to import/export terrain sets and terrain information to an external file, creating procedurally generated tilemaps, and more.
Accessing the terrain set data from GDScript is not necessary to create a tilemap with terrains. You can create a tilemap with terrains and configure everything from the Godot editor. However, if you need to add, query, or modify terrain sets or terrains at game runtime, you will need some APIs to do that.
How to Define, Read and Modify the Terrain Sets From GDScript
The internal data structures of Tilemap can be quite complex and overwhelming at first, but don’t worry – I’ve got you covered.
Each Tilemap contains a slot for a TileSet object, which can be easily assigned through the Godot editor. The TileSet contains all the information about tiles, terrains, collision, animation, and others. Within a TileSet, you have several structures like the terrain_set list and a TileSetSource. Each value in the terrain_set list contains a list of Terrain IDs.
By the way, I have a few other articles about tilemap collision and layers. Since these are difficult subjects, I try to explain how to do it in simple steps that anyone can understand. If you are interested, check out the Tilemap Layers and the Tilemap Collision articles. Let’s continue with terrains.
A TileSetSource is the base class for the tile source data objects (TileSetAtlasSource or TileSetScenesCollectionSource). The data source object has a list of TileData objects, which themselves contain the actual data about each tile. The data of a TileData object contains different kinds of information such as terrain set and terrain IDs, z-index, material, appearance probability, and more.

There are many methods you can use to create and modify terrain sets and the terrains contained within them. Here are the basic ones you might use:
add_terrain_set(to_position): adds a new terrain set to the TileSet object.set_terrain_set_mode(terrain_set, mode): sets the matching mode of the terrain set.add_terrain(terrain_set, to_position): adds a new terrain to a terrain set.set_terrain_name(terrain_set, terrain_index, name): Sets the name of a terrain.set_terrain_peering_bit(peering_bit, terrain): Sets a single peering bit in the tile data.
In order to use some of those methods, you will need to call several more methods:
get_tileset(): retrieves the assigned TileSet object from a TileMap node.get_source(source_id): returns the tile set source data of the TileSet object. The source could either be a ‘TileSetAtlasSource’ or a ‘TileSetScenesCollectionSource’ object.get_tile_data(atlas_coords, alternative_tile): gets the tile data for a specific tile from the tile set source object.
To see how you can use all of these APIs to your advantage, read the simple example in the next section.
Example of Creating and Modifying an Existing Terrain Set From GDScript
extends TileMap

func _ready():

	# Get the assigned tile set
	var tileSet : TileSet = get_tileset()

	# Add a new terrain set at position 0
	tileSet.add_terrain_set(0)

	# Set the terrain set match mode
	tileSet.set_terrain_set_mode(0, TileSet.TERRAIN_MODE_MATCH_CORNERS_AND_SIDES)

	# Add a new terrain to terrain set 0 at position 0
	tileSet.add_terrain(0, 0)

	# Set the terrain name to be 'Mossy Terrain'
	tileSet.set_terrain_name(0, 0, "Mossy Terrain")

	# Get the source Atlas with ID 1
	var atlasSource : TileSetAtlasSource = tileSet.get_source(1) as TileSetAtlasSource

	# Get the tile data at coordinates (0, 0)
	var tileData : TileData = atlasSource.get_tile_data(Vector2i(0, 0), 0)

	# Set the peering bits of the tile
	tileData.set_terrain_peering_bit(TileSet.CELL_NEIGHBOR_BOTTOM_CORNER, 0)
	tileData.set_terrain_peering_bit(TileSet.CELL_NEIGHBOR_RIGHT_CORNER, 0)
Common Questions and Answers
What Is the Difference Between ‘Match Corners and Sides’, ‘Match Corners’ and ‘Match Sides’ Modes in Godot 4?
Match Corners and Sides,’ ‘Match Corners,’ and ‘Match Sides’ modes in Godot 4 refer to the matching mode of a terrain set. Here are the definitions of the available modes:
- Match Corners and Sides: requires both corners and sides to match with neighboring terrains.
- Match Corners: requires only corners to match with neighboring terrains.
- Match Sides: requires only sides to match with neighboring terrains.
What Is the Difference Between ‘Connect Mode’ and ‘Path Mode’ in the Godot 4 Terrain Paint Tool?
The ‘Connect Mode’ configures Godot’s terrain painting algorithm to paint the center tile first, then modifies the surrounding tiles according to the defined peering bits, without considering the number of strokes you apply.
On the other hand, the ‘Path Mode’ configures the algorithm to choose and paint a tile, based on the previously painted tile in the same stroke. It does not modify the surrounding tiles.
My Terrain Is Not Painted Correctly. What Am I Doing Wrong?
There are several possible reasons why your tiles are not painted correctly. Here are some cases and suggestions:
- The terrain set mode or peering bits are defined incorrectly. This means that Godot’s matching algorithm will place tiles incorrectly when putting the tiles in your scene. You can have a quick read of this article to get a better understanding of how terrain sets and terrains work (step 3 of the ‘Defining Terrain Sets and Terrains for a Tilemap in Godot 4’ section will guide you). In addition, you can go to the Godot tilemap documentation and read there: https://docs.godotengine.org/en/stable/tutorials/2d/using_tilemaps.html#handling-tile-connections-automatically-using-terrains.
- The tile set sprites are misaligned. Sometimes the sprite sheet you import into Godot does not follow a perfect grid pattern and must be manually marked. In those cases, human error can come into play. Misaligned tile sets can cause distortions in the tile map visuals when painting it in your scene. Check that your sprites in the tile set are pixel perfect.
- Wrong matching mode is selected. If you select a wrong matching mode for your terrain set, you will get some unexpected results. Check your matching mode in the tilemap Inspector panel. ‘Match Corners and Sides’ mode will be more appropriate for painting a full 2D map, while ‘Match Corners’ and ‘Match Sides’ are more suitable for single dimension tiles, such as paths, walls, roads, pipes, etc.
Is It Possible to Access the Terrain Set From GDScript?
Yes, Godot allows you to access and modify the terrain sets and terrains from GDScript. The internal data structures of a Tilemap are fairly complex. You can read my simple explanation in this article in the ‘How to Define, Read, and Modify the Terrain Sets from GDScript’ section.

World of Tanks
World of Tanks is a team-based massively multiplayer online action game dedicated to armored warfare in the middle of the 20th century. Throw yourself into epic tank battles with other tankers all over the world. Your arsenal includes more than 400 armored vehicles from America, the United Kingdom, Germany, France, the Soviet Union, China and Japan.
My Take on Tilemap Terrains
Tilemap terrains and tilemaps, in general, in Godot, are not as simple as they seem at first. However, with great complexity comes great flexibility. If you have reached this far, you now understand tilemap terrains at a good level. Godot’s official documentation has a good explanation of the topic if you need it: https://docs.godotengine.org/en/stable/tutorials/2d/using_tilemaps.html#handling-tile-connections-automatically-using-terrains.
Special thanks to Maaot on itch.io for providing the excellent tileset atlas image. You can download the asset pack here: https://maaot.itch.io/mossy-cavern.
Tilemaps are a fantastic way to build your 2D levels, but I bet you have only scratched the surface of what you can do with them. Visit my blog at Night Quest Games Blog to learn more, deepen your knowledge, and create the most beautiful and creative games you have ever made. See you there!
If the information in this article was helpful to you, please consider supporting this blog through a donation. Your contributions are greatly appreciated and allow me to continue maintaining and developing this blog. Thank you!


