Scenes are a fundamental part of any game. They define the boundaries of distinct parts of your game and are used not only for encapsulation of objects in a context but also for memory management.
In most games, there is more than one scene, and switching between them will cause all scene data to be released from memory. However, sometimes you need to transfer some data between one scene to the next. Unfortunately, Godot 4 does not currently have an easy solution for transferring data between scenes, so we must implement a system to help us with that. There are a few options, as you will see in the next sections.
In this article, I want to explain what scenes are in Godot, how they are managed, what happens when you switch scenes, and finally, what the options are for transferring data between scenes.
Examples of Transferring Data Between Scenes
One example of why you would need to transfer data between scenes is to retain player properties between levels. Assuming each level in a game is a separate scene, when switching levels, all scene data, including the player data, will be erased from memory. This is a problem because the player properties should be global and not depend on the level. Player properties could include things like the number of lives, health, weapons, mana, coins, and so on.
Another good example is transferring data from a menu scene to a level scene. Assuming a main menu is a different scene from the level, you will need to transfer some data between them. Can you think of what type of data you might need to transfer? There are many things you might need, such as:
- Loading a game: The most basic thing you might need is to load a game, but there is a problem here. The player selects the saved game file from the “Menu” scene, and the level needs to be loaded in the “Level” scene. There is no memory sharing between them, so you must transfer the selected file name from the “Menu” scene to the “Level” scene, and then load the game from there.
- Player selection: Some games allow you to select and customize the player from the menu before starting the game. For example, you can select the player’s race (goblin, human, elf, etc.), basic skills, weapons, or even choose your kingdom in strategy games.
- Game type selection: Selecting the type of game (capture the flag, combat, achieve a goal). This choice may affect the type of scene you select. In previous cases, I assumed there is only one “Level” scene, but there may be more. So in this case, you will need to instantiate the correct scene and transfer some parameters to it.
- World generation: Defining the parameters of the generated world. A good example is an auto-generated world where you fine-tune the parameters, and the game generates it. In this case, the entire generated world data must be transferred to a different scene to start the game. This might be a large chunk of data to move.
Quick Introduction to Scenes in Godot 4
In this section, you will learn about the basics of scenes, how they are managed, and see some examples of how scenes can be used in 2D and 3D games.
What Are Scenes in Godot?
The most basic definition of scenes I can give is that they are containers of game entities. A game entity can be a character, an object, code logic, a resource, and anything else you need to store in memory at runtime.
In smaller games, these containers don’t take a large amount of memory on users’ computers. But for larger games, loading big scenes can be a burden on the computer, especially if you have to load several scenes at once. For this reason, Godot (or any other game engine) must manage and control the scene memory allocation and switching logic. This does not mean you can’t implement a scene switching system on your own; you absolutely can. However, you must understand the inner workings of Godot’s scene and node system to avoid overloading the user’s computer memory and potentially causing the game to crash.
In Godot, every game entity is represented by a node, and every node can have its own code and resources attached to it. A scene is just a hierarchy of nodes working together to create everything you see, hear or interact with.
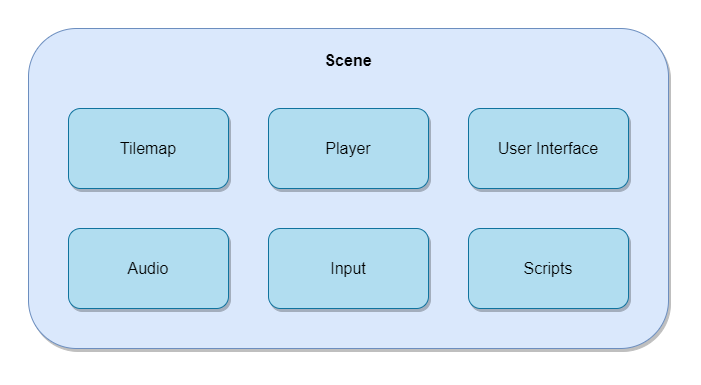
Scenes are not limited to visual objects; they also contain nodes for audio, input event logic, and many other entities, which allow your game to run smoothly and interact with the player.
Memory Management of Scenes
Every object in the game must be present in memory to be accessed. When an object is instantiated, the application (Godot) requests the operating system (Windows/Linux/MacOS/Android) for a free chunk of memory to put the object in. The operating system then finds a suitable spot in memory and allows the application to store the object in it.
Every time this object needs to be accessed, either to read or write to it, the application can directly refer to the memory address given by the operating system. When the object is no longer needed, the application notifies the operating system that the object is irrelevant, and the operating system will release this memory area so it can be used by other objects later on.
This process is true for every object or data allocated in the game. A scene is a container that is loaded into memory along with all of its objects. This is important since each scene can take up a lot of memory. Godot manages the loading and releasing of scenes to avoid overloading the user’s memory. If the memory is overloaded, the game could significantly slow down or even crash. Now you understand why carefully managing scenes and memory in your game is crucial for the normal function of your game.
Why Do We Need Scenes, Anyway?
The division of your game into scenes is up to you. For example, in a 2D game, you could decide that each level in your game is a separate scene. This would force the game to unload the previous scene and load the next scene into memory when transitioning between levels. Another approach would be to store all level information as a data structure and swap the relevant data in a template scene without having to release the entire container from memory.
On the other hand, switching from a menu to a level in the same scene would be impractical since the data is so different between those two screens. In this case, a menu would be one scene, and the level would be a different scene. Transitioning between the menu and level scenes will cause the menu to be released from memory and the level to be loaded, or vice versa.
Looking at 3D games, the scenes are much larger since the objects in the scene are more complex and take up much more memory. Imagine a game with an open world where you can travel great distances on the map, maybe go inside buildings, rooms, or travel to different map areas. It is impossible to load the entire map into memory, or the PC might catch fire. This is why each map area, indoor environment, or room should have its own scene. For instance, each time the player moves to a different map area, the scene is switched dynamically at runtime, and the previous area is released, keeping the amount of occupied memory at a reasonable level.
Ultimately, this switching around of scenes has a very important purpose, which is to minimize the amount of occupied memory at any given moment.
Looking Under the Hood of Scene Switching in Godot 4
Godot uses a tree structure to manage all scenes in the game. And as with each tree, it has a root. Godot manages the main scene displayed on the screen under the root node.
Every time you call get_tree().change_scene_to_file(filepath), Godot will read the requested scene from your disk, load it into memory, release the previous main scene, and replace the main scene with the new one. Once this is done, the displayed scene on the screen will change.
If the new scene is large, the player will feel a delay when the scenes are switched. To mitigate this effect, you could use some form of a transition screen or effect just to make it a bit more pleasant for the player.

What Is a PackedScene?
Godot uses an object called PackedScene to represent all the data a scene will use. It is a form of scene that will not take much memory; it’s kind of a zip form of your scene. When the time comes to actually show the scene, Godot will instantiate the PackedScene object and add it to the scene tree. The instantiation process will increase the memory consumption of the system.
How to Transfer Data Between Scenes in Godot 4
There are a couple of ways you could implement the data transfer.
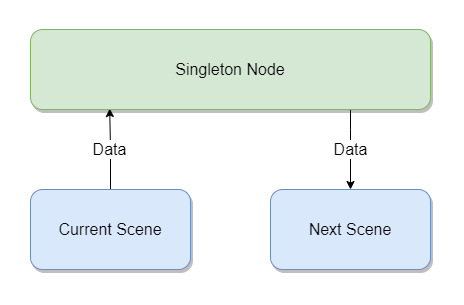
The first option involves creating a global data structure that will hold the information you want to transfer between scenes. Since this data structure is not released when switching scenes, it is a good place to store the required data.
The second option is to implement a system that manually switches between scenes and, in the process, transfers the data. This option is a bit more complicated to implement but results in a much more elegant solution to the problem.
Option 1: Global Structures That Retain Data
Godot allows you to define Singleton objects in your project. If you are not familiar with the Singleton design pattern, simply put, it’s a global object that can only have a single instance. Because of these properties, the object and the data in it can be accessed from anywhere in the code and will generally not be deleted until the application exits.
Using a Singleton object, you can define the data structures or variables you want to pass along from one scene to the next. Changing scenes will not change or release the Singleton object.
Defining an autoloaded scene or script is a critical thing to know, and I have an article that will teach you exactly what you need: https://www.nightquestgames.com/godot-4-autoload-singletons-in-gdscript.
The official Godot documentation contains a good explanation of how Autoload works in Godot: https://docs.godotengine.org/en/3.0/getting_started/step_by_step/singletons_autoload.html.
Here are the steps for implementing this method:
- Create a script that contains all the data structure definitions/variables you want to transfer between scenes.
- Add the script to your project’s Autoload list in the Godot project settings window.
- When it’s time to switch scenes:
- Copy the data from the current scene to the singleton script.
- Request Godot to switch to a different scene (destroys the current scene and loads the next one).
- Copy the data from the singleton script to the new scene.
Let’s see an example of how you can implement it. I have created a small Resource script that represents the data I want to transfer between my scenes, a player scene, and two scenes representing the levels I want to switch between.
The PlayerProperties script implementation includes 3 properties: lives, bullets and diamonds. You can see the meaning of these properties and methods in the code below.
extends Node
class_name PlayerProperties

var Lives : int = 0			# Number of lives the player has left
var Bullets : int = 0		# Number of bullets the player has left
var Diamonds : int = 0		# Number of diamonds the player collected throughout the game

# Initialize the resource with given data
func _init(lives : int = 10, bullets : int = 50, diamonds : int = 0):
	Lives = lives
	Bullets = bullets
	Diamonds = diamonds

# Print player properties
func Print() -> void:
	print("Player lives = %d" % Lives)
	print("Player bullets = %d" % Bullets)
	print("Player diamonds = %d" % Diamonds)
The Player script contains an instance of the PlayerProperties class, and some getter and setter methods for easy access.
extends Node2D
class_name Player

var m_Properties : PlayerProperties = null

# Returns the player proeprties object
func GetProperties() -> PlayerProperties:
	return m_Properties

# Set the player properties
func SetProperties(properties: PlayerProperties) -> void:
	m_Properties = PlayerProperties.new(properties.Lives, properties.Bullets, properties.Diamonds)

# Print player properties
func Print() -> void:
	m_Properties.Print()
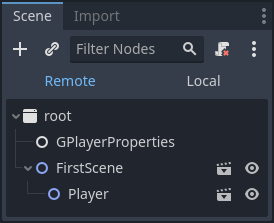
First and second scenes share the same script since they both represent a level. I have named the script SceneLogic since it handles all logic related to a scene. The GPlayerProperties object is a global PlayerProperties instance I defined in the Autoload section of the Project Settings.
extends Node2D
class_name SceneLogic

@onready var m_NodePlayer : Player = get_node("Player")

# Load the player properties from the global data structure
func _ready():
	m_NodePlayer.SetProperties(GPlayerProperties)
	m_NodePlayer.Print()

# Load the next scene in the game
func LoadNextScene():

	var playerProperties =  m_NodePlayer.GetProperties()

	# Transfer the existing player proeprties to a global structure
	GPlayerProperties.Lives = playerProperties.Lives
	GPlayerProperties.Bullets = playerProperties.Bullets
	GPlayerProperties.Diamonds = playerProperties.Diamonds

	# Load the next scene
	get_tree().change_scene_to_file("res://SecondScene.tscn")
Each scene contains a Player node, which is initialized from the global player proeprties. Each time the next scene is loaded, the LoadNextScene() method will update the global properties so the next scene can grab them at node initialization stage. The values of the properties in the first scene are determined by the default values in the PlayerProperties object constructor.
Option 2: Manual Scene Switching With Data Transfer
In this method, you are not relying on Godot’s scene switching mechanism. Instead, you need to create your own scene manager, which will add or remove scenes from the tree. Once you have the scene manager, you can instantiate the new scene while the old scene still exists and pass the required information between them.

If you want to see how I implemented a basic scene manager system, go to https://www.nightquestgames.com/changing-scenes-in-godot-4-is-easy.
Warning: Be careful with this method, as you have two scenes existing simultaneously in memory. If the scenes are large enough, it might take too much memory on the user’s computer and significantly slow down the game or crash altogether.
Godot’s documentation has a page on how to switch scenes manually, but it contains a very basic explanation of the method. Visit the official Godot documentation here: https://docs.godotengine.org/en/stable/tutorials/scripting/change_scenes_manually.html.
Here are the steps for implementing this method:
- Implement a Scene Manager that has two capabilities:
- It instantiates the new scene before releasing the old one.
- It has an interface for passing parameters to the new scene.
- When it’s time to switch scenes:
- Encapsulate all the data you want to transfer into an object
- Call the Scene Manager, request to switch a scene, and pass in the data object.
The implementation of a Scene Manager is not difficult, but it requires some effort. The Scene Manager in the example I mentioned before does not include the requirements I wrote. It simply wraps the Godot scene switching logic with a nice API. If you want to implement a scene manager that can hold more than one scene at a time, there are some great video guides on YouTube, which will show you how to do exactly that!
Assuming you have a SceneManager singleton script that has a SwitchScene(newScene, data) method. I will take the same example from the first option.
extends Node2D
class_name ManagedScene

@onready var m_NodePlayer : Player = get_node("Player")

# Load the next scene in the game
func LoadNextScene():
	# Switch to the next scene using the SceneManager and pass in the player properties
	SceneManager.SwitchScene("res://SecondScene.tscn", m_NodePlayer.GetProperties())

# Set the player properties
func SetPlayerProperties(properties : PlayerProperties) -> void:
	m_NodePlayer.SetProperties(properties)

# Prints the player properties
func PrintPlayerProperties() -> void:
	m_NodePlayer.Print()
Calling the LoadNextScene() method will call the SceneManager and transfer the player data to it. The SceneManager should then instantiate the requested scene and add it to the scene tree. Once the scene is ready, the SceneManager should call the scene’s SetPlayerProperties() method to apply the transferred proeprties and then call PrintPlayerProperties() to print them.
You can generalize this idea for other data structures and transfer all the data you need to pass between scenes.
Which Method Is Better for You?
I always tend to implement generic systems that take care of everything for you. And although they take much more time to implement, they are worth the effort in the long run.
So, if you have a time shortage or a small project for which you don’t need large systems, use the first method. Just implement transitions with small objects using a global structure.
On the other hand, if you have a large game project with large data objects or some complex game logic involving scene switching, you should use the second method and implement a flexible Scene Manager class that will handle all scene switching and data transfer logic for you. Implementing a robust system will save you a lot of time and headache in the future (if built correctly).
Conclusion
The methods I mentioned in the post are the most common ones developers use to pass data between scenes, but I am sure there are more. If you have a different solution to this problem, write it in the comments so everybody else can learn from it.
Developing games is not an easy task and you need to learn a lot of skills to create a compelling game. One of the hardest skills to master is programming. Since games are large software projects, it is necessary to understand software and code architecture at a very high level. This is where my blog comes in. There, you can find game development related posts that will help you boost your code and game development skills to a much higher level. Go to Night Quest Games Blog to learn more.
If the information in this article was helpful to you, please consider supporting this blog through a donation. Your contributions are greatly appreciated and allow me to continue maintaining and developing this blog. Thank you!


This was very helpful.
Tank you