A logging system is one of the most fundamental components of good game development practice and software development in general. Without a robust logging system, you will have a hard time understanding what happens in your software during runtime. I can’t stress enough how important this is. And since the logger is one of the most important things you need for code development, it is one of the first modules you should add to your projects.
Why Do You Need a Logger Class Anyway?
Simple message printing to the Godot output window can work, but for larger games, this will not be enough. With a logger, you will be able to see the progression of events in the software at runtime and conveniently observe variable values at specific times. The logger also allows you to debug issues offline (after the game has ended or crashed) by inspecting a log file.
Defining the Requirements for the Logger Class
I want to define the requirements of the logger I am going to create. It should be able to do the following
- Print formatted strings to the output window of the Godot editor.
- Print formatted strings to an external file in the file system.
- Each message has a severity level, which can be one of the following: Debug, Info, Warning, and Error.
- Each message has the current date and time.
- The user (you) can define the minimal logging severity level.
Now that we have defined the requirements, let’s see how we can actually implement all those requirements in a single file in GDScript.
Implementing the Logger Class in GDScript
I will split the implementation into several parts: class and property definitions, log file creation, date and time methods, and internal/external logging methods.
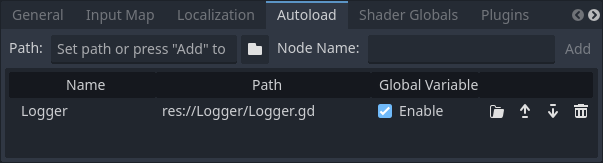
Note: It is important to mention that the Logger class should be added to the Autoload list of your Godot project to allow it to be accessed from anywhere in the code. If you are not familiar with the Autoload concept in Godot, you can read about it at my Godot 4 Save and Load Games: How to Build a Robust System article.
Defining the Logger Class and Its Properties
The first thing you need to do is to define the class and all its members. The two main variables you want to control are the LogsFolder and the LoggingLevel variables.
The logs folder is the base folder for your logs. Each time you run the game, a new log file with a unique name will be automatically generated. The reason I implemented it this way is to avoid overwriting previous runs, as you might want to look at previous game sessions.
The logging level is the minimum message severity shown in the log. For example, setting the EMessageSeverity.Debug level will print all messages to the log (since the Debug severity is the lowest level). On the other hand, if you want to see warnings and errors only, you can set the level to EMessageSeverity.Warning.
extends Node

# Default log file name prefix
const LogFileNamePrefix = "Log"

# Enumeration of message severity
enum EMessageSeverity { Debug, Info, Warning, Error }

# Message severity names
var m_MessageSeverityName : Array[String] = ["Debug", "Info", "Warning", "Error"]

# Log file object to output messages
var m_LogFile : FileAccess = null

# Minimal logging level
var LoggingLevel : EMessageSeverity = EMessageSeverity.Info

# Base folder of log files
var LogsFolder : String = ""
Formatting Time and Date Strings for Log Text and Filename
A good log should contain the time and date of each message, which are very important for debugging. Godot provides a convenient and fast way of retrieving the current time and date. In this case, I have two groups of methods:
- Time and date strings for the log, which are written in the log text (
_GetTimeForLog()and_GetDateForLog()) - Time and date strings for the log file name (
_GetTimeForLogFileName()and_GetDateForLogFileName()).
The time and date string for the file must be different from the log text because the operating system does not allow the colon and forward-slash symbols in the file name.
Another question you might ask yourself is: why include the time and date in the log file name? The answer is simple: to have a unique file name that also tells you the exact date and time the game session started. As you will see in the code below, I have allowed the user to provide their own file name. If the user doesn’t provide a name, a default name will be generated.
# | Description: Returns the current time as a formatted string for the log
# | Return: Current time as a formatted string for the log
func _GetTimeForLog() -> String:
	var currentTime = Time.get_time_dict_from_system()
	return "%02d:%02d:%02d" % [currentTime.hour, currentTime.minute, currentTime.second]

# | Description: Returns the current time as a formatted string for the log file name
# | Return: Current time as a formatted string for the log file name
func _GetTimeForLogFileName() -> String:
	var currentTime = Time.get_time_dict_from_system()
	return "%02d_%02d_%02d" % [currentTime.hour, currentTime.minute, currentTime.second]

# | Description: Returns the current date as a formatted string for the log
# | Return: Current date as a formatted string for the log
func _GetDateForLog() -> String:
	var currentDate = Time.get_date_dict_from_system()
	return "%02d/%02d/%04d" % [currentDate.day, currentDate.month, currentDate.year]

# | Description: Returns the current date as a formatted string for the log file name
# | Return: Current date as a formatted string for the log file name
func _GetDateForLogFileName() -> String:
	var currentDate = Time.get_date_dict_from_system()
	return "%02d_%02d_%04d" % [currentDate.day, currentDate.month, currentDate.year]
Creating the Log File and Handling Errors
The methods below handle the creation of the log file. The user can set the base logs folder and create a new log file, as I mentioned before. The file name can be provided by the user. If the file name is not provided, the code will generate a default name, which includes the date and time of the game session.
The CreateLogFile(filename) method returns the status of the operation. If the file was opened successfully, it will return OK. Otherwise, it will return the error code of the failure.
# | Description: Sets the base folder for all logs
# | Parameter folder: The base folder to put all logs in
# | Return: None
func SetLogsFolder(folder : String) -> void:
	LogsFolder = folder

# | Description: Creates a log file in the assigned folder
# | Parameter filename: Name of log file (inculding extension)
# | Return: None
func CreateLogFile(filename : String = "") -> int:
	# Create the requested folder if it doesn't exist yet
	if (not DirAccess.dir_exists_absolute(LogsFolder)):
		DirAccess.make_dir_absolute(LogsFolder)

	# Open the target log file
	var logFileFullPath = LogsFolder + "/" + (_GetLogFileName() if filename == "" else filename)
	m_LogFile = FileAccess.open(logFileFullPath, FileAccess.WRITE)

	# Returns OK if the file was opened successfully, otherwise returns the error
	return FileAccess.get_open_error()

# | Description: Returns the default name of the log file
# | Return: The default name of the log file
func _GetLogFileName() -> String:
	return "%s_%s_%s.log" % [LogFileNamePrefix, _GetDateForLogFileName(), _GetTimeForLogFileName()]
Writing Messages to the Output Window and to an External File
These are the main methods that allow you to print log messages. I deliberately split each message severity into its own function to provide convenient access to each of them: LogDebug(message), LogInfo(message), LogWarning(message) and LogError(message).
I have also provided a convenient way to change the logging level at runtime using the SetLoggingLevel(level) method.
# | Description: Logs a message with a severity of Debug
# | Parameter message: The message string to output
# | Return: None
func LogDebug(message : String) -> void:
	_LogMessage(message, EMessageSeverity.Debug)

# | Description: Logs a message with a severity of Info
# | Parameter message: The message string to output
# | Return: None
func LogInfo(message : String)  -> void:
	_LogMessage(message, EMessageSeverity.Info)

# | Description: Logs a message with a severity of Warning
# | Parameter message: The message string to output
# | Return: None
func LogWarning(message : String)  -> void:
	_LogMessage(message, EMessageSeverity.Warning)

# | Description: Logs a message with a severity of Error
# | Parameter message: The message string to output
# | Return: None
func LogError(message : String)  -> void:
	_LogMessage(message, EMessageSeverity.Error)

# | Description: Sets the current logging level
# | Parameter level: Required logging level
# | Return: None
func SetLoggingLevel(level : EMessageSeverity)  -> void:
	LoggingLevel = level

# | Description: Internal logging function for all message severities
# | Parameter message: The message string to output
# | Parameter severity: Severity of the message to output
# | Return: None
func _LogMessage(message : String, severity : EMessageSeverity)  -> void:
	if (LoggingLevel <= severity):
		var formattedMessage : String = "%s %s [%s] %s" % \
			[_GetDateForLog(), _GetTimeForLog(), _GetSeverityName(severity), message]

		# Write the message to the Godot output window
		_LogMessageOutput(formattedMessage)

		if (m_LogFile):
			# Write the message to the log file
			_LogMessageFile(formattedMessage)

# | Description: Internal logging function to standard output
# | Parameter message: The message string to output
# | Return: None
func _LogMessageOutput(message : String)  -> void:
	print(message)

# | Description: Internal logging function to a file
# | Parameter message: The message string to output
# | Return: None
func _LogMessageFile(message : String)  -> void:
	m_LogFile.store_string(message + "\n")
	m_LogFile.flush()

# | Description: Returns the name of the message severity as a string
# | Parameter messageSeverity: Severity enum of the message
# | Return: None
func _GetSeverityName(messageSeverity : EMessageSeverity) -> String:
	return m_MessageSeverityName[messageSeverity]
How to Use the Logger Class in Your Game
Here is an example of how you set up and use the logger in your game.
	# Set the logging level to Debug (show all messages)
	Logger.SetLoggingLevel(Logger.EMessageSeverity.Debug)

	# Set the base folder for the logs (each log will have a unique file name)
	Logger.SetLogsFolder("res://Logs")

	# Create the log file
	var status = Logger.CreateLogFile()
	if (status != OK):
		# Write the warning to the Godot output window only
		Logger.LogWarning("Unable to create log file [ Error code: %d ]" % status)

	# Start logging stuff
	Logger.LogDebug("This is a debug message")
	Logger.LogInfo("This is an info message")
	Logger.LogWarning("This is a warning message")
	Logger.LogError("This is an error message")
The code is divided into two parts: the first half is used for setting the logger parameters, and the second half is responsible for message logging. In the first half, I set the logging level to ‘Debug,’ specify the base folder for all my game logs, and create the log file with a default name.
Please note that if, for some reason, the file cannot be created, the CreateLogFile(filename) method will return an error. In such cases, I handle the error by printing a warning to the Godot output window.
External Resources for Learning About Logging in Godot
If you are looking for a complete solution that you can use out-of-the-box, you might want to look at the code here: https://github.com/4d49/godot-logger. This repository provides an add-on tool that you can copy to your project. The cool thing about the implementation in this tool is the integration of the logging options into the Godot Project Settings.
Conclusion
As I mentioned at the beginning of the post, this class is extremely important for the software development process. The logging system I presented in this article is far from perfect and can be improved and expanded according to your needs.
You can also integrate this code with the Godot editor to display logging options in the Project Settings. This can be achieved by implementing an add-on tool.
Software plays a significant role in game development, and proficiency in it is crucial for success. The further I progress in my game development journey, the more I realize the importance of my software engineering knowledge. Visit my blog at Night Quest Game Blog to learn how to create system-driven games and maximize your software skills. Good luck!
If the information in this article was helpful to you, please consider supporting this blog through a donation. Your contributions are greatly appreciated and allow me to continue maintaining and developing this blog. Thank you!


