Scenes in Godot 4 serve as modular packages for storing game information. A scene can encompass objects, characters, scripts, or a combination of these elements. It can also include instances of other scenes.
Every scene has a scene tree that manages the node hierarchy and child scenes. Each node serves a specific purpose, such as Sprite nodes that hold image and animation data.
In this article, I will consider scenes as game stages, such as menus, levels, and places, rather than focusing on individual items or characters. My goal is to demonstrate how changing scenes works in Godot 4 and how you can create a scene-switching system with the following features:
- It allows you to switch to any scene in the game, regardless of the current scene.
- It functions as a single global system that can be accessed from any part of the code.
- It executes logic that is separate from the game and can be easily transferred to other projects with minimal modifications.
- It provides a solid foundation for future expansions, such as incorporating visual effects during scene transitions.
In this article, I will guide you through the architecture, workflow, and implementation of a Scene Manager system that you can incorporate into any of your projects.
Why Build a Dedicated Scene Manager System in GDScript?
You can always just switch scenes from the current scene, so why implement a dedicated system for that?
First of all, it’s always good software practice to create generic systems and avoid using dependent or tightly coupled code. I have a great article about that topic: System-Driven Design.
Secondly, there are many cases where you would want to perform an action before transitioning to a different scene. The logic for this action will have to be copied to every scene in your game. Consider a fade-in/fade-out effect during transitions. Without a Scene Manager, you would have to write the visual effects logic in every single scene, resulting in massive code duplication across your entire codebase.
Finally, it’s very convenient to create a system that you test once and then forget about its inner workings. Each time you use it, you can be sure it works; otherwise, none of the scenes would function properly.
Scene Manager Architecture and Workflow
Before I start explaining my solution, I want to mention that the official Godot documentation describes how to implement this type of system. Unfortunately, it is very messy and not as flexible as you would want it to be. You can read their solution in the “Custom Scene Switcher” section at: https://docs.godotengine.org/en/stable/tutorials/scripting/singletons_autoload.html.
I want to give you a theoretical overview of how this system is going to work. This architecture uses Godot’s Autoload system, which you can read about here: Godot 4 Autoload System. The actual code for the Scene Manager is written in the next sections of the article.
What Is the Architecture of the Scene Manager System?
The “Scene Manager” is a global entity comprised of a scene and a script. The script will contain several exported variables and methods. The list of scenes will be exported, allowing you to add all scene names through the Godot Editor. The script will contain the scene switching logic, as well as other convenient methods.
Every time a scene change is needed, the current scene simply calls the SceneManager entity and requests a scene change.
Note: This architecture works because the Scene Manager is added to the project’s Autoload list, which means it is automatically loaded and runs alongside the main scene. The main scene should be the first scene of your game.
Workflow of the Scene Manager System
As the game developer, you should have a good understanding of the scenes required for your game. You can add the list of scene names through the Inspector panel of the Scene Manager node.
The Scene Manager node is loaded alongside the main scene, as you defined it in the project’s settings. From there, each currently displayed scene can access the Scene Manager and request a switch to a different scene. This switch can be triggered by a signal or any other event that occurs while the scene is running.
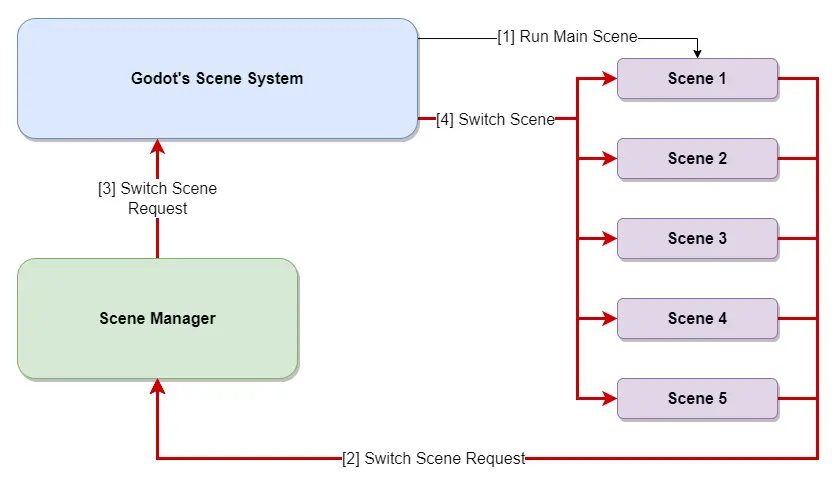
Here is a detailed description of the workflow:
- Godot’s scene system runs the main scene you defined in the project’s settings. In parallel with the main scene, Godot’s Autoload mechanism creates the Scene Manager and executes its script.
- When the current scene needs to switch to another scene, it sends a request to the Scene Manager, providing the next scene’s alias.
- The Scene Manager receives the request and accesses Godot’s scene system to ask it to switch the currently displayed scene.
- Godot’s scene system then switches the displayed scene to the requested one. Steps 2-4 continue until the application exits.
Changing Scenes Using a Simple Scene Manager
The code below is a simple example of how you can quickly change scenes by implementing a Scene Manager for your game. The code below is implemented in a single file (SceneManager.gd).
Step 1: Defining the Scene Manager Node
The SceneManager node holds a dictionary with scene aliases as keys and paths to scenes as values. It also contains the alias of the current scene.
extends Node
class_name NSceneManager

# A collection of scenes in the game. Scenes are added through the Inspector panel
@export var Scenes : Dictionary = {}

# Alias of the currently selected scene
var m_CurrentSceneAlias : String = ""
Step 2: Adding Basic Functionality to the Scene Manager
These methods are the meat and potatoes of the Scene Manager. The script includes methods for adding, removing, and changing scenes. It also includes methods for restarting the current scene and quitting the game.
# Description: Add a new scene to the scene collection
# Parameter sceneAlias: The alias used for finding the scene in the collection
# Parameter scenePath: The full path to the scene file in the file system
func AddScene(sceneAlias : String, scenePath : String) -> void:
	Scenes[sceneAlias] = scenePath

# Description: Remove an existing scene from the scene collection
# Parameter sceneAlias: The scene alias of the scene to remove from the collection
func RemoveScene(sceneAlias : String) -> void:
	Scenes.erase(sceneAlias)

# Description: Switch to the requested scene based on its alias
# Parameter sceneAlias: The scene alias of the scene to switch to
func SwitchScene(sceneAlias : String) -> void:
	get_tree().change_scene_to_file(Scenes[sceneAlias])

# Description: Restart the current scene
func RestartScene() -> void:
	get_tree().reload_current_scene()

# Description: Quit the game
func QuitGame() -> void:
	get_tree().quit()
Step 3: Adding Convenience Methods for the User
The methods in this group are optional. They are here to allow a more convenient access to some information about the scenes in the game. You might need these methods for debugging or other purposes.
# Description: Return the number of scenes in the collection
func GetSceneCount() -> int:
	return Scenes.size()

# Description: Returns the alias of the current scene
func GetCurrentSceneAlias() -> String:
	return m_CurrentSceneAlias
Step 4: Initializing the Scene Manager
Godot’s scene system loads the main scene into memory. Unfortunately, the Scene Manager is not aware of the main scene, so we need to update it by accessing the project’s settings and retrieving the main scene path. From the main scene path, the Scene Manager finds the alias of the main scene in the local dictionary and updates the m_CurrentSceneAlias property.
# Description: Find the initial scene as defined in the project settings
func _ready() -> void:
	var mainScene : StringName = ProjectSettings.get_setting("application/run/main_scene")
	m_CurrentSceneAlias = Scenes.find_key(mainScene)
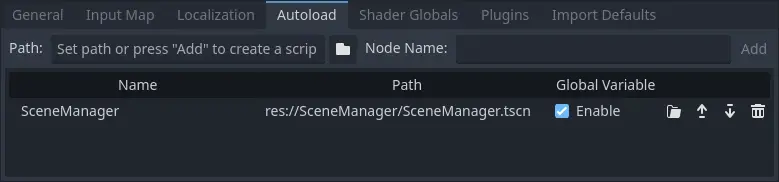
Step 5: Adding the Scene Manager to the Project’s Autoload List
As mentioned previously, you need to add the Scene Manager node to your project’s Autoload list.
Include it in the list and assign it a unique name that you will use to reference the Scene Manager object in your code.
Testing the Scene Manager System
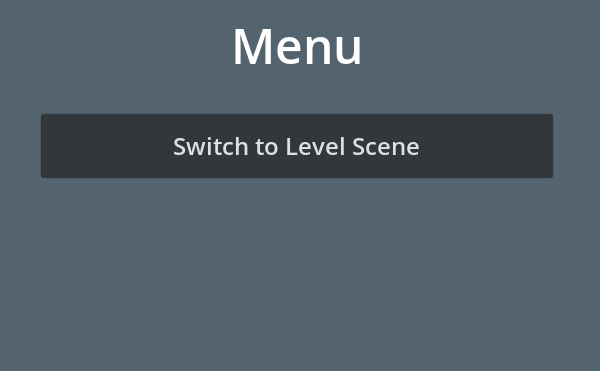
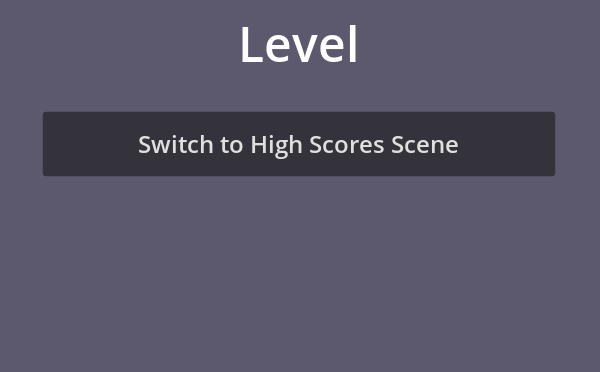
To test the Scene Manager, I have created three scenes: a “Menu” scene, a “Level” scene, and a “High Scores” scene. Each scene consists of several nodes, including a background rectangle, a label for the scene title, and a button for switching to a different scene.
I assigned a different background color to each scene, connected each button to a method, and implemented the method to navigate to the next scene. The switching order is as follows: Menu scene -> Level scene -> High Scores scene. The “High Scores” scene loops back to the “Menu” scene. The details of all these steps are laid out below.
Step 1: Creating the Test Scenes
The steps below will guide you through the process of creating the test scenes:
- Create three new scenes, giving them unique names and defining the root node to be a “Control”. I called my scenes SceneManagerTestMenu, SceneManagerTestLevel, and SceneManagerTestHighScores.
- For each scene, add the following nodes: a “ColorRect” node for the background color, a “VBoxContainer” for the inner elements, a “Label” and a “Button” node under the VBoxContainer.
- Change the background color of the “ColorRect” node for each scene.
- Change the label text to reflect the scene type.
- Create a new script for each scene and connect the button to a method. My methods are called
_OnButtonPressed().

Step 2: Adding the Test Scenes to the Scene Manager
The Scene Manager must be aware of all scenes you have in the game, so add the scene names and aliases to it, including the first scene. Additionally, let’s define the first scene to load in the game.
The following steps will help you accomplish those tasks:
- Open the “Scene Manager” scene in the Godot editor.
- Click on the root node in the Scene Tree panel.
- Click on the “Scenes” variable located at the top of the Inspector panel.
- Add all the scenes you have to this dictionary, including the first scene in your game. The key is an arbitrary alias, while the value is the actual path to the scene in the file system. Note: The code is written in a way that required each value in the dictionary to be a “StringName” type (constant immutable string), as opposed to a regular “String” or a “NodePath”.
- Set the first scene path in your Project Settings.

Step 3: Writing the Scene Scripts
For each of my three scripts, I simply switch the scene to the next one upon clicking the button.
extends Control
class_name CSceneManagerTestMenu

func _OnButtonPressed():
	SceneManager.SwitchScene("Level")
extends Control
class_name CSceneManagerTestLevel

func _OnButtonPressed():
	SceneManager.SwitchScene("HighScores")
extends Control
class_name CSceneManagerTestHighScores

func _OnButtonPressed():
	SceneManager.SwitchScene("Menu")
Step 4: Playing the Game
If you followed this tutorial, you should be able to switch between scenes with the press of a button. Start the game and check if you can change the scene by clicking the button.
If you encounter unexpected behavior, go back and review the previous steps. If you are still having trouble, leave a comment in the comments section below, and I will try to help you.

Summary
The scene management solution I explained in this article is not a complete system. It’s a basic example to show you how to create a scene manager.
You can make it more advanced by adding features like fancy transition effects, loading scenes in the background, or automatic saving. However, those topics go beyond the scope of this article.
As a dedicated software engineer, my focus is on building reliable and robust systems that can be easily transferred between games, ultimately saving a lot of time and headaches. Having solid coding skills is crucial for creating successful games. If you want to learn more and become proficient in game development, I invite you to check out my blog at Night Quest Games Blog. Good luck!
If the information in this article was helpful to you, please consider supporting this blog through a donation. Your contributions are greatly appreciated and allow me to continue maintaining and developing this blog. Thank you!


Hi! Thanks for the tutorial. For some reason, the lines given below yield “Trying to assign value of type ‘Nil’ to a variable of type ‘String’.” error. Looks like the mainScene must be added to the dictionary first to allow m_CurrentSceneAlias to find “mainScene” key.
func _ready() -> void:
var mainScene: StringName = ProjectSettings.get_setting(“application/run/main_scene”) # res://screens/test_menu.tscn
m_CurrentSceneAlias = Scenes.find_key(mainScene)
Hi,
All scenes you have, including the first scene, must be added to the exported ‘Scenes’ variable of the SceneManager through the Inspector.
Adding the first scene to the SceneManager is important because most games will have a menu as their first scene. The SceneManager needs to be aware of the menu scene in order to allow the user to return to it when they quit the game.
Sorry for the misunderstanding. I will update the article to make it clearer.
Change the type to in this instruction: `var mainScene: StringName = …`
Also make sure the exported dictionary is has both key(s) and value(s) as type `String`.
What I think it happening is that the dictionary contains String(s), you are looking for StringName(s), so it just returns Null. Better if confirmed by the author though. I’m a pretty experienced developer but I’m just starting to learn Godot. Not sure of the difference between String and StringName, just noticed the mismatch in the code above (`m_CurrentSceneAlias` is declared as `String` also).
Hey Pedro,
A StringName is just a constant string. My intention was to declare all scene names as StringName types, since their names are predefined.
Your suggestion will work as well and will simplify things – just define everything in the dictionary and the current scene variable as a String type. 🙂
I can’t get this to work. What’s the overall file structure for this project? Is the main root node of type NSceneManager and the other scenes are child nodes or is the main root node Node2D? In project settings, is the main scene your root node for the project or is it the Menu scene like in the dictionary of scenes? No matter how I configure it, I get an “Trying to assign value of type ‘Nil’ to a variable of type ‘String’.” error in the line m_CurrentSceneAlias = Scenes.find_key(mainScene)? Maybe because I had to manually assign a string for a key and NodePath for the value in the Inspector/Dictionary setup? Does it not like my string definitions for the keys?
Hi John,
The Scene Manager I described does not define the project’s structure; It is an independant scene, which you should add to the Autoload tab in your project’s settings (acting as a singleton).
The main scene in your project’s settings should be the actual scene you want as your first one, regardless of whether you implement this Scene Manager or not.
The issue you are having with
Trying to assign value of type ‘Nil’ to a variable of type ‘String’is probably happening because of these reasons:1. You must specify your first scene (the one you define in project settings) in the Scene Manager’s dictionary.
2. The value types in the Scene Manager’s dictionary in the Inspector should be “StringName” (not “String” or “NodePath”). I specifically defined the main scene to be a StringName (a constant immutable string) in this code line:
var mainScene : StringName = ProjectSettings.get_setting("application/run/main_scene").Hope I helped!
Thanks for the quick response. Now I’m having trouble getting SceneManager.gd to show the Scenes variable in the inspector. In your tutorial you said “Open the “Scene Manager” scene in the Godot editor”. So we created SceneManager.gd. Is this what you mean by the “Scene Manager” scene? I’m a total Godot noob and am struggling between the difference between GDscripts and scenes. Should I create a SceneManager.tscn after creating SceneManager.gd? Which one do I click on to “Open the “Scene Manager” scene in the Godot editor”? If I highlight either in the file system, I see the Scene Manager GDscript code we wrote in the middle panel and the Inspector panel says SceneManager.gd, but I don’t see the Scenes variable anywhere.
Hi John,
Sorry for the confusion. You should create a new scene (SceneManager.tscn) and attach the script (SceneManager.gd) to the root node in the scene.
Once you have done that, go to the project settings, open the Autoload tab and add the SceneManager.tscn file to the list.
To see the scene manager dictionary, simply open the SceneManager.tscn file from the FileSystem panel and click the root node. You will see the scene dictionary in the Inspector panel.
I have some troubles with setting exported variables in inspector. This example fails for me with info in debug about Scenes length == 0. I also tried to add another exported variable and set it in Inspector like
`@export var AAA : int = 2`
and set value in inspector like to 15
But still getting AAA == 15 in debug info.
What could be wrong?
Hey Kiril,
Several things can go wrong. The ones come to my mind is:
* You had other errors (maybe in other scripts) that prevented the AAA value from updating.
* Bug in Godot that in some edge case don’t update the values from the inspector.
Please try restarting the Godot engine and open a new clean project (just to test if the @export works). Once you have a clean project, copy the “Step 1: Defining the Scene Manager Node” section code from this tutorial and see if you can add entries into the ‘Scenes’ dictionary.
Let me know how it goes.
>But still getting AAA == 15 in debug info.
i mean 2 (as it set in code, not in inspector)
About your response
I tried and this bug still repeats. I found some issues about it in google, and it probably related to .net (i implemented this lesson in c#) as for me.
Well, not a big deal. I guess there are no problems with setting some values via config files or even separate script files, for example.
(My zoomer mind don’t know how this comments work, so i update in another)
Only after I set dictionary inside the script
“`
@export var Scenes : Dictionary = {
StringName(“MainMenu”): StringName(“res://scenes/scene_manager_test_menu.tscn”),
StringName(“Menu2”): StringName(“res://scenes/menu_2.tscn”),
}
“`
this example worked
my guess is `_ready()` section works before (?) anything from Inspector was loaded.
Hi there,
I just figured out the same problem as everyone here.
To resolve this, `you have to first create the scene, attach your script, add your variables to the dict. Then ONLY when you’re done with all this, you can add the autoload in the project menu, filling the filepath of your freshly registered scene`.
Hope that helps. Otherwise you still can add your key/value pairs to the dict with code.
in addition to this, godot uses uid instead of paths now, on godot 4.4 this will not work if you use paths. right click the scene in your file system and click copy uid, paste that string of gibberish as your key. mine is “uid://gapqs0xricy1” for example
the position of key and value have also changed since this tutorial was published. its now key:value instead of value:key. so swap those two when you define it like in the example Kirill gave above
last thing is that you should use Scenes[mainScene] instead of Scenes.find_key(mainScene) the original is used to get the first key that has the value of mainScene
these 3 things (in addition to the above) fixed my code, goodluck everyone!