Isometric games started in the late 1970s and early 1980s. Since then, they’ve been used in different types of games like strategy, simulation, role-playing, and puzzles. Nowadays, Isometric games are still being developed both by indie developers and AAA studios. Isometric games offer a unique visual style and gameplay possibilities.
In this article, I will give a brief introduction to isometric projection and isometric games, and then we will delve into how you can use Godot’s Tilemap node to create stunning isometric games. Let’s roll!
What Is Isometric Projection?
An isometric projection is a method for projecting a 3D world onto a 2D space, like a piece of paper or a computer monitor. It belongs to a category of camera projections known as Orthographic projections. In an isometric projection, objects may lose some depth and might seem flat compared to the 3D world you see naturally. This is because isometric objects lack vanishing points; instead, each axis of an object is parallel to the world axis.
In an isometric environment, objects seem the same size, regardless of their distance from the viewer or camera. In contrast, a Perspective projection makes distant objects appear smaller, while closer objects appear larger.
For a more detailed explanation of Isometric projections, check out the Best Examples of Isometric Games and How They Work article.

Examples of Games With Isometric Projection
There are many examples of isometric games from various genres like strategy, city builders, and RPGs. Some well-known classic isometric games include Red Alert 2, WarCraft 2, StarCraft 1, the Age of Empires series, the SimCity series, the Tropico series, Baldur’s Gate 1, Baldur’s Gate 2, and many others.
If you revisit any of these games (or watch gameplay videos), you’ll notice that the camera always maintains the same angle, and objects, whether close or far, appear to be the same size.
Other Types of Camera Projections Used in Video Games
There are various projection types that video game developers have used throughout the years. All these projections offer different ways to project a 3D world onto a 2D screen. Here are some of the most popular ones:
- Perspective projection: This camera projection imitates the human eyes’ vision, providing a 3D view commonly used in first-person shooters, third-person shooters, role-playing games, adventure games, and sports and racing games.
- Top-down projection: Also known as Bird’s-eye view, this projection places the camera directly above the world and points it down. Classic games like the original GTA use this technique.
- Dimetric / Trimetric Projection: The orthographic projections group includes several types of projections distinguished by the camera angle. The camera angle defines the ratio between the width and the height of the objects.
How to Develop Isometric Games in Godot
Godot provides an excellent framework for developing isometric games. The Tilemap node in Godot allows you to cut a sprite sheet into sprite images and project them onto the screen using your chosen camera projection. When dealing with the isometric projection of the Tilemap node, there are multiple options available. In this article, the focus will be on the most common isometric projection type.
Creating a Tilemap node with an isometric view is relatively simple. To do so, follow these steps:
- Prepare a sprite sheet with the necessary tiles as a single image file (typically a png file with an alpha channel) and import it into your Godot project.
- Create a new TileMap node in your scene and select it.
- In the Inspector panel, generate a new TileSet resource.
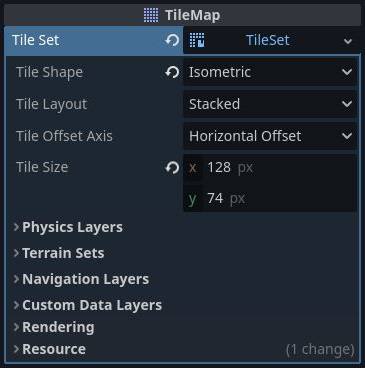
- Choose the ‘Isometric’ projection in the ‘Tile Shape’ property, and leave the ‘Tile Layout’ and ‘Tile Offset Axis’ properties at their default values.
- Go to the TileSet tab at the bottom of the screen and attach the imported sprite sheet image.
- Configure the TileSet so that all tiles are ready. If you have complex objects requiring several tiles stitched together, continue reading. I address this issue later on.
Configuring the Isometric Camera Projection in the Tilemap Node in Godot
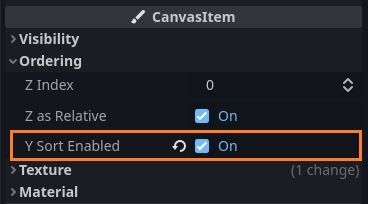
Apart from specifying the camera projection of the Tilemap, you need to adjust several parameters to ensure the correct drawing and behavior of the tiles. The first step is to enable Y-Sorting, and the second step is to define the tile size of the TileSet, as well as the tile size of the TileMap node.
What Is Y-Sorting and How to Sort Tiles Correctly
Y-sorting is the process of arranging the drawing order of the objects visible on the screen. In the case of an isometric Tilemap, each tile is drawn in its assigned order. Incorrect Y-sorting may lead to visual issues. Typically, lower tiles are drawn before the upper tiles on the Tilemap. Drawing in this order creates the illusion of a 3D camera while actually operating in 2D space.
As soon as you create a Tilemap node in Godot and configure it to have an Isometric projection, you receive a warning next to the Tilemap node, indicating that the Tilemap node and all internal layers should have Y-sorting enabled. Ignoring this warning will likely result in incorrect sorting of the drawing order of the tiles and lead to visual inconsistencies.
To address these issues, follow these steps:
- Enable the “Y Sort Enabled” property of the Tilemap node (Inspector -> CanvasItem -> Ordering).
- Enable the “Y Sort Enabled” property for each layer in the Tilemap node (Inspector -> TileMap -> Layers).
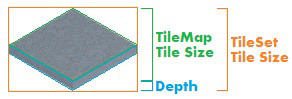
Difference Between Tile Size in Tileset and Tile Size in Tilemap
Godot distinguishes between the tile size defined in the Tileset and the tile size defined by the Tilemap. Understanding the differences is crucial, as it can save you a lot of headaches as your Tilemap evolves.
- Tile size in Tileset: Specifies the size of the tile image in the sprite sheet. It includes the actual image pixels that will be drawn on the screen.
- Tile size in Tilemap: Specifies the surface size of a tile. Each tile has a Z component that defines the height of the object in the tile. As tiles are partially drawn on top of each other, the tile size defined in the Tilemap only includes the surface part, without considering the depth of the object. This information helps the Tilemap node understand the exact occlusion allowed on every object in the tile.
Advanced Features of the Tilemap Node in Godot
In most cases, you will need to utilize more advanced features of Tilemaps, such as multi-tile objects or using layers to stack tiles on top of each other. These features enable you to generate variety and complexity in the tilemaps within your games. Let’s explore each of these features.
Creating Multi-Tile Objects and Aligning Them to the Isometric Grid
Multi-tile objects are combinations of several tiles, as defined in the Tileset. For instance, the tile size in a Tileset might be set as a 64×32 rectangle, but a tall object spanning over 3 tiles may require a 64×96 tile. Godot enables you to group tiles and create complex objects.
How to Define Multi-Tile Objects in a Tileset in Godot
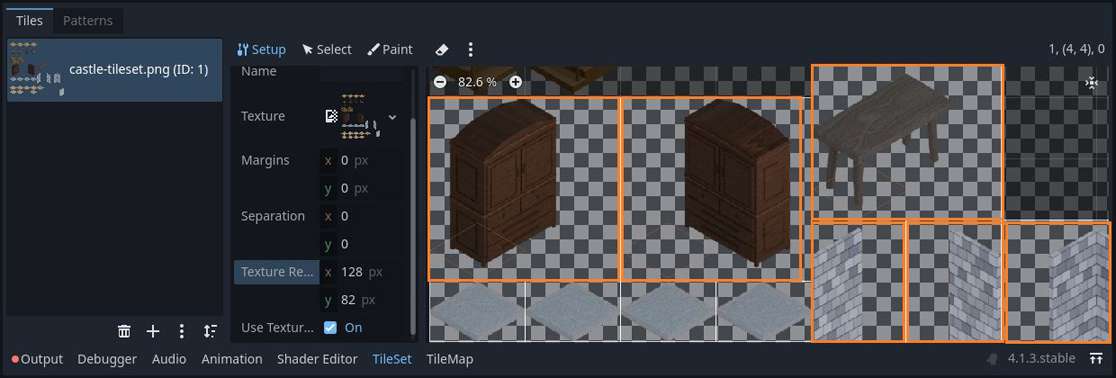
Defining multi-tile objects in Godot is relatively easy. Open the TileSet editor tab and follow these steps:
- Click the ‘Setup’ button to enable atlas setup mode.
- Press and hold the Shift button on your keyboard.
- In the tiles area, press and hold the left mouse button and drag the selection across all tiles you want to combine.
- Release the mouse button and keyboard key to create the complex object.
Once the object is created, you will see a larger tile containing all the selected tiles. You can now place that large tile on the map through the TileMap editor tab.
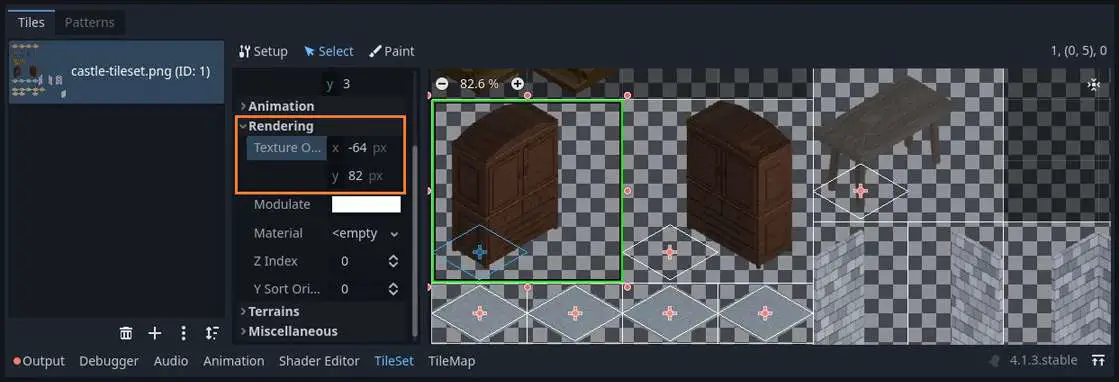
Using the ‘Texture Origin’ Property to Align Multi-Tile Objects to the Isometric Grid
If you followed the steps to create a multi-tile object as I described in the previous section and tried to place it on the map, you probably noticed that the tile is not positioned exactly where your mouse cursor is found. That’s because the origin of the complex tile image is still in its center. If this works for you – great! If not – you will probably need to change the origin point of the object. For me, the most intuitive location for the origin is at the bottom left corner of the tile.
To change the origin point of the tile, open the TileSet editor tab and follow the steps below:
- Click the ‘Select’ button to enable tile selection mode.
- Select the large tiles you want to modify.
- In the ‘Base Tile’ menu that appears on the left, open the ‘Rendering’ section.
- Change the ‘Texture Origin’ vector to offset the actual tile origin point.
When you change the origin value, you will notice a diamond shape on the tile itself, marking the new position of the origin point. Note that if the position is beyond the scope of the tile, a text will appear with the newly entered offset.
Using Tilemap Layers to Stack Tiles on Top of Each Other
The Tilemap layers allow you to put tiles on top of each other without overwriting the tiles already found on the map.
For instance, The floor of a castle can be the bottom layer of the Tilemap, the walls, chairs, tables, doors and other decorations can be placed on the second layer, and the chandeliers can be placed on the third layer.
The layer stack ensures that whatever happens in your game, the drawing order will always stay the same, meaning that the tables, chairs and decorations will always be drawn over of the floor and the chandeliers will always be drawn over the decorations. After all, it makes sense that the tables and chairs are not found beneath the floor, right?
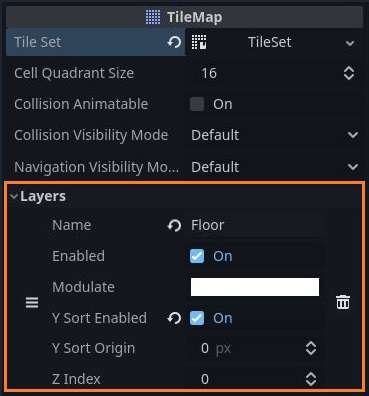
How to Use Tilemap Layers to Stack Multiple Tiles on Top of Each Other
To create multiple Tilemap layers, open the Inspector panel of the Tilemap node and follow these steps:
- Click on the ‘Add Element’ button in the Tilemap layers list (Inspector -> Tilemap -> Layers).
- Give the new layer an appropriate name and enable the “Y Sort Enabled” checkbox.
- Update the “Z Index” field to represent the new layer. Lower values are rendered at the back, while higher values rendered in the front (closer to the camera).
- Go to the TileMap editor tab and select the current target layer (top right corner of the tab).
- Select a tile and start placing it on the map.
You will notice that when you switch layers, all other layers except the selected one will be lightly dimmed so you can see the current layer clearly. If you would like to learn more about Tilemap layers, check out the Godot 4 Tilemap Layers: Everything You Need to Know article.
Rearranging Tilemap Layers for Correct Tile Drawing
The order of the layers in the Tilemap layer list does not determine the drawing order; instead, the “Z Index” field does. While the order of layers in the list does change the drawing order of tiles when all layers have the same Z index, tiles from different layers may still mix and create visual issues. The most effective way to determine the drawing order of layers in your tilemap is by defining the Z index for each layer. Layers are drawn from a low Z index to a high Z index.
My Take on Isometric Tilemaps in Godot
Godot provides a substantial amount of functionality for Isometric games. The user interface may not always be intuitive, but once you understand the concept, things get relatively smooth. For a more in-depth understanding of the TileMap node and its functions, you can continue reading the official Godot TileMap documentation at https://docs.godotengine.org/en/stable/tutorials/2d/using_tilemaps.html.
If you’re interested in learning more about Godot and game development, explore the Night Quest Games Blog. You’ll find plenty of articles that can help you on your game development journey. Best of luck!
If the information in this article was helpful to you, please consider supporting this blog through a donation. Your contributions are greatly appreciated and allow me to continue maintaining and developing this blog. Thank you!


Very interesting, thank you very much.