The Tilemap node in Godot is an excellent tool for quickly creating 2D games based on a set of tiles. Although you can control and configure the tileset in many ways, there are sometimes issues with the tile rendering. These issues are not necessarily related to the tileset itself but rather to the rendering or image import preferences configured in the engine.
The visual problems can sometimes be seen as gaps between the tiles on the tilemap or as artifacts appearing on a tile. These issues can appear when the image is static but commonly occur when the camera moves around the tilemap and the positions of the tiles on the screen change.
In this article, I will explain the most common causes of these visual problems and provide solutions to solve them or, at least, mitigate them so they are not too obvious.
1. Tiles in the Tileset Are Misaligned
Tilesets in Godot are divided into individual tiles based on specific pixel locations on the image and a specific number of pixels for width and height to determine the tile area.
In some cases, the location and dimensions of the tiles on the image don’t match the exact pixels defined in the Tilemap node in Godot.
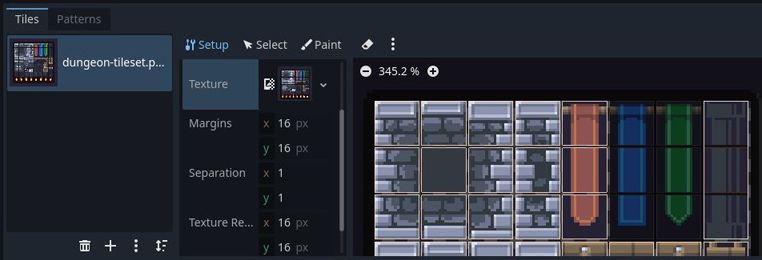
Problem: The difference in location and size of the tiles between the sprite sheet and the definition in Godot may cause misalignment in the tileset division, creating visible gaps or artifacts on some of the tiles.
Solution: Ensure that the tile alignments in the image are pixel-perfect.
One approach is to modify the image using an external art tool/image editor and adjust the tiles so that Godot divides the tileset correctly. The other approach is to leave the image as it is and correct the selected pixels for each tile inside the tileset editor in Godot.
As a rule of thumb, if you created the tileset image, it’s much better to correct the image itself. If the image was not created by you and it’s difficult to modify, go with the second approach.
2. The ‘Fix Alpha Border’ Option Is Enabled
The ‘Fix Alpha Border’ option attempts to correct the edge pixels transitioning from transparent to opaque in textures displayed with bilinear filtering. Unfortunately, this can sometimes cause individual tiles to have artifacts on their edges.
Problem: The ‘Fix Alpha Border’ option, enabled for the imported sprite sheet, causes artifacts at the edges of the tiles.
Solution: Disable the ‘Fix Alpha Border’ option in the ‘Import’ tab and reimport the asset.
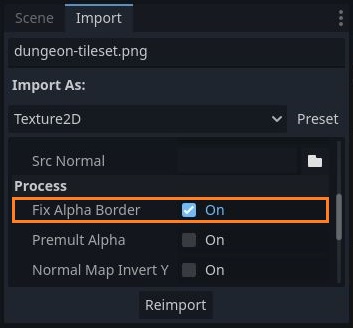
- Select the image containing the sprite sheet used in the tileset from the FileSystem panel.
- Open the ‘Import’ tab (usually found in the Scene panel above the FileSystem).
- In the ‘Process’ section, uncheck the “Fix Alpha Border” option.
- Click the ‘Reimport’ button at the bottom of the panel to import the image again with the new settings.
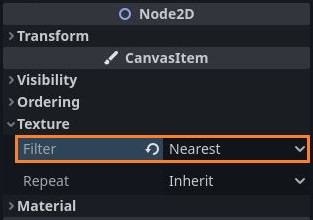
3. Tilemap Texture Filter Is Not Set to ‘Nearest’
When the GPU renders a texture, like your tileset image, it maps the texture pixels to their positions on the screen. During the texture sampling process, it attempts to enhance the quality of the rendered texture by applying a filter. There are several filter options available, such as Linear, Nearest, and Mipmaps.
The ‘Nearest’ filter doesn’t alter the pixel colors; it directly maps each texture pixel onto the screen. In contrast, other filters might distort tiles by blending colors from one tile with its neighboring tile.


Problem: The texture filtering method in the Tilemap node in Godot isn’t set to ‘Nearest’, causing some tileset pixels to be altered (averaged with nearby pixels) when displayed on the screen.
Solution: Set the texture filter of the Tilemap node to ‘Nearest’. This ensures that each tile in the Tilemap is rendered precisely as it appears in the original texture image, without applying any filters. This might result in a more pixelated appearance for the tileset image but guarantees pixel-perfect sampling.
- Select the Tilemap node from the scene tree.
- In the Inspector panel, change the texture filter property to ‘Nearest’ (CanvasItem -> Texture -> Filter).
Alternatively, you can set the default filter method in the project to ‘Nearest’. Note that the entire node hierarchy leading to the Tilemap node must be set to ‘Inherit’ to propagate the default filter setting.
- Open the “Project Settings” window from the top menu in Godot.
- In the ‘General’ tab, change the default texture filter to ‘Nearest’ (Rendering -> Textures -> Default Texture Filter).
4. The ‘Snap 2D Transforms to Pixel’ Option Is Disabled
When tiles are rendered on the screen, their exact pixel locations can be floating-point numbers, which can result from resolution changes or image stretching.
This means that when a tile is rendered, the actual transform values of the tile might be rounded up or down based on the fraction of the original pixel location. Rounding the pixel location values causes the tiles to be incorrectly rendered, especially during camera movement.
Problem: Tilemap tiles are not snapped to an exact pixel when rendered, causing tile jittering during camera movement.
Solution: Enable the “Snap 2D Transforms to Pixel” option in the project settings. This ensures that each tile is rendered at the exact intended pixel location, even when the camera moves around the Tilemap.
- Open the “Project Settings” window from the top menu in Godot.
- In the ‘General’ tab, enable the advanced settings located in the top right corner of the tab.
- Enable the “Snap 2D Transforms to Pixel” option (Rendering -> 2D -> Snap 2D Transforms to Pixel).
Learning Godot and Game Development
I hope this article helped you overcome your tileset issues. Thanks to Genewheel for providing the tileset used in this article: https://genewheel.itch.io/16×16-dungeon-tileset.
Sources of Information for This Article
- Godot Forums: https://ask.godotengine.org/118096/tilemaps-sprite-have-tiny-gap-sometimes
- Texture Filtering: https://docs.derivative.ca/Texture_Filtering
- Godot Project Settings Documentation: https://docs.godotengine.org/en/stable/classes/class_projectsettings.html
- Godot Import Settings Documentation: https://docs.godotengine.org/en/stable/tutorials/assets_pipeline/importing_images.html
The Night Quest Games Blog
For more information and guides about Godot and game development in general, visit the Night Quest Games Blog. See you there!
If the information in this article was helpful to you, please consider supporting this blog through a donation. Your contributions are greatly appreciated and allow me to continue maintaining and developing this blog. Thank you!


