There are many cases where you might need an object that lives throughout the entire lifetime of your game. For example, independent libraries and services, global variables and states, common data structures, and more. This type of object is called a Singleton, which is a fancy way of saying that an object can only have a single instance.
Creating singleton objects is not possible in GDScript; however, Godot provides you with an easy way of creating singletons using the AutoLoad system.
What Is Autoload in Godot 4?
AutoLoad is an internal system in Godot that allows you to load scenes and scripts automatically when your game starts. Godot will generate an instance of the requested scene or script and keep it in memory until your game shuts down. It is useful for creating global code modules and scenes that are independent of other resources in the project.
How to Make a Scene or Script Load Automatically in Godot 4
Loading a scene or script automatically is as easy as boiling eggs. Assuming you already have the scene or script, all you have to do is follow these steps:
- Go to the Project settings by clicking on “Project” in the top menu and selecting “Project Settings”.
- In the project settings window, click on the “Autoload” tab.
- In the “Path” text box, write the path to the scene or script you want to automatically load. You can also use the button with the folder icon to browse for the file.
- Come up with a unique name for the node and write it in the “Node Name” text box.
- Click the “Add” button on the right side of the screen.
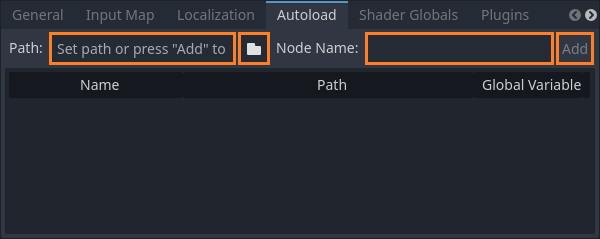
That’s it! Once the scene or script is added to the list, you can refer to it in your code like a singleton object.
Note: Godot’s Autoload mechanism creates a scene for the loaded script, so it must inherit from the ‘Node’ class. For example, if you try to automatically load a script that inherits from ‘Resource’, you will get a debugger error, and the game will not work properly.
Example of Automatically Loading a Script or Scene in Godot 4
In this section, I will show you a simple example of how you can access the singleton class and use it in your code.
Example: Making a Simple ‘Game State’ Singleton
A game state class is a data structure that holds the current state of the game. It contains general data that you might want to transfer across scenes, levels, and places, or it can be used as a way to communicate or transfer data between nodes. It always exists in the game and is independent of other scenes or scripts.
Step 1: Implementing the Game State Class
The Game State implementation is very straightforward. I want to store general information about the game, such as the current level and game difficulty. Additionally, I want to store player information and inventory so that it can be transferred across levels.
extends Node

# General properties
var CurrentLevel : int = 0					# Current level in the game
var GameDifficulty : int = 0				# Difficulty of the game

# Player properties
var PlayerName : String = ""				# Player's name
var PlayerLives : int = 0					# Player lives left
var PlayerExperience : float = 0			# Player experience points

# Player inventory items
var PlayerInventory : Array[String] = []	# Array of item names
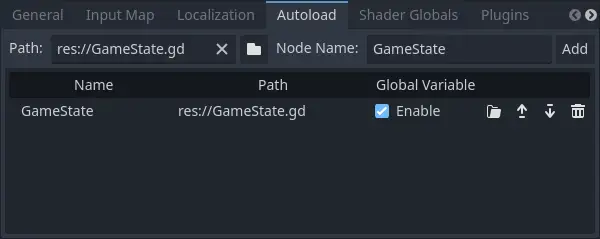
Step 2: Adding the Script to the Autoload List
Tell Godot to automatically load the script when the game starts by Adding it to the Autoload list in your project’s settings.
Step 3: Accessing the Properties in the Game State Singleton
The code below is an example of how you can access the properties of the Game State from anywhere in the code. I created two classes: the “Player” class, which handles all player-related functions, and the “World” class, which uses the general data portion of the game state.
You can see that I did not make an instance of the “GameState” class. This is done automatically by Godot. It means that the class only has one instance, making it a singleton.
# Filename: Player.gd
# Description: Player related functionality

extends CharacterBody2D
class_name Player

# Sets the player name
func SetName(playerName : String) -> void:
	GameState.PlayerName = playerName

# Adds experience to the player
func AddExperience(experience : float) -> void:
	GameState.PlayerExperience += experience

# Gets the number of lives the player has
func GetLives() -> int:
	return GameState.PlayerLives

# Gets an item from the player's inventory
func GetItem(index : int) -> String:
	return GameState.PlayerInventory[index]
# Filename: World.gd
# Description: General data and functions related to the game world

extends Node2D
class_name World

const MAX_LEVELS : int = 20		# Number of levels in the game

# Set the game difficulty
func SetGameDifficutly(difficulty : int) -> void:
	GameState.GameDifficulty = difficulty

# Increments the current level
# Returns true if the current level is the last one, false otherwise
func GoToNextLevel() -> bool:
	if (GameState.CurrentLevel == MAX_LEVELS):
		return true

	GameState.CurrentLevel += 1
	return false
Learning More About Godot 4 and Game Development
As a software developer, it annoys me that GDScript does not support some of the common practices found in other languages, such as creating singletons and static variables. However, I also realize that GDScript is a scripting language built on top of the Godot engine, which makes it technically almost impossible to add these features.
With that being said, Godot’s solution for the global singleton object works pretty well, so I can’t complain. The official Godot documentation might have some more technical details about this feature. If you are interested, you can read about it at https://docs.godotengine.org/en/stable/tutorials/scripting/singletons_autoload.html.
By the way, I have many more Godot tutorials and guides on my blog at Night Quest Games Blog. See you there!
If the information in this article was helpful to you, please consider supporting this blog through a donation. Your contributions are greatly appreciated and allow me to continue maintaining and developing this blog. Thank you!


