In languages like C and C++, you have the option to define data containers using the word ‘struct’. Once the struct is defined, you can create these objects in memory, define an array, or even create complex nested structures.
Unfortunately, Godot doesn’t have the ‘struct’ idea built-in in the GDScript language. But Godot developers implemented a nice way to overcome this issue. In this article, I will show you how you can define these large data structures and display them directly in the editor using scripts that extend the Resource class.
The Basic Problem of Complex Games
Complex games usually require large and nested data structures to represent all characters, objects, and states. While it is possible to define and manipulate these structures in code, it will be easier if we could export them and fill the data through the Godot Editor. It is crucial to have the ability to define unique data for different scenes. Godot has a few options for doing that, but we are going to focus on writing our own custom resources.
Using Resources to Create Complex Data Containers in Godot
As stated in the official Godot documentation, Resource objects are data containers used by nodes to perform some functionality. In Godot, you can create your own resources to store the data required for your game. The nice thing about resources is that you can nest and chain them together to create complex structures.
These structures are important in large games as they provide generic data structures the code can iterate over to keep the game running. Once the data structures are defined in code, you can export them to the Godot editor and fill the data visually.
Why Resources in Godot Are Powerful Tools
Resource scripts are as flexible as any other script in Godot. You can define constants, methods, signals, and even use inheritance to extend other resources. But the best thing about them is you don’t need to worry about importing/exporting (serializing/deserializing) them. This functionality is done seamlessly by the engine, without you having to define anything related to your data. Once you write the resource script, you can see and change the data directly in the Godot editor.
Another big advantage of using resources as data containers is that you can nest resources and create large data structures. This is critical to making the game’s logic as generic as possible and avoiding building things manually for each of the game’s scenes.
Example: A Complex Data Structure
An army has different types of units. Each unit has several properties such as name, type (melee/range), health and special abilities. A unit can have no special ability or it can have many special abilities.
For example, an Archer has a unit type of ‘Range Unit’, initial health of 50 and special abilities of ‘No Range Penalty’ and ‘Magic Resistance’.
A goblin is a melee unit, which has initial health of 80 points and no special unit abilities.
The attached illustration shows what the structure that holds this data should look like.

How to Create Data Containers Using Resources in Godot
To create a data container, you need to write a new script that extends the Resource class and exports all required variables. It is encouraged to override the _init() function so that your exported variables have a default value. You can also share types and make nested resources. To do that, you must define a class name for each resource by using the class_name keyword.
If you are not familiar with the basic concept of exporting variables to the Godot editor, I suggest reading the Godot documentation page discussing this topic: https://docs.godotengine.org/en/stable/tutorials/scripting/gdscript/gdscript_exports.html.
Example: Implementing the ‘Army’ Data Container
I have implemented the ‘UnitAbility’ and ‘Unit’ classes of our example. The UnitAbility script exports an enum for the special ability of each unit. The Unit class encapsulates and exports the unit’s attributes: name, type, health and an array of UnitAbility objects. You can see the code below.
Implementing the Unit Ability Class (UnitAbility.gd)
extends Resource
class_name UnitAbility

enum EUnitAbilities { NoAbility, NoRangePenalty, MagicResistance, MaxDamage }

@export var Ability : EUnitAbilities

func _init(ability = EUnitAbilities.NoAbility):
	Ability = ability
Implementing the Unit Class (Unit.gd)
extends Resource
class_name Unit

enum EUnitType { MeleeUnit, RangeUnit }

@export var Name : String
@export var Type : EUnitType
@export_range(1, 100) var Health : int
@export var Abilities : Array[UnitAbility]

func _init(name : String, type : EUnitType, health : int):
	Name = name
	Type = type
	Health = health
Note: You don’t need to initialize arrays in the _init() function since arrays are empty (size = 0) by default when created.
Filling the Data Containers in the Godot Editor
Now it is time to fill the data in your data structure. To do that, go to the scene you want to hold the data and attach a script if you don’t have one already. In the script, export the variables with the types you want to use from the resource scripts.
Step 1: Implementing the Army Class (Army.gd)
The Army node holds the array of units, which are exported to the editor. By exporting this array, you will be able to see it as if it was a part of the editor itself.
extends Node2D

# Array of units in the army
@export var Units : Array[Unit]
Step 2: Filling the Data Containers In The Godot Editor
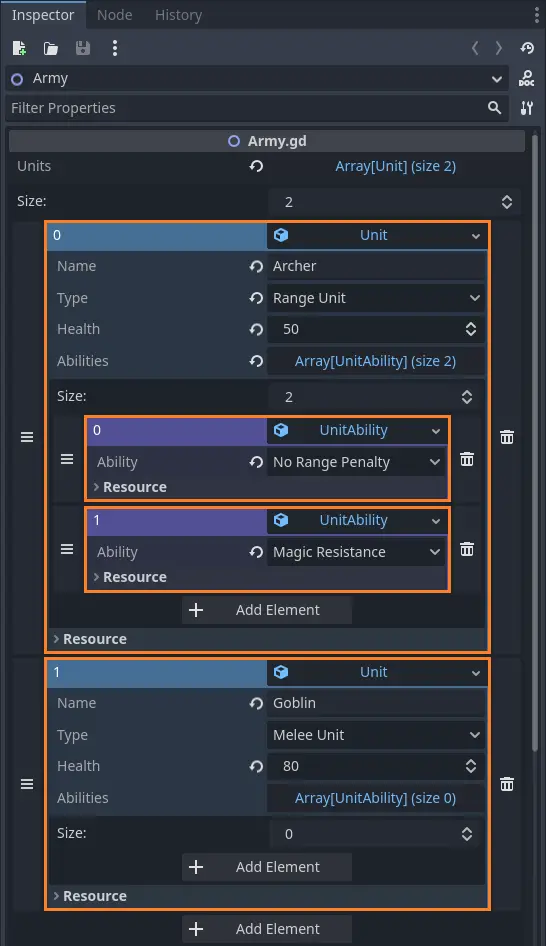
Once the types are exported, you should be able to see them in the Inspector panel and add some concrete data to them.
To add a new object to the list, click on the ‘Add Element’ button, and then click on the created object to see its internal properties.
In the attached screenshot, you can see that I filled the data structure with actual data for several unit types in my game.
In this example, I created an army with the 2 units we previously discussed:
- Archer
- Type: Range Unit
- Health: 50
- Abilities:
- No Range Penalty
- Magic Resistance
- Goblin
- Type: Melee Unit
- Health: 80
- Abilities: None
Since we defined the ‘Units’ variable as an array, we can essentially add as many units as we need to this list. The same idea is true for the ‘UnitAbility’ array as well.
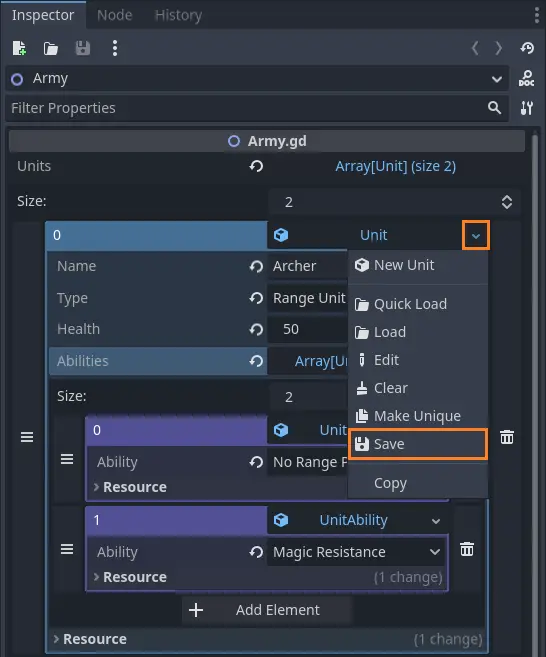
Step 3 (Optional): Saving and Loading Resource Files in the Godot Editor
To allow for greater flexibility, Godot allows you to save the data in a ‘tres’ file. This file can be loaded back with all the data in other places as many times as you want.
This feature is very useful since you don’t have to enter the same data again and again in different places. Plus, you can use a base ‘tres’ file as a template to fill in the actual data.
To save the data as a resource, click on the little arrow button next to the unit slot. Then, click on the ‘Save’ button and select a file name and path.
After saving the resource, you should see the name of the slot change. Instead of ‘Unit’, the name will be changed to the file name you assigned when saving the data.
To load a resource file (in this example, a unit with some data), open the menu with the little arrow on an empty slot and click the ‘Load’ button. Select the resource you need, and it will create a new unit with all saved data.
Final Thoughts
Creating complex data structures is inevitable in large games, and Godot provides a very comfortable way of managing these structures. Although using Godot’s interface to manage data structures can be confusing at times, it is a great way to visualize the hierarchical nature of complex and nested data structures.
If you want to learn more about Godot or game development, you are welcome to read my blog at Night Quest Games Blog. And although not always up to date, the Godot documentation is a good resource to use: https://docs.godotengine.org/en/stable/tutorials/scripting/resources.html.
If the information in this article was helpful to you, please consider supporting this blog through a donation. Your contributions are greatly appreciated and allow me to continue maintaining and developing this blog. Thank you!


How do you get around the fact that Godot only shallow-copies references to resources, creating incorrectly linked data and even editor errors? Do you have to go through all of this nested data and click “make unique” on each piece every time (since “make all unique” doesn’t seem to work)? Or do you have to create every resource new from scratch? If you miss doing this, how do you debug it?